๐Ÿงถ Beautiful โœจ Detailed ๐Ÿ’ Adorable

Round Bag Crochet Pattern

Round Bag Crochet Pattern
4.8โ˜… Rating
8-10 Hours Time Needed
1.9K Made This
โœ‚๏ธ

Intermediate Level

Ideal for those with basic knitting experience, featuring slightly more advanced stitches and techniques to expand your skills.

โฑ๏ธ

All-Day Adventure

Requires 8-10 hours, ideal for a full day of immersive knitting.

โœจ

Stylish Touch

An elegant detail to elevate any look, combining traditional techniques with contemporary design sensibilities.

About This Round Bag Crochet Pattern

Round Bag Crochet Pattern crochet pattern - detailed view of completed project

The finishing touch of leather handles transforms this project into a professional-looking accessory. Perfect for carrying your essentials while showcasing your crochet skills with a practical and beautiful handmade piece.

Why You'll Love This Round Bag Crochet Pattern

I absolutely love how this pattern combines functionality with timeless elegance. The satisfaction of watching those circular pieces grow from the magic ring is incredibly rewarding. What makes this pattern special is how the simple technique of working in the round creates such a polished, sophisticated result. I appreciate that it uses straightforward stitches but produces something that looks professionally crafted. The structured nature of the cord means your finished bag will hold its shape beautifully and last for years. Plus, there's something deeply satisfying about creating a practical accessory you'll actually use and receive compliments on every time you carry it.

Round Bag Crochet Pattern step 1 - construction progress Round Bag Crochet Pattern step 2 - assembly progress Round Bag Crochet Pattern step 3 - details and accessories Round Bag Crochet Pattern step 4 - final assembly and finishing

Switch Things Up

I love how versatile this round bag pattern is for customization. You can easily switch up the color by choosing cord in vibrant shades like terracotta, sage green, or even classic black for a completely different look.

For a bohemian vibe, I sometimes add fringe or tassels along the bottom edge of the bag. You can also experiment with different handle options like wooden rings, chain straps, or even crocheted handles in a contrasting color.

If you want to make the bag larger or smaller, simply add or subtract rounds in the circular pieces and adjust the number of rows in the side panel accordingly. I've made mini versions that work beautifully as crossbody bags.

For a textured variation, try working some rounds in back loop only or incorporating different stitch patterns like alternating single and double crochet rows. This creates visual interest while maintaining the structure.

I also recommend adding an interior pocket by crocheting a small rectangular piece and sewing it inside the finished bag. This makes the bag even more functional for organizing your essentials. The possibilities are truly endless with this foundational pattern.

Common Mistakes & How to Fix Them

โœ— Not maintaining consistent tension throughout rounds can cause the circular pieces to become wavy or cup instead of lying flat. โœ— Skipping stitch markers when working in spiral rounds makes it difficult to track where each round begins and can throw off your stitch count. โœ— Crocheting too loosely with cord creates a floppy bag that won't hold its shape, always work with firm tension for structured results. โœ— Failing to properly align the round and side pieces before joining can result in a twisted or misshapen bag assembly.

Round Bag Crochet Pattern

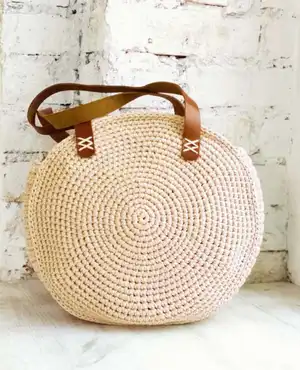
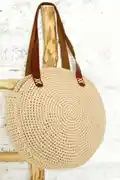
Create this stunning round bag with elegant leather handles using simple crochet techniques. This beautiful circular bag features a timeless design worked in natural cord, making it perfect for everyday use or special occasions. The pattern includes detailed instructions for creating two round pieces and a rectangular side panel that are seamlessly joined together. With its structured shape and professional finish, this handmade bag will become your go-to accessory for any season.

Intermediate 8-10 Hours

Materials Needed for Round Bag Crochet Pattern

โ€” Main Fabric

  • 01
    3-4 mm cotton, acrylic or polyester cord (300-350 meters)
  • 02
    Polyester cord recommended in natural/beige color

โ€” Tools Required

  • 01
    Crochet hook 5 mm
  • 02
    Scissors
  • 03
    Stitch markers
  • 04
    Yarn needle
  • 05
    Leather handles for bag with buttons or sewn attachment
  • 06
    Steaming equipment for blocking

Progress Tracker

0% Complete

โ€” Round Pieces (Make 2) :

MR :

6 sc in Magic Ring

Info :

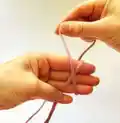
Tightly pull the ring. Work in a spiral. When you make the first stitch in each round, place a marker for counting rounds. Try to crochet tighter.

Round 1 :

6 inc (12)

Info :

Hide the end inside the stitches then cut it off

Round 2 :

[inc, sc]*6 (18)

Round 3 :

[2 sc, inc]*6 (24)

Round 4 :

[inc, 3 sc]*6 (30)

Round 5 :

2 sc, [inc, 4 sc]*5, inc, 2 sc (36)

Round 6 :

4 sc, [inc, 5 sc]*5, inc, sc (42)

Round 7 :

[6 sc, inc]*6 (48)

Round 8 :

[inc, 7 sc]*6 (54)

Round 9 :

2 sc, [inc, 8 sc]*5, inc, 6 sc (60)

Round 10 :

4 sc, [inc, 9 sc]*5, inc, 5 sc (66)

Round 11 :

6 sc, [inc, 10 sc]*5, inc, 4 sc (72)

Round 12 :

8 sc, [inc, 11 sc]*5, inc, 3 sc (78)

Round 13 :

10 sc, [inc, 12 sc]*5, inc, 2 sc (84)

Round 14 :

12 sc, [inc, 13 sc]*5, inc, 1 sc (90)

Round 15 :

[14 sc, inc]*6 (96)

Round 16 :

[inc, 15 sc]*6 (102)

Round 17 :

2 sc, [inc, 16 sc]*5, inc, 14 sc (108)

Round 18 :

4 sc, [inc, 17 sc]*5, inc, 13 sc (114)

Round 19 :

6 sc, [inc, 18 sc]*5, inc, 12 sc (120)

Round 20 :

8 sc, [inc, 19 sc]*5, inc, 11 sc (126)

Info :

Cut off the cord, leaving the end about 20 cm. Pull the cord out and use a needle to close the round. Hide the end on wrong side and cut it off.

Info :

Crochet a second round piece using rounds 1-20

โ€” Side of the Bag :

Foundation :

ch 9

Row 1 :

Start from the second ch from the hook: 8 sc, ch1, turn (8)

Row 2 :

Skip 1 stitch: 6 sc, inc, ch1, turn (8)

Rows 3-88 :

Skip 1 stitch, 8 sc, ch1, turn (8)

Info :

Take note, the last 8th sc in each row must be crocheted a little on the side. Do not cut the end of the cord.

โ€” Assembly :

Info :

Steam the parts following the recommendations for your cord or yarn

Step 1 :

Put the round and side parts next to each other. Begin to join the parts with sl st to the end of the rectangular part.

Step 2 :

Make sl st around the perimeter of the round all the way

Step 3 :

Cut off the cord, leaving the end about 20 cm. Pull the cord out and use a needle to close the round. Hide the end on wrong side and cut it off.

Step 4 :

Take new crochet cord, the second round piece and attach it to the side piece with sl st

Step 5 :

Make sl st around the perimeter of the round all the way

Step 6 :

Cut off the cord, leaving the end about 20 cm. Pull the cord out and use a needle to close the round. Hide the end on wrong side and cut it off.

Step 7 :

Sew leather handles to the bag

Assembly Instructions

  • Steam all crocheted pieces following the cord manufacturer's recommendations to ensure proper blocking and shape.
  • Align one circular piece with the long rectangular side piece, matching edges carefully to avoid twisting.
  • Using slip stitches and working yarn, join the circular piece to the side panel all the way around the perimeter.
  • Close the joining round by pulling the cord through with a needle and weaving in the end on the wrong side.
  • Attach the second circular piece to the opposite edge of the side panel using the same slip stitch method.
  • Complete the second joining round and secure all ends by weaving them invisibly into the wrong side of the work.
  • Sew or attach leather handles to the top edge of the bag using the button attachments or by stitching securely through the cord fabric.

Important Notes

  • ๐Ÿ’กUse stitch markers consistently in each round to avoid losing your place when working in continuous spirals.
  • ๐Ÿ’กMaintain firm, even tension throughout the project as loose stitches will create a floppy bag that won't hold its shape.
  • ๐Ÿ’กSteam or block your pieces before assembly to ensure they lie flat and join together smoothly without puckering.
  • ๐Ÿ’กWhen working the side panel, pay special attention to crocheting the 8th stitch slightly to the side as instructed for proper shaping.
  • ๐Ÿ’กTake your time aligning the round and side pieces before joining to ensure the bag isn't twisted or misshapen.
  • ๐Ÿ’กWeave in all ends securely on the wrong side as they may show through the open stitches of cord work.
  • ๐Ÿ’กChoose quality leather handles that complement the natural color of your cord for a polished, professional finish.

This elegant round bag pattern combines timeless circular design with practical functionality. Using simple single crochet and increase techniques, you'll create a structured accessory that's both beautiful and durable. The finishing touch of leather handles elevates this handmade piece to boutique quality. Perfect for showcasing your skills while creating something you'll treasure for years. Happy crocheting and enjoy carrying your stylish new bag everywhere you go!

You ask,

we answer.

FAQs

What size will my finished bag be?

Using 3mm polyester cord and a 5mm hook as recommended, your bag will be approximately 14.5 inches (37 cm) wide. The final size can vary based on your tension and the thickness of cord you choose.

Can I use different yarn instead of cord?

Yes, you can substitute with cotton or acrylic yarn, but keep in mind that cord provides structure and durability. If using softer yarn, your bag may be less structured and could require a fabric lining for stability.

How do I keep my circular pieces flat and not cupped?

Maintain consistent tension throughout and ensure you're placing your increases correctly in each round. Working too tightly can cause cupping, while too loosely creates ruffling. Blocking with steam after completion also helps flatten the pieces.

Where can I find handles with button attachments?

Leather handles with button or rivet attachments are available at craft stores, online marketplaces like Etsy or Amazon, or leather supply shops. Alternatively, you can sew handles directly onto the bag for a secure attachment.

Do I need to line the bag?

A lining isn't required but can be added for extra structure and to prevent items from falling through the stitches. Choose a fabric that complements your cord color and hand-stitch it inside the finished bag.

Why do I need to crochet the 8th stitch on the side in rows 3-88?

This creates the proper angle for the side panel to curve naturally when joined to the circular pieces. Skipping this instruction will result in a panel that doesn't fit properly around the round base.