๐Ÿงถ Beautiful โœจ Detailed ๐Ÿ’ Adorable

Santa Christmas Cat Amigurumi Pattern

Santa Christmas Cat Amigurumi Pattern
3.9โ˜… Rating
4-5 Hours Time Needed
2.9K Made This
โœ‚๏ธ

Intermediate Level

Ideal for those with basic knitting experience, featuring slightly more advanced stitches and techniques to expand your skills.

โฑ๏ธ

Weekend Treat

Takes 5-7 hours, making it an enjoyable project to finish over a couple of days.

๐ŸŽ„

Holiday Cheer

Festive fun for the season, bringing handmade magic to celebrations and creating new family traditions.

About This Santa Christmas Cat Amigurumi Pattern

This Santa Christmas Cat pattern combines the beloved charm of feline friends with festive holiday spirit. The design features intricate details like a textured white beard, classic Santa suit with black belt, and an authentic gift sack. Each element is carefully crafted to create a cohesive and adorable Christmas decoration that captures the whimsical magic of the season.

Santa Christmas Cat Amigurumi Pattern crochet pattern - detailed view of completed project

The pattern uses multiple colors including beige for the cat's body, classic red and white for the Santa costume, and black accents for authentic detailing. Safety eyes and careful shaping techniques bring this festive friend to life.

Why You'll Love This Santa Christmas Cat Amigurumi Pattern

I absolutely love how this pattern captures the perfect blend of Christmas magic and feline charm! The detailed beard work creates such beautiful texture, and watching the little Santa outfit come together is incredibly satisfying. The miniature gift sack adds an extra touch of authenticity that makes this piece truly special for holiday displays.

Santa Christmas Cat Amigurumi Pattern step 1 - construction progress Santa Christmas Cat Amigurumi Pattern step 2 - assembly progress Santa Christmas Cat Amigurumi Pattern step 3 - details and accessories Santa Christmas Cat Amigurumi Pattern step 4 - final assembly and finishing

Switch Things Up

I love experimenting with different color combinations for this Santa cat pattern! Sometimes I'll create a gray tabby version or even a sleek black cat Santa for variety. The beard technique can also be adapted - try using a slightly thicker yarn for an even fluffier effect, or experiment with different shell stitch variations.

For those who want to make it extra special, I sometimes add tiny jingle bells to the hat or create matching mini ornaments. You could also scale up the pattern by using a larger hook and thicker yarn to create a bigger decoration for your mantle or Christmas tree area.

Common Mistakes & How to Fix Them

โœ— Forgetting to stuff parts before closing can result in flat, shapeless pieces that lack dimension โœ— Not maintaining consistent tension while changing colors can create visible gaps in the fabric structure โœ— Placing safety eyes too close together makes the cat look cross-eyed instead of adorable โœ— Overstuffing the beard section can make it too rigid and lose its fluffy appearance

Santa Christmas Cat Amigurumi Pattern

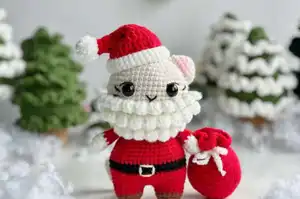
Create an adorable festive companion with this charming Santa Christmas Cat amigurumi pattern. This delightful holiday project features a sweet beige cat dressed in Santa's iconic red suit, complete with a fluffy white beard, matching hat with pompom, and a miniature gift sack. Perfect for adding handmade Christmas magic to your holiday decorations or as a special gift for cat lovers and crochet enthusiasts alike.

Intermediate 4-5 Hours

Materials Needed for Santa Christmas Cat Amigurumi Pattern

โ€” Main Fabric

  • 01
    Sport weight yarn in beige, white, red, brown, pink, and black colors
  • 02
    Fine weight (2) yarn suitable for detailed amigurumi work

โ€” Tools Required

  • 01
    2.5mm (C) crochet hook
  • 02
    Safety eyes 12-15mm
  • 03
    Stitch markers
  • 04
    Sewing needle
  • 05
    Scissors
  • 06
    Hot glue gun
  • 07
    Fiberfill stuffing
  • 08
    White pompom 10-15mm

Progress Tracker

0% Complete

โ€” ARMS :

Info :

Make 2 pieces, join the rounds with a slip stitch

Row 1 :

6SC in an MR (6) - Begin with white yarn

Row 2 :

(SC, INC) 3 times (9)

Row 3-4 :

9SC (9)

Info :

Change to red yarn

Row 5-9 :

9SC (9)

Info :

Fasten off and cut the yarn and leave a long tail for sewing. Sew the two edges together

โ€” LEGS :

Info :

Make 2 pieces, join the rounds with a slip stitch

Row 1 :

6SC in an MR (6) - Begin with brown yarn

Row 2 :

6INC (12)

Row 3 :

(2SC, INC) 4 times (16)

Row 4 :

16SC (16)

Info :

Change to red yarn

Row 5-6 :

16SC (16)

Info :

Cut the yarn. Make one more leg until round 6 but DO NOT cut the yarn

โ€” BODY :

Info :

Begin with RED yarn, Make chain 2: Seamless leg Joint

Row 1 :

16SC of the first leg, 2SC of the chain, 16SC of the second leg, 2SC on a back bump of the chains between 2 legs (36)

Row 2 :

(5SC, INC) 6 times (42)

Row 3 :

(6SC, INC) 6 times (48)

Row 4-5 :

48SC (48)

Info :

Change to black yarn

Row 6-7 :

48SC (48)

Info :

Change to red yarn

Row 8-9 :

48SC (48)

Row 10 :

(4SC, DEC) 8 times (40)

Row 11-12 :

40SC (40)

Row 13 :

(3SC, DEC) 8 times (32)

Row 14 :

32SC (32)

Row 15 :

(2SC, DEC) 8 times (24)

Row 16 :

24SC (24)

Info :

Stuffing. Fasten off and cut the yarn

โ€” TAIL :

Info :

Use beige yarn

Row 1 :

6SC in an MR (6)

Row 2-15 :

6SC (6)

Info :

Fasten off and cut the yarn. Sew the tail in the body at R6-7

โ€” HEAD :

Info :

Use Beige yarn

Row 1 :

8 SC in an MR (8)

Row 2 :

8 INC (16)

Row 3 :

(SC, INC) 8 times (24)

Row 4 :

(2 SC, INC) 8 times (32)

Row 5 :

32 SC (32)

Row 6 :

(7 SC, INC) 4 times (36)

Row 7 :

(5 SC, INC) 6 times (42)

Row 8 :

(6 SC, INC) 6 times (48)

Row 9-17 :

48 SC (48)

Row 18 :

(4 SC, DEC) 8 times (40)

Row 19 :

(3 SC, DEC) 8 times (32)

Row 20 :

(2 SC, DEC) 8 times (24)

Info :

Stuffing. Fasten off and cut the yarn and leave a long tail for sewing

โ€” EARS :

Info :

Begin with Beige yarn

Row 1 :

6 SC in an MR (6)

Row 2 :

(SC, INC) 3 times (9)

Row 3 :

2 SC, INC, 2 SC, INC, 2 SC, INC (12)

Row 4 :

3 SC, INC, 3 SC, INC, 3 SC, INC (15)

Row 5 :

4 SC, INC, 4 SC, INC, 4 SC, INC (18)

Info :

Fasten off and cut the yarn. Sew the two edges together and attach the ears to the head at R4-9. Sew the arms to the head at R19. Attach the eyes at R11-12, 7st apart

โ€” BEARD :

Info :

Use white yarn

Row 1 :

Make 23 chains, Start in the 3rd stitch from the hook: 21DC

Row 2 :

2CH, and turn, 21DC

Row 3 :

2CH, and turn, skip 1 stitch, SLST, (2CH, skip 1 stitch, SLST) 9 times

Row 4 :

(CH, and turn SC, 3DC, SC) in one st, (SC, 3DC, SC) 9 times, 2CH, SLST in row 2

Row 5 :

2CH, and turn, skip 1 stitch, SLST, (2CH, skip 1 stitch, SLST) 8 times

Row 6 :

(CH, and turn SC, 3DC, SC) in one st, (SC, 3DC, SC) 9 times, 2CH, SLST in row 1

Row 7 :

2CH, and turn, skip 1 stitch, SLST, (2CH, skip 1 stitch, SLST) 9 times

Row 8 :

(CH, and turn SC, 3DC, SC) in one st, (SC, 3DC, SC) 9 times, SLST

Info :

Fasten off and leave a long tail for sewing at R11

โ€” SANTA'S SACK :

Info :

Use with red yarn, Join the rounds with a slip stitch

Row 1 :

6SC in an MR (6)

Row 2 :

6 INC (12)

Row 3 :

(SC, INC) 6 times (18)

Row 4 :

(2SC, INC) 6 times (24)

Row 5 :

(3SC, INC) 6 times (30)

Row 6 :

30SC (30)

Row 7 :

(4SC, INC) 6 times (36)

Row 8 :

(5SC, INC) 6 times (42)

Row 9-11 :

42 SC (42)

Row 12 :

(5SC, DEC) 6 times (36)

Row 13-14 :

36SC (36)

Row 15 :

(4SC, DEC) 6 times (30)

Row 16-17 :

30SC (30)

Row 18 :

15DEC (15)

Row 19 :

(SC, CH, Skip 1 stitch) Repeat it at the end (15)

Row 20 :

2CH, (15HDC-INC) 6 times (30)

Row 21 :

2CH, 30HDC (30)

Info :

Stuffing. Fasten off and cut the yarn. Make 20 chains with white yarn and cut it. Sew the Chains to the pocket in CH of R19

โ€” SANTA'S HAT :

Info :

Begin with RED yarn, Join the rounds with a slip stitch

Row 1 :

6DC in an MR (6)

Row 2 :

2CH, 6DC (6)

Row 3 :

2CH, (2DC, INC) 2 times (8)

Row 4 :

2CH, (DC, INC) 4 times (12)

Row 5 :

2CH, (2DC, INC) 4 times (16)

Row 6 :

2CH, (DC, INC) 8 times (24)

Row 7 :

2CH, (2DC, INC) 8 times (32)

Row 8 :

2CH, (7DC, INC) 4 times (36)

Info :

Cut the RED yarn and change it to WHITE yarn

Row 9-12 :

CH, 36SC (36)

Info :

Fasten off and leave a long tail for sewing. Attach pompom ball: 10-15mm (white) to the hat. Sew the hat to the head at R16-19. Sew the face as a photo

Assembly Instructions

  • Attach the head to the body by sewing securely at the neck area
  • Sew the arms to the sides of the head at row 19
  • Attach the ears to the head between rows 4-9, spacing them evenly
  • Position and attach safety eyes at rows 11-12, keeping them 7 stitches apart
  • Sew the fluffy white beard to the face at row 11
  • Attach the Santa hat to the head at rows 16-19 and add the white pompom
  • Sew the tail to the back of the body at rows 6-7

Important Notes

  • ๐Ÿ’กUse stitch markers to keep track of your rounds, especially during color changes
  • ๐Ÿ’กStuff firmly but not too tightly to maintain the proper shape
  • ๐Ÿ’กTake extra care when creating the textured beard for the best fluffy effect
  • ๐Ÿ’กPosition all facial features before final sewing to ensure proper proportions

This delightful Santa Christmas Cat pattern brings together the magic of the holidays with adorable feline charm. The intricate beard detailing and authentic Santa costume create a truly special festive decoration that will warm hearts for years to come. Perfect for adding handmade Christmas spirit to your home! Happy crocheting!

You ask,

we answer.

FAQs

What size will the finished Santa cat be?

The finished Santa cat will be approximately 4-5 inches tall, making it perfect for Christmas displays and gift-giving.

Can I use different yarn weights for this pattern?

This pattern is specifically designed for sport weight yarn. Using different weights may affect the final size and proportions of your Santa cat.

How do I make the beard look fluffy and realistic?

The key is in the shell stitch technique described in rows 4, 6, and 8 of the beard section. Work these stitches loosely for the best texture.

Is this pattern suitable for beginners?

This is an intermediate pattern due to the color changes, detailed assembly, and special techniques like the textured beard. Basic amigurumi experience is recommended.