๐Ÿงถ Beautiful โœจ Detailed ๐Ÿ’ Adorable

Snake Slythie Harry Potter Amigurumi Pattern

Snake Slythie Harry Potter Amigurumi Pattern
4.6โ˜… Rating
8-10 Hours Time Needed
2.5K Made This
โœ‚๏ธ

Intermediate Level

Ideal for those with basic knitting experience, featuring slightly more advanced stitches and techniques to expand your skills.

โฑ๏ธ

All-Day Adventure

Requires 8-10 hours, ideal for a full day of immersive knitting.

๐Ÿ

Whimsical Buddy

Playful characters full of personality, designed to spark imagination and become cherished playtime favorites.

About This Snake Slythie Harry Potter Amigurumi Pattern

This detailed Snake Slythie pattern combines traditional amigurumi techniques with intricate color work and embroidery details. The pattern features a poseable wire armature, jacquard colorwork for the striped belly, and includes bonus accessories like a house crest, magical locket, and striped scarf. Perfect for intermediate crocheters looking to challenge their skills while creating a truly magical piece.

Snake Slythie Harry Potter Amigurumi Pattern crochet pattern - detailed view of completed project

The finished snake measures 11cm high in sitting position and 32cm in length when extended. Special attention to safety notes regarding wire armature for child-safe alternatives.

Why You'll Love This Snake Slythie Harry Potter Amigurumi Pattern

I absolutely love how this pattern brings together so many advanced techniques in one adorable project! The jacquard colorwork creates beautiful striped details, while the embroidered features add personality and charm. The bonus accessories make this more than just an amigurumi - it's a complete magical character with house pride. The wire armature makes the snake poseable, adding interactive play value that both kids and adults will enjoy.

Snake Slythie Harry Potter Amigurumi Pattern step 1 - construction progress Snake Slythie Harry Potter Amigurumi Pattern step 2 - assembly progress Snake Slythie Harry Potter Amigurumi Pattern step 3 - details and accessories Snake Slythie Harry Potter Amigurumi Pattern step 4 - final assembly and finishing

Switch Things Up

I absolutely love how this pattern pushes your crochet boundaries while creating something truly magical! The jacquard colorwork technique used for the striped belly is such a game-changer - it creates professional-looking color changes that really make this snake special. What I find most exciting is how the wire armature transforms this from a simple stuffed toy into an interactive, poseable character.

The attention to detail in the facial features really brings Slythie to life - from the embroidered eyelashes to the tiny white bead teeth, every element adds personality. I particularly enjoy working the bonus accessories because they tell a complete story. The house crest with its intricate embroidery work, the magical locket with metallic threads, and that perfectly striped scarf all come together to create a cohesive character.

This pattern taught me so much about advanced color work and construction techniques. The way you build the head in two pieces and join them creates such a perfect shape, and learning to work jacquard while maintaining neat edges was a real skill-builder. It's one of those patterns that challenges you to grow as a crocheter while creating something you'll treasure forever!

Common Mistakes & How to Fix Them

โœ— Forgetting to mark the beginning of rounds can lead to misaligned pattern pieces and uneven shaping โœ— Not stuffing firmly enough during construction can result in a floppy, misshapen snake that won't hold poses โœ— Cutting yarn threads too early when doing jacquard colorwork can create loose ends and uneven color transitions โœ— Skipping the wire safety precautions can create choking hazards or sharp edges that make the toy unsafe for children

Snake Slythie Harry Potter Amigurumi Pattern

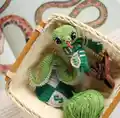
Bring the magic of Slytherin house to life with this enchanting Snake Slythie amigurumi pattern! This adorable Slytherin mascot features intricate details including a striped house scarf, detailed crest, and magical locket. Perfect for Harry Potter fans who want to create their own piece of wizarding world magic through the art of crochet.

Intermediate 8-10 Hours

Materials Needed for Snake Slythie Harry Potter Amigurumi Pattern

โ€” Main Fabric

  • 01
    YarnArt Jeans 160m/50gr Sport weight yarn in green (Yarn A)
  • 02
    YarnArt Jeans 160m/50gr Sport weight yarn in light grey (Yarn B)
  • 03
    YarnArt Jeans 160m/50gr Sport weight yarn in dark green (Yarn C)

โ€” Tools Required

  • 01
    Crochet hook 1.75mm (for main snake)
  • 02
    Crochet hook 1.5mm (for tongue and locket)
  • 03
    10mm safety eyes
  • 04
    Black, white and red embroidery threads mouline
  • 05
    Black threads
  • 06
    Black felt
  • 07
    White beads (2 pieces for teeth)
  • 08
    Needles for cutting with bead ends
  • 09
    Super Glue Moment
  • 10
    Pin or stitch marker
  • 11
    Synthepus stuffing
  • 12
    Yarn needle (thick with blunt end)
  • 13
    Scissors
  • 14
    Needle
  • 15
    Round-nose pliers
  • 16
    Aluminum wire 2mm diameter (25cm length)
  • 17
    Electrical tape
  • 18
    Golden and silver metalized threads mouline
  • 19
    Green mouline threads
  • 20
    Water soluble cross stitch canvas
  • 21
    Iron for steaming

Progress Tracker

0% Complete

โ€” Muzzle (Yarn A) :

Round 1 :

5 loops, turning, 4sc starting from 2nd loop from hook, 4sc from back of chain (8l)

Round 2 :

only through back loops [sc, inc]x4 (12l)

Round 3 :

12sc, sl st in 1st sc (12l)

Info :

Cut and fix thread. Mark with pin where muzzle connects to head - move pin to 2nd loop from beginning of round

โ€” Head and Body :

Detail 1 (Yarn A) Round 1 :

7 loops, turning, 6sc starting from 2nd loop from hook, 6sc from back of chain (12l)

Round 2 :

[sc, inc]x6 (18l)

Round 3 :

[2sc, inc]x6 (24l)

Info :

Cut and fix thread. Mark with pin where first detail connects to second - move pin to 7th loop from beginning counting anticlockwise

Round 4 :

incomplete round: 3sc along second detail, 6sc of first detail together with 6sc of second detail, then 15sc along second detail

Round 5 :

[5sc, inc]x6 (42l)

Info :

Sew holes between details using extra thread

Round 6 :

[6sc, inc]x6 (48l)

Round 7-8 :

48sc (48l)

Round 9 :

incomplete round: 25sc along head, 6sc of head together with 6sc of muzzle, then 17sc along head

Info :

Crochet floating loop (extra sc) and move pin marking beginning of round to this loop

Round 10 :

24sc on head, 6sc on muzzle, 18sc on head (48l)

Info :

Sew holes between muzzle and head using extra thread

Round 11-13 :

48sc (48l)

Round 14 :

9sc, [sc, dec]x6, [dec, sc]x6, 3sc (36l)

Info :

Place safety eyes between rounds 8-9, distance approximately 11 stitches. Embroider facial features and attach felt mask

Round 15 :

9sc, [dec]x12, 3sc (24l)

Info :

Insert wire ring to head opening and fix on 6 points every 4th sc

Round 16 :

24sc (24l)

Round 17 :

9sc, [sc, dec]x2, [dec, sc]x2, 3sc (20l)

Round 18 :

only through back loops 10sc (Yarn A); 8sc (Yarn B); 2sc (Yarn A) (20l)

Round 19-23 :

10sc (Yarn A); 8sc (Yarn B); 2sc (Yarn A) (20l)

Round 24 :

7sc, inc, 2sc (Yarn A); 7sc, inc (Yarn B); 2sc (Yarn A) (22l)

Round 25-27 :

11sc (Yarn A); 9sc (Yarn B); 2sc (Yarn A) (22l)

Round 28 :

8sc, inc, 2sc (Yarn A); 8sc, inc (Yarn B); 2sc (Yarn A) (24l)

Round 29-36 :

12sc (Yarn A); 10sc (Yarn B); 2sc (Yarn A) (24l)

Round 37 :

12sc (Yarn A); 9sc, inc (Yarn B); dec (Yarn A) (24l)

Round 38-43 :

12sc (Yarn A); 11sc (Yarn B); sc (Yarn A) (24l)

Round 44-75 :

12sc (Yarn A); 12sc (Yarn B) (24l)

Round 76 :

dec, 10sc (Yarn A); dec, 10sc (Yarn B) (22l)

Round 77-78 :

11sc (Yarn A); 11sc (Yarn B) (22l)

Round 79 :

dec, 9sc (Yarn A); dec, 9sc (Yarn B) (20l)

Round 80-81 :

10sc (Yarn A); 10sc (Yarn B) (20l)

Round 82 :

dec, 8sc (Yarn A); dec, 8sc (Yarn B) (18l)

Round 83-84 :

9sc (Yarn A); 9sc (Yarn B) (18l)

Round 85 :

dec, 7sc (Yarn A); dec, 7sc (Yarn B) (16l)

Round 86-87 :

8sc (Yarn A); 8sc (Yarn B) (16l)

Round 88 :

dec, 6sc (Yarn A); dec, 6sc (Yarn B) (14l)

Round 89-90 :

7sc (Yarn A); 7sc (Yarn B) (14l)

Round 91 :

dec, 5sc (Yarn A); dec, 5sc (Yarn B) (12l)

Round 92-93 :

6sc (Yarn A); 6sc (Yarn B) (12l)

Info :

Stop stuffing body and continue crocheting

Round 94 :

dec, 4sc (Yarn A); dec, 4sc (Yarn B) (10l)

Round 95-96 :

5sc (Yarn A); 5sc (Yarn B) (10l)

Round 97 :

dec, 3sc (Yarn A); dec, 3sc (Yarn B) (8l)

Round 98-99 :

4sc (Yarn A); 4sc (Yarn B) (8l)

Info :

Cut excess wire, twist end into loop and wrap with electrical tape

Round 100 :

dec, 2sc (Yarn A); dec, 2sc (Yarn B) (6l)

Info :

Trim thread, pass through all loops using yarn needle, tighten and secure. Embroider lines on breast with black threads

Assembly Instructions

  • Stuff the head firmly with synthepus while crocheting, ensuring even distribution for proper shaping
  • Insert the wire ring into the head opening and secure at six points every 4th stitch for structural support
  • Attach safety eyes between rounds 8-9 with approximately 11 stitches distance, securing felt mask pieces first
  • Embroider facial features including eyelashes, nostrils, mouth, and eyebrows using embroidery floss and black threads
  • Sew white bead teeth under the embroidered mouth and attach the red embroidery floss tongue
  • Continue stuffing body while working jacquard colorwork, maintaining firm but not tight filling throughout
  • Secure wire end with electrical tape before finishing final rounds to prevent sharp edges

Important Notes

  • ๐Ÿ’กUse stitch markers to track beginning of rounds, especially during jacquard color changes and shaping
  • ๐Ÿ’กWire armature should be used with caution as it is not safe for babies and young children
  • ๐Ÿ’กTry to crochet tightly so stuffing material is not visible through stitches
  • ๐Ÿ’กMark connection points with pins before joining pieces to ensure proper alignment
  • ๐Ÿ’กWhen working jacquard technique, carry non-working yarn inside to keep wrong side neat
  • ๐Ÿ’กStuff firmly but not too tightly for best shape and to maintain wire mobility

This enchanting Snake Slythie pattern brings the mysterious charm of Slytherin house directly into your hands! Featuring advanced techniques like jacquard colorwork and detailed embroidery, this pattern creates a truly magical companion complete with house accessories. The poseable wire armature adds interactive play value while the intricate details showcase your crochet mastery. Perfect for Harry Potter fans who want to create their own piece of wizarding world magic! ๐Ÿโœจ

You ask,

we answer.

FAQs

Is this pattern suitable for beginners?

This is an intermediate level pattern requiring knowledge of jacquard colorwork, embroidery techniques, and working with wire armatures. Beginners should master basic amigurumi first.

Can I make this pattern without the wire armature?

Yes, you can omit the wire for a child-safe version, though the snake won't be poseable. Simply stuff firmly and continue with normal closure techniques.

What if I can't find the exact yarn colors specified?

You can substitute any sport weight yarn in similar colors. Just ensure your gauge matches by adjusting hook size if needed.

How long does this pattern take to complete?

Expect 8-10 hours for the main snake, plus additional time for the bonus accessories like the scarf, crest, and locket.

Are the bonus accessories included in the main pattern?

Yes! The pattern includes complete instructions for the locket, house crest, and striped scarf as bonus accessories.