๐Ÿงถ Beautiful โœจ Detailed ๐Ÿ’ Adorable

Sol and Luna Boho Lantern Pattern

Sol and Luna Boho Lantern Pattern
4.6โ˜… Rating
8-12 Hours Time Needed
3.1K Made This
โœ‚๏ธ

Beginner Friendly Level

Perfect for those just starting their sewing journey, with clear instructions and simple techniques

โฑ๏ธ

All-Day Adventure

Requires 8-10 hours, ideal for a full day of immersive knitting.

๐Ÿก

Cozy Accent

A warm touch for your space that transforms ordinary corners into inviting nooks filled with handmade charm.

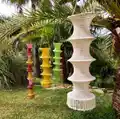
About This Sol and Luna Boho Lantern Pattern

The Sol and Luna lantern gets its characteristic shape from metal or wooden rings and makes a lovely decorative element for your garden or apartment. Equipped with fairy lights, the lantern looks even more beautiful by night. The pattern is written in a beginner-friendly way with each step detailed, making it perfect for those who know basic stitches to create their lantern quickly.

Sol and Luna Boho Lantern Pattern crochet pattern - detailed view of completed project

The design allows any size rings, any yarn type and weight, so you can crochet your lantern as long as you like. You'll get detailed instructions on finding the right stitch and round count for your specific project.

Why You'll Love This Sol and Luna Boho Lantern Pattern

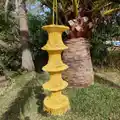
I absolutely love how versatile this pattern is - you can make it your own with any yarn and ring size! The way it transforms with fairy lights creates such a magical atmosphere, and I find the rhythmic stitching between rings incredibly relaxing. What really excites me is how you can customize it with optional decorative patterns to match your personal style perfectly.

Sol and Luna Boho Lantern Pattern step 1 - construction progress Sol and Luna Boho Lantern Pattern step 2 - assembly progress Sol and Luna Boho Lantern Pattern step 3 - details and accessories Sol and Luna Boho Lantern Pattern step 4 - final assembly and finishing

Switch Things Up

I love experimenting with different yarn textures and colors to create unique lantern variations. Sometimes I'll use a gradient yarn that shifts from deep sunset oranges to soft twilight purples, creating a natural ombre effect that's absolutely stunning when lit. Other times, I'll incorporate metallic threads alongside my base yarn for subtle sparkle that catches both natural and artificial light beautifully.

One of my favorite modifications is creating seasonal versions - using rich burgundies and golds for autumn, fresh greens and whites for spring, or even incorporating glow-in-the-dark yarn for a magical nighttime effect. I've also discovered that varying the optional patterns between rings creates wonderful visual interest, like alternating the open mesh pattern with solid sections.

For outdoor versions, I sometimes add weatherproofing by working with treated cotton or synthetic yarns, and I've even created mini versions using embroidery hoops for intimate table settings. The beauty of this pattern is how it adapts to your creative vision while maintaining its essential bohemian charm.

Common Mistakes & How to Fix Them

โœ— Crocheting too tightly around the rings making subsequent rounds difficult to work โœ— Forgetting to count stitches after decrease and increase rounds leading to uneven lantern shape โœ— Not maintaining consistent distance between rings creating an unbalanced appearance throughout the lantern โœ— Skipping the stitch marker placement making it hard to track rounds and optional pattern placement

Sol and Luna Boho Lantern Pattern

Create a stunning bohemian-style hanging lantern that transforms any space into a magical sanctuary. This versatile pattern works with any yarn weight and ring size, allowing you to customize your perfect decorative piece. The lantern's elegant shape comes from metal or wooden rings, creating beautiful shadows when illuminated with fairy lights for enchanting evening ambiance.

Beginner Friendly 8-12 Hours

Materials Needed for Sol and Luna Boho Lantern Pattern

โ€” Main Fabric

  • 01
    Jute yarn (e.g., Mondial Juta, 100g/65m) - about 500-600g for 5 rings of 26cm diameter
  • 02
    Cotton yarn (e.g., Lana Grossa Star, 50g/90m) - about 350-400g for 5 rings of 20cm diameter
  • 03
    Macramรฉ yarn (e.g., 3mm cotton) - 3-4 balls of 300m each for 5 rings of 50cm diameter

โ€” Tools Required

  • 01
    Crochet hook (half size larger than yarn recommendation)
  • 02
    Wooden or metal rings (minimum 3, preferably 5-6 rings of same diameter)
  • 03
    Scissors
  • 04
    Measuring tape
  • 05
    Stitch markers
  • 06
    Darning needle for sewing hanger
  • 07
    Fairy lights or LED string lights (optional)

Progress Tracker

0% Complete

โ€” First Ring :

Setup :

Crochet an even number of single crochet around the ring until you can join without stretching. Join with slip stitch.

โ€” Rounds Between Rings :

Round 1 :

Mark starting point with stitch marker. Work one half double crochet in each stitch around outside of ring.

Round 2 (Decrease) :

Work in spiral rounds, always crochet two stitches together to halve the stitch count.

Following Rounds :

Continue in spiral rounds with chosen basic pattern (half double crochet or double crochet) maintaining consistent distance between rings.

Penultimate Round :

Work half double crochet in every stitch.

Last Round (Increase) :

Work two half double crochet in every stitch to double stitch count.

โ€” Following Rings :

Setup :

Work single crochet around next ring, inserting hook into stitch before grabbing yarn inside ring.

Continue :

Repeat rounds between rings pattern until reaching next ring.

โ€” Optional Patterns :

Pattern 1 Round 1 :

Alternate one double crochet with one chain.

Pattern 1 Round 2 :

Half double crochet in each stitch including chains.

Pattern 2 Round 1 :

2 double crochet into one stitch, skip next - repeat to end.

Pattern 2 Round 2 :

2 double crochet into each gap between previous round's double crochets.

โ€” Finishing Rounds (Optional) :

Round 1 :

Half double crochet, reducing stitches by crocheting two together.

Round 2 :

Alternate one normal stitch with crocheting two together.

Repeat :

Alternate rounds 1 and 2 until top opening reaches desired size.

โ€” Hanger Cord :

Start :

Make 3 chain stitches, then 1 single crochet into first chain.

Continue :

Turn cord toward you, work single crochet into two side loops, repeat for desired length.

Attach :

Sew cord to top ring or optional finishing rounds.

โ€” Fringes :

Preparation :

Cut yarn strands twice as long as desired fringe length (about half the distance between rings).

Attachment :

Fold strands in half, pull loop through stitch with hook, then pull loose ends through loop and tighten.

Finishing :

Let fringes hang before trimming with sharp scissors for even length.

Assembly Instructions

  • Work around each ring in sequence, maintaining consistent stitch count and spacing between rings
  • Attach optional decorative patterns 4-5 rounds after each ring, maintaining same pattern spacing throughout
  • Create hanger cord and sew securely to top ring or finishing rounds for proper weight distribution
  • Add fringes to bottom ring in bundles of 3 strands per stitch for dense, elegant finish
  • Thread fairy lights through lantern structure before final assembly for best light distribution
  • Trim all yarn tails and fringes evenly after allowing them to hang and settle naturally

Important Notes

  • ๐Ÿ’กUse stitch markers to track rounds, especially important when working optional decorative patterns
  • ๐Ÿ’กMaintain consistent distance between rings using the 3/4 diameter rule for balanced proportions
  • ๐Ÿ’กDon't crochet too tightly around rings as this makes subsequent rounds difficult to work
  • ๐Ÿ’กCount stitches after each decrease and increase round to ensure proper lantern shaping
  • ๐Ÿ’กChoose hook size half size larger than yarn recommendation for optimal drape and structure

This enchanting Sol and Luna Boho Lantern pattern brings magical ambiance to any space with its flowing design and customizable features. The versatile instructions work with any yarn weight and ring size, making it perfect for both beginners and experienced crocheters. Whether hung in your garden or apartment, this stunning piece creates beautiful shadows and transforms ordinary spaces into bohemian sanctuaries. ๐Ÿฎ Happy crocheting! โœจ๐Ÿงถ

You ask,

we answer.

FAQs

What size rings should I use for my first lantern?

For beginners, I recommend starting with 20cm diameter rings as they're easier to handle and require less yarn. You can always make larger versions once you're comfortable with the technique.

Can I use different yarn weights in the same lantern?

Yes! The pattern is designed to be flexible. Just remember to adjust your hook size accordingly and maintain consistent tension throughout your work.

How do I calculate the distance between rings?

Use the 3/4 diameter rule: for 20cm rings, space them about 15cm apart. For 26cm rings, use about 19.5cm spacing. This creates harmonious proportions.

What type of lights work best with this lantern?

Solar or battery-operated fairy lights with transparent cables work wonderfully. Choose mini-LEDs that can be hidden inside the lantern structure for the most magical effect.

How do I prevent the lantern from becoming too stiff?

If using heavy yarn like jute or macramรฉ, choose double crochet throughout instead of half double crochet. This creates a more open structure that drapes better.