๐Ÿงถ Beautiful โœจ Detailed ๐Ÿ’ Adorable

Spooky Voodoo Doll Amigurumi Pattern

Spooky Voodoo Doll Amigurumi Pattern
4.2โ˜… Rating
4-5 Hours Time Needed
1.7K Made This
โœ‚๏ธ

Intermediate Level

Ideal for those with basic knitting experience, featuring slightly more advanced stitches and techniques to expand your skills.

โฑ๏ธ

Weekend Treat

Takes 5-7 hours, making it an enjoyable project to finish over a couple of days.

๐Ÿงธ

Whimsical Buddy

Playful characters full of personality, designed to spark imagination and become cherished playtime favorites.

About This Spooky Voodoo Doll Amigurumi Pattern

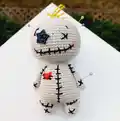
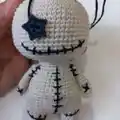
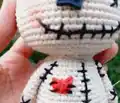
This voodoo doll pattern creates a charming yet spooky character with authentic details like cross-stitched patches and embroidered features. The design uses simple amigurumi techniques with special attention to the iconic stitched appearance. The arms are intentionally left unstuffed to create the traditional floppy feel of a real voodoo doll, while the body maintains its shape with proper stuffing.

Spooky Voodoo Doll Amigurumi Pattern crochet pattern - detailed view of completed project

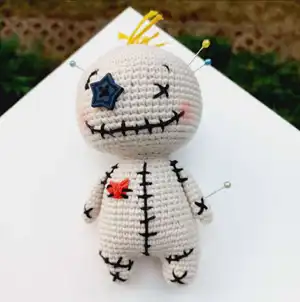
The pattern includes detailed embroidery instructions for creating the signature cross-stitch patches and facial features. Yellow yarn creates the distinctive hair tufts that complete the authentic voodoo doll appearance.

Why You'll Love This Spooky Voodoo Doll Amigurumi Pattern

I absolutely love how this pattern captures the whimsical spookiness of a traditional voodoo doll without being scary. The embroidery work is so satisfying to complete, and watching those signature cross-stitches come together really brings the character to life. I find the combination of simple amigurumi techniques with detailed surface embroidery creates the perfect balance of challenge and enjoyment.

Spooky Voodoo Doll Amigurumi Pattern step 1 - construction progress Spooky Voodoo Doll Amigurumi Pattern step 2 - assembly progress Spooky Voodoo Doll Amigurumi Pattern step 3 - details and accessories Spooky Voodoo Doll Amigurumi Pattern step 4 - final assembly and finishing

Switch Things Up

I love experimenting with different color combinations for this voodoo doll - imagine creating one in deep purples and blacks for a more gothic look, or bright rainbow colors for a whimsical twist on the traditional design.

Sometimes I add extra embroidered details like tiny hearts or stars to personalize each doll. You could even create themed versions - maybe a Christmas voodoo doll with red and green patches, or a Valentine's version with pink hearts instead of crosses.

I've found that changing the hair color and style can completely transform the doll's personality. Try using different textured yarns for the hair tufts, or even add tiny braids or ponytails for variety.

Common Mistakes & How to Fix Them

โœ— Overstuffing the arms when the pattern specifically states to leave them unstuffed for authentic flexibility โœ— Rushing through the embroidery details which are crucial for achieving the authentic voodoo doll appearance โœ— Making the chain connection between legs too tight, causing the body to pucker or distort โœ— Forgetting to leave long tails for sewing when finishing off sections, making assembly more difficult

Spooky Voodoo Doll Amigurumi Pattern

Create your own mystical voodoo doll with this enchanting amigurumi pattern! This unique character features distinctive embroidered stitches, colorful patches, and authentic voodoo doll details that make it perfect for Halloween decorations or year-round spooky fun. The pattern includes step-by-step instructions for creating the classic doll shape with arms that aren't stuffed for authentic flexibility. Complete with detailed embroidery guidance for that signature stitched look that brings this mysterious little companion to life.

Intermediate 4-5 Hours

Materials Needed for Spooky Voodoo Doll Amigurumi Pattern

โ€” Main Fabric

  • 01
    Alize Cotton Gold 599 (cream/beige) for main body and head
  • 02
    Alize Cotton Gold 110 (black) for embroidered details and stitching
  • 03
    Alize Cotton Gold 60 (yellow) for hair tufts
  • 04
    Additional small amounts in red and blue for patches

โ€” Tools Required

  • 01
    2.00mm crochet hook or size to fit your yarn
  • 02
    Polyester fiberfill stuffing
  • 03
    Tapestry needle for embroidery work
  • 04
    Scissors for cutting yarn
  • 05
    Stitch markers for tracking rounds
  • 06
    Straight pins for positioning pieces during assembly

Progress Tracker

0% Complete

โ€” Head :

Round 1 :

6 sc in magic ring (6)

Round 2 :

(inc) x6 (12)

Round 3 :

(sc, inc) (18)

Round 4 :

(inc, 2 sc) x6 (24)

Round 5 :

(3 sc, inc) x6 (30)

Round 6 :

2 sc, inc, (4 sc, inc) x5, 2 sc (36)

Round 7 :

(5 sc, inc) (42)

Round 8 :

3 sc, inc, (6 sc, inc) x5, 3 sc (48)

Round 9 :

(7 sc, inc) x6 (54)

Round 10 :

4 sc, inc, (8 sc, inc) x5, 4 sc (60)

Round 11-23 :

sc around (60) (13 rnds)

Round 24 :

(3 sc, dec) x12 (48)

Round 25 :

(2 sc, dec) x12 (36)

Round 26 :

2 sc, dec, (4 sc, dec) x5, 2 sc (30)

Round 27 :

(3 sc, dec) x6 (24)

Round 28 :

sc around (24)

โ€” Leg :

Round 1 :

7 sc in magic ring (7)

Round 2 :

(inc) x7 (14)

Round 3-5 :

sc around (14) *make 2 pieces

Info :

After making the first leg, cut the thread. When making the second leg, do not cut the thread and continue to the body

โ€” Body :

Round 6 :

ch4, join the first leg with the sc. Crochet on the first leg: 2 sc, (inc, 5 sc) x2, working on the chain: inc, 2 sc, inc, crochet on the second leg: (5 sc, inc) x2, 2 sc, working on the chain: 4 sc (42)

Round 7 :

(13 sc, inc) x3 (45)

Round 8-12 :

sc around (45) (5 rnds)

Round 13 :

(13 sc, dec) x3 (42)

Round 14-16 :

sc around (42) (3 rnds)

Round 17 :

(5 sc, dec) x6 (36)

Round 18-20 :

sc around (36) (3 rnds)

Round 21 :

(4 sc, dec) x6 (30)

Round 22-24 :

sc around (30)

Round 25 :

(3 sc, dec) x6, slst (24)

Info :

Fasten off and leaving a long tail for sewing. Stuff the body. Sew the Head with the Body

โ€” Arm :

Round 1 :

6 sc in magic ring (6)

Round 2 :

(sc, inc) x3 (9)

Round 3-11 :

sc around (9) (9 rnds)

Info :

I don't fill arms

Assembly Instructions

  • Stuff the head firmly and attach it securely to the body using the long tail left from the body
  • Sew the arms to the sides of the body at shoulder level, ensuring they hang naturally without stuffing
  • Create the signature cross-stitch embroidery pattern along the center of the body and limbs using black yarn
  • Embroider facial features including the stitched mouth and eye details as shown in the pattern photos
  • Add colorful fabric patches using red and blue yarn, securing them with cross-stitch embroidery
  • Attach yellow yarn tufts to the top of the head to create the characteristic voodoo doll hair

Important Notes

  • ๐Ÿ’กDo not stuff the arms - they should remain floppy for authentic voodoo doll movement and feel
  • ๐Ÿ’กTake your time with the embroidery work as it's what gives this project its distinctive character
  • ๐Ÿ’กUse a tapestry needle for all embroidery to avoid splitting the yarn and ensure clean stitches
  • ๐Ÿ’กThe chain connection between legs is crucial for proper body shaping - don't make it too tight
  • ๐Ÿ’กPin all embroidered elements in place before stitching to ensure proper positioning and symmetry

This delightfully spooky voodoo doll pattern brings a touch of mystical charm to your amigurumi collection! With its signature cross-stitch embroidery and authentic details, this little character is perfect for Halloween displays or year-round conversation starters. The combination of simple crochet techniques with detailed surface work creates a project that's both enjoyable to make and impressive to display. Whether you're into spooky decor or just love unique amigurumi designs, this voodoo doll will cast a spell on everyone who sees it! ๐Ÿงถ Happy crocheting! โœจ

You ask,

we answer.

FAQs

Why shouldn't I stuff the arms?

Leaving the arms unstuffed creates the authentic floppy feel of a traditional voodoo doll, allowing them to move naturally and maintaining the characteristic appearance.

What type of embroidery thread should I use?

Use the same yarn as your project (Cotton Gold) in contrasting colors for the best results and consistent texture throughout the piece.

How do I create the cross-stitch patches?

Use a tapestry needle to create cross-stitches over the crocheted surface, following the photos in the pattern for placement and design inspiration.

Can I make this doll larger?

Yes, you can use a larger hook and thicker yarn to scale up the pattern while maintaining the same proportions.

Is this pattern suitable for children?

While the construction is child-safe, consider the recipient's comfort level with voodoo doll imagery before gifting.