🧢 Beautiful ✨ Detailed πŸ’ Adorable

Spring Teapot House Amigurumi Pattern

Spring Teapot House Amigurumi Pattern
4.1β˜… Rating
12-15 Hours Time Needed
2.3K Made This
βœ‚οΈ

Intermediate Level

Ideal for those with basic knitting experience, featuring slightly more advanced stitches and techniques to expand your skills.

⏱️

Slow & Steady

A 10-12 hour projectβ€”great for savoring the process over several sessions.

🏑

Cozy Accent

A warm touch for your space that transforms ordinary corners into inviting nooks filled with handmade charm.

About This Spring Teapot House Amigurumi Pattern

This adorable Spring Teapot House pattern brings together the best of amigurumi and home decor in one magical project. The design features a mint green teapot base with a lovely lilac lid, complete with functional elements like a spout and handle. What makes this pattern truly special are the charming architectural details - windows with shutters, a welcoming door, and beautiful cascading flowers that bring the whole piece to life.

Spring Teapot House Amigurumi Pattern crochet pattern - detailed view of completed project

The finished teapot house stands approximately 18.5cm tall and uses a variety of colors including mint, lilac, pink, yellow, green, and brown. Each element is carefully crafted to create a cohesive and enchanting fairy tale home.

Why You'll Love This Spring Teapot House Amigurumi Pattern

I absolutely love how this pattern combines practical crochet skills with pure imagination! The way the teapot transforms into a whimsical house is just magical, and I find the process of adding all the tiny details incredibly satisfying. There's something so peaceful about working the flowers and leaves that makes this project feel like meditation.

Spring Teapot House Amigurumi Pattern step 1 - construction progress Spring Teapot House Amigurumi Pattern step 2 - assembly progress Spring Teapot House Amigurumi Pattern step 3 - details and accessories Spring Teapot House Amigurumi Pattern step 4 - final assembly and finishing

Switch Things Up

I love experimenting with seasonal variations of this teapot house! For autumn, I swap the pink flowers for orange and burgundy blooms, and change the mint green to a warm golden yellow. Winter versions look magical in white and silver with tiny snowflake decorations instead of flowers.

You could also try making mini versions using finer yarn and smaller hooks - they make adorable gifts! I've even created a whole village of teapot houses in different sizes and colors. The pattern adapts beautifully to personal creativity.

Common Mistakes & How to Fix Them

βœ— Not stuffing the teapot body firmly enough which can cause the shape to become distorted over time βœ— Forgetting to insert the plastic base before continuing which provides essential structure for the bottom βœ— Placing the spout incorrectly - remember the marker should face toward the teapot body βœ— Rushing the flower placement without planning - always pin first to get the perfect arrangement

Spring Teapot House Amigurumi Pattern

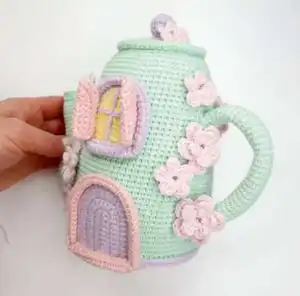
Transform your crochet skills into pure magic with this enchanting Spring Teapot House pattern! This whimsical design combines the charm of a functional teapot with the fantasy of a fairy tale cottage, complete with delicate windows, adorable door, and cascading flowers. Perfect for intermediate crocheters who want to create something truly special that will become a treasured heirloom piece.

Intermediate 12-15 Hours

Materials Needed for Spring Teapot House Amigurumi Pattern

β€” Main Fabric

  • 01
    Yarn Art Jeans mint 79 (main color - more than 1 skein needed)
  • 02
    Yarn Art Jeans lilac 19, light yellow 88, light pink 18, green 69, brown 40 (small quantities)
  • 03
    Alize Cotton Gold Hobby pink 393

β€” Tools Required

  • 01
    2.25mm crochet hook
  • 02
    Big eyed needle
  • 03
    Hot glue gun
  • 04
    Scissors
  • 05
    Water erasable marker
  • 06
    Sewing pins
  • 07
    Synthetic fiberfill
  • 08
    Hard plastic piece (thick plastic folder or cutting board)
  • 09
    Chenille wire (pipe cleaners) 4 pieces of 30cm long

Progress Tracker

0% Complete

β€” Teapot Base :

Round 1 :

6 sc in AR

Round 2 :

inc*6=12 sc

Round 3 :

(1 sc, inc)*6=18 sc

Round 4 :

1 sc, inc, (2 sc, inc)*5, 1 sc=24 sc

Round 5 :

(3 sc, inc)*6=30 sc

Round 6 :

2 sc, inc, (4 sc, inc)*5, 2 sc=36 sc

Round 7 :

(5 sc, inc)*6=42 sc

Round 8 :

3 sc, inc, (6 sc, inc)*5, 3 sc=48 sc

Round 9 :

(7 sc, inc)*6=54 sc

Round 10 :

4 sc, inc, (8 sc, inc)*5, 4 sc=60 sc

Round 11 :

(9 sc, inc)*6=66 sc

Round 12 :

5 sc, inc, (10 sc, inc)*5, 5 sc=72 sc

Round 13 :

(11 sc, inc)*6=78 sc

Round 14 :

6 sc, inc, (12 sc, inc)*5, 6 sc=84 sc

Info :

Cut plastic circle and glue to wrong side

Round 15 :

84 sc through back loops

Rounds 16-24 :

9 rounds of 84 sc

Round 25 :

(12 sc, dec)*6=78 sc

Rounds 26-34 :

9 rounds of 78 sc

Round 35 :

(11 sc, dec)*6=72 sc

Rounds 36-43 :

8 rounds of 72 sc

Round 44 :

(10 sc, dec)*6=66 sc

Rounds 45-50 :

6 rounds of 66 sc

Round 51 :

(9 sc, dec)*6=60 sc

Round 52 :

60 sc

Round 53 :

(8 sc, dec)*6=54 sc

Round 54 :

(7 sc, dec)*6=48 sc

Info :

Stuff firmly

Round 55 :

Change to lilac, 48 sc through back loops

Round 56 :

48 sc through both loops

Round 57 :

(6 sc, dec)*6=42 sc

Round 58 :

(5 sc, dec)*6=36 sc

Round 59 :

(4 sc, dec)*6=30 sc

Round 60 :

(3 sc, dec)*6=24 sc

Round 61 :

(2 sc, dec)*6=18 sc

Round 62 :

(1 sc, dec)*6=12 sc

Round 63 :

Dec until closed

β€” Spout :

Round 1 :

6 sc in AR

Round 2 :

inc*6=12 sc

Round 3 :

(1 sc, inc)*6=18 sc

Round 4 :

18 sc through back loops

Rounds 5-7 :

18 sc

Round 8 :

inc, 17 sc=19 sc

Round 9 :

2 sc, inc, 16 sc=20 sc

Round 10 :

2 sc, inc, 17 sc=21 sc

Round 11 :

2 sc, inc, 18 sc=22 sc

Round 12 :

2 sc, inc, 19 sc=23 sc

Round 13 :

2 sc, inc, 20 sc=24 sc

Round 14 :

24 sc

Round 15 :

(3 sc, inc)*6=30 sc

Rounds 16-17 :

30 sc

Round 18 :

(4 sc, inc)*6=36 sc

Rounds 19-20 :

36 sc

Round 21 :

(5 sc, inc)*6=42 sc

Rounds 22-23 :

42 sc

Round 24 :

(6 sc, inc)*6=48 sc

Rounds 25-27 :

48 sc

Round 28 :

(6 sc, dec)*6=42 sc

Round 29 :

(5 sc, dec)*6=36 sc

Info :

Stuff narrow part tightly, wide part looser

Round 30 :

(4 sc, dec)*6=30 sc

Round 31 :

(3 sc, dec)*6=24 sc

Round 32 :

(2 sc, dec)*6=18 sc

Round 33 :

(1 sc, dec)*6=12 sc

Round 34 :

dec*6

β€” Handle :

Round 1 :

6 sc in AR

Round 2 :

inc*6=12 sc

Continuing :

Crochet spiral rounds without inc to desired length

Info :

Insert 4 chenille wires twisted together

β€” Lid Handle :

Round 1 :

6 sc in AR

Round 2 :

inc*6=12 sc

Rounds 3-4 :

12 sc, stuff

Round 5 :

dec*6

β€” Door :

Foundation :

Chain 10, crochet U-shaped rows

Row 1 :

8 sc, 3 inc in last loop, 8 sc=19 sc

Row 2 :

8 sc, inc*3, 8 sc=22 sc

Row 3 :

8 sc, (1 sc, inc)*3, 8 sc=25 sc

Row 4 :

8 sc, (2 sc, inc)*3, 8 sc=28 sc

Row 5 :

8 sc, (3 sc, inc)*3, 8 sc=31 sc

Row 6 :

8 sc, (4 sc, inc)*3, 8 sc=34 sc

Row 7 :

Change to pink, through back loops: 8 sc, (5 sc, inc)*3, 8 sc=37 sc

Row 8 :

37 sc through back loops

Rows 9-10 :

37 sc through both loops

β€” Windows :

Foundation :

Chain 8, crochet like door

Row 1 :

6 sc, 3 sc in last loop, 6 sc=15 sc

Row 2 :

6 sc, inc*3, 6 sc=18 sc

Row 3 :

6 sc, (1 sc, inc)*3, 6 sc=21 sc

Row 4 :

6 sc, (2 sc, inc)*3, 6 sc=24 sc

Row 5 :

Change to lilac, through back loops: 6 sc, (3 sc, inc)*3, 6 sc=30 sc

Row 6 :

30 sc through back loops

Rows 7-8 :

30 sc through both loops

β€” Flowers :

Foundation :

Chain 5, close into ring with sl st

Petals :

In ring: (2 ch, 2 dc, 2 ch, sl st) repeat 5 times

Two-layer flowers :

Make 5 jumpers under petals, then crochet larger petals: 2 ch, 3 dc, 2 ch, sl st

β€” Leaves :

Foundation :

Chain 7

Pattern :

1 sl st, 1 sc, 2 hdc, 1 sc, 1 sl st

β€” Assembly :

Final Steps :

Attach all components, embroider branches, add flowers and leaves

Assembly Instructions

  • Attach the spout to the teapot body ensuring the marker faces toward the teapot
  • Sew the handle to the teapot with one end near the top and the other close to the bottom
  • Attach the lid handle to the center of the lilac lid
  • Glue or sew the door to the front lower section of the teapot
  • Attach windows to the teapot body, one above the door and one on the opposite side
  • Embroider brown branches connecting the flower placement areas
  • Attach flowers and leaves following the embroidered branch pattern

Important Notes

  • πŸ’‘Use contrasting yarn as a stitch marker to keep track of rounds accurately
  • πŸ’‘Insert the plastic base before continuing past round 14 for proper structure
  • πŸ’‘Stuff the teapot body firmly but not too tightly to maintain the proper shape
  • πŸ’‘When attaching the spout, flatten the wide end slightly for better adhesion
  • πŸ’‘Pin all decorative elements before final attachment to ensure perfect placement
  • πŸ’‘Use water-erasable marker for branch outlines - it will disappear when complete

This enchanting Spring Teapot House pattern brings fairy tale magic to your crochet collection! The combination of functional teapot elements with whimsical house details creates a truly unique piece that will captivate everyone who sees it. With its cascading flowers, charming windows, and perfect spring colors, this project is pure joy to create and even more wonderful to display. 🌸 Happy crocheting! 🧢✨

You ask,

we answer.

FAQs

What skill level is needed for this pattern?

This is an intermediate level pattern that requires knowledge of basic crochet stitches and some experience with amigurumi techniques.

Can I use different colors than suggested?

Absolutely! Feel free to customize the colors to match your decor or seasonal preferences while maintaining good contrast between elements.

How do I make the teapot stable?

The pattern includes instructions for adding a plastic base which is essential for stability and structure.

Can I make this without the flowers?

Yes, the teapot house looks lovely on its own, but the flowers really bring the spring theme to life!

Is the teapot functional for actual tea?

No, this is a decorative piece only and should not be used with liquids.