🧢 Beautiful ✨ Detailed πŸ’ Adorable

Stanley the Strawberry Amigurumi Pattern

Stanley the Strawberry Amigurumi Pattern
4.8β˜… Rating
1-2 Hours Time Needed
1.3K Made This
βœ‚οΈ

Beginner Friendly Level

Perfect for those just starting their sewing journey, with clear instructions and simple techniques

⏱️

Bite-Sized Project

Complete in under 2 hoursβ€”quick, fun, and perfect for a little creative escape.

πŸ“

Tiny Treasure

Small, sweet, and gift-worthy creations that fit perfectly in the palm of your hand with detailed charm.

About This Stanley the Strawberry Amigurumi Pattern

Stanley the Strawberry is worked in continuous rounds using basic single crochet and increase techniques. This pattern creates a plump, realistic strawberry shape with a charming leafy top. The design uses simple color changes to achieve the classic red body with green leaves, making it perfect for practicing fundamental amigurumi skills.

Stanley the Strawberry Amigurumi Pattern crochet pattern - detailed view of completed project

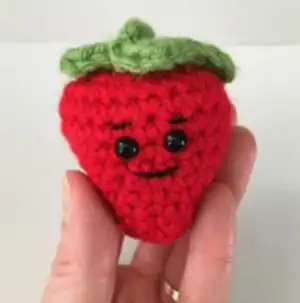
With optional safety eyes, Stanley develops a sweet personality that makes him irresistible. The compact size and quick work time make this pattern ideal for last-minute gifts or satisfying weekend projects.

Why You'll Love This Stanley the Strawberry Amigurumi Pattern

I absolutely love how Stanley captures the essence of summer sweetness in such a tiny package! The satisfaction of watching this little strawberry take shape in just an hour or two is incredibly rewarding. What really makes my heart happy is how Stanley's innocent expression brings instant joy to anyone who sees him - he's like a pocket-sized dose of happiness that never fails to make people smile.

Stanley the Strawberry Amigurumi Pattern step 1 - construction progress Stanley the Strawberry Amigurumi Pattern step 2 - assembly progress Stanley the Strawberry Amigurumi Pattern step 3 - details and accessories Stanley the Strawberry Amigurumi Pattern step 4 - final assembly and finishing

Switch Things Up

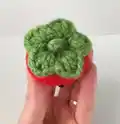
I love experimenting with Stanley's personality by trying different color combinations - imagine a purple berry or even a rainbow version! You could also vary the leaf style by making them more ruffled or adding texture stitches. For a winter twist, I sometimes make Stanley in cream and pink for a sweet strawberry and cream theme. The beauty of this pattern is how easily it adapts to your creative vision while maintaining that irresistible charm.

Common Mistakes & How to Fix Them

βœ— Forgetting to stuff the body before closing - stuff firmly as you work the decrease rounds βœ— Making the magic ring too loose - pull tight to prevent holes at the bottom βœ— Placing safety eyes too far apart - they should be about 1 stitch apart for the best kawaii effect βœ— Not maintaining consistent tension - keep stitches even for a smooth, professional finish

Stanley the Strawberry Amigurumi Pattern

Create your own adorable Stanley the Strawberry with this charming amigurumi pattern! This sweet little strawberry measures approximately 2.5 inches and features an irresistible kawaii face with optional safety eyes. Perfect for beginners looking to practice basic crochet stitches while making something absolutely delightful. Stanley makes a wonderful gift, keychain charm, or desk companion that's sure to bring smiles wherever he goes.

Beginner Friendly 1-2 Hours

Materials Needed for Stanley the Strawberry Amigurumi Pattern

β€” Main Fabric

  • 01
    #4 Worsted Weight yarn in red and green colors
  • 02
    Small amounts of red and green yarn sufficient for 2.5 inch finished project

β€” Tools Required

  • 01
    Crochet hook size G (4.0mm or 4.25mm)
  • 02
    Two 6mm safety eyes (optional)
  • 03
    Tapestry needle
  • 04
    Stitch marker
  • 05
    Measuring tape
  • 06
    Fiberfill stuffing
  • 07
    Black embroidery thread (for mouth)

Progress Tracker

0% Complete

β€” Body :

Round 1 :

Using red create a magic ring, sc 6

Round 2 :

*sc 2, scinc in next* repeat around (9)

Round 3 :

*sc 3, scinc in next* repeat around (10)

Round 4 :

*sc 4, scinc in next* repeat around (12)

Round 5 :

*sc 3, scinc in next* repeat around (15)

Round 6 :

*sc 4, scinc in next* repeat around (18)

Round 7 :

*sc 5, scinc in next* repeat around (21)

Round 8 :

*sc 6, scinc in next* repeat around (24)

Info :

Insert the safety eyes between rnds 8 & 9 OR embroider eye so they are 1 st apart

Round 9 :

*sc 7, scinc in next* repeat around (27)

Round 10 :

*sc 8, scinc in next* repeat around (30)

Round 11 :

sc in each st around (30)

Round 12 :

invdec 15 times (15), leaving a long tail, change to green

Round 13 :

*sc, invdec* repeat around (10), join to first with slst

Round 14 :

ch 1, turn working in front loops *sc, [2dc, ch 2, 2dc] in next* repeat around (5 sc, 5 leaves)

Info :

Fasten off and weave in ends. Using a tapestry needle, weave the yarn tail from the join in and out of the back loops of rnd 14, pull tight to close the hole. Continue to weave the yarn tail in and out of the top until the opening is fully closed

β€” Mouth :

Info :

Using a small length of black embroidery thread or yarn, embroider a mouth just below the eyes (See photo on page 1)

β€” Stem :

Info :

Using green, ch 7 (or until desired length). Fasten off and attach as loop on top of the strawberry (See photo on page 1)

Assembly Instructions

  • Stuff the strawberry body firmly as you work the decrease rounds, ensuring a plump shape
  • If using safety eyes, insert them between rounds 8 and 9, approximately 1 stitch apart
  • Embroider a small curved mouth just below the eyes using black thread
  • Attach the chain stem as a loop on top of the strawberry for hanging or decoration
  • Weave in all yarn ends securely to prevent unraveling

Important Notes

  • πŸ’‘Use stitch markers to keep track of rounds and maintain proper stitch count
  • πŸ’‘Stuff firmly but not too tightly to maintain the strawberry's natural shape
  • πŸ’‘Safety eyes are optional - you can embroider eyes instead for a softer look
  • πŸ’‘Keep consistent tension throughout for an even, professional appearance
  • πŸ’‘The pattern is worked in continuous rounds - do not join with slip stitches except where specified

This delightful Stanley the Strawberry pattern brings summer sweetness to your crochet hook! With his adorable kawaii expression and perfectly plump shape, Stanley is the ideal beginner-friendly project that works up quickly and brings instant joy. Whether you're making him as a gift, keychain, or just because he's irresistibly cute, this little strawberry is guaranteed to make you smile. πŸ“ Happy crocheting! 🧢✨

You ask,

we answer.

FAQs

Can I make Stanley without safety eyes?

Absolutely! You can embroider the eyes instead using black yarn or thread for a softer, child-safe alternative.

What size will my finished Stanley be?

Stanley measures approximately 2.5 inches tall when made with worsted weight yarn and a size G hook.

Can I use different yarn weights?

Yes, but your finished size will vary. Use a hook appropriate for your yarn weight and adjust stuffing accordingly.

How do I prevent holes in my magic ring?

Pull the yarn tail tight after completing the first round and secure it well before continuing with round 2.

Can I make Stanley bigger?

Yes! Simply use a thicker yarn and larger hook, or add additional increase rounds before working the straight rounds.