🧢 Beautiful ✨ Detailed πŸ’ Adorable

Majestic Whale Amigurumi Pattern

Majestic Whale Amigurumi Pattern
4.2β˜… Rating
12-15 Hours Time Needed
3.4K Made This
βœ‚οΈ

Advanced Level

Designed for experienced knitters, these patterns involve intricate designs and complex techniques to challenge and inspire.

⏱️

Slow & Steady

A 10-12 hour projectβ€”great for savoring the process over several sessions.

πŸ‹

Charming Critter

Delightful animal designs with sweet details that capture the essence of your favorite woodland and farmyard friends.

About This Majestic Whale Amigurumi Pattern

This magnificent whale pattern features an intricate construction technique that creates a realistic three-dimensional shape. The pattern includes detailed instructions for creating moveable fins with internal wire armature, allowing for dynamic posing. The combination of blue and white yarns creates beautiful contrast that mimics the natural coloring of humpback whales.

Majestic Whale Amigurumi Pattern crochet pattern - detailed view of completed project

Special techniques include invisible color changes, wire insertion for poseable fins, and detailed embroidery work that brings the whale's features to life with authentic ocean character.

Why You'll Love This Majestic Whale Amigurumi Pattern

I absolutely love how this pattern challenges your skills while creating something truly spectacular! The wire-supported fins make this whale incredibly interactive and display-worthy. The satisfaction of completing such an intricate project is unmatched, and the final result is a stunning piece that captures the majesty of these ocean giants perfectly.

Majestic Whale Amigurumi Pattern step 1 - construction progress Majestic Whale Amigurumi Pattern step 2 - assembly progress Majestic Whale Amigurumi Pattern step 3 - details and accessories Majestic Whale Amigurumi Pattern step 4 - final assembly and finishing

Switch Things Up

I love experimenting with different color combinations for this whale pattern! Instead of the traditional blue and white, try creating an orca whale using black and white yarns, or go fantastical with purple and silver for a magical ocean creature. You could also adjust the size by using different yarn weights - a chunky yarn creates an adorable oversized version that's perfect for cuddling.

For added personality, consider embroidering different facial expressions or adding small details like barnacles using textured stitches. The wire armature system works beautifully for creating dynamic poses, so don't be afraid to experiment with different fin positions to give your whale unique character and movement!

Common Mistakes & How to Fix Them

βœ— Forgetting to insert safety eyes before closing the head completely during rounds 29-30 βœ— Not using stitch markers consistently leading to misaligned pattern pieces and uneven shaping βœ— Rushing the wire insertion process without properly wrapping ends causing potential injury βœ— Skipping the invisible color change technique resulting in visible and messy color transitions βœ— Over-stuffing the body making it too firm and affecting the whale's natural curved shape βœ— Not following the shifting stitch instructions causing the spiral pattern to become distorted

Majestic Whale Amigurumi Pattern

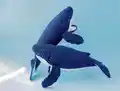
Dive into this enchanting whale amigurumi pattern that brings the ocean's gentle giant to life! This comprehensive tutorial guides you through creating a beautifully detailed humpback whale with intricate fins, realistic texture work, and charming embroidered details. Perfect for ocean lovers and those seeking a rewarding crochet challenge.

Advanced 12-15 Hours

Materials Needed for Majestic Whale Amigurumi Pattern

β€” Main Fabric

  • 01
    YarnArt Jeans yarn 55% cotton 45% pac, size 2 (50g/150m) in blue color 54
  • 02
    YarnArt Jeans yarn 55% cotton 45% pac, size 2 (50g/150m) in white color 01

β€” Tools Required

  • 01
    Crochet hook size 1.75mm
  • 02
    Safety eyes 8mm
  • 03
    Scissors
  • 04
    Stitch markers
  • 05
    Beads
  • 06
    Polyester stuffing (syntepuh)
  • 07
    Wire 0.89mm or 1mm
  • 08
    Adhesive roll bandage
  • 09
    Tapestry needle

Progress Tracker

0% Complete

β€” Head + Body :

Round 1 :

8 sc into MR [8]

Round 2 :

8 inc [16]

Round 3 :

(1 sc, inc)*8 [24]

Round 4 :

12 sc, (1 sc, inc)*6 [30]

Round 5-9 :

30 sc [30] {5 rounds}

Round 10 :

2 sc, inc, (4 sc, inc)*5, 2 sc [36]

Round 11 :

36 sc [36]

Round 12 :

12 sc, (3 sc, inc)*6 [42]

Round 13 :

3 sc, inc, (6 sc, inc)*5, 3 sc [48]

Round 14 :

48 sc [48]

Round 15 :

12 sc, (5 sc, inc)*6 [54]

Round 16-17 :

54 sc [54] {2 rounds}

Round 18 :

15 sc, inc, (6 sc, inc)*5, 3 sc [60]

Round 19-21 :

60 sc [60] {3 rounds}

Round 22 :

(9 sc, inc)*6 [66]

Round 23-24 :

66 sc [66] {2 rounds}

Round 25 :

16 sc, inc, (8 sc, inc)*5, 4 sc [72]

Round 26-27 :

72 sc [72] {2 rounds}

Round 28 :

30 sc, 3 inc, 30 sc, 3 inc, 6 sc [78]

Round 29 :

30 sc, (1 sc, inc)*3, 30 sc, (1 sc, inc)*3, 6 sc [84]

Round 30-34 :

84 sc [84] {5 rounds}

Info :

Insert safety eyes between rounds 29 and 30 leaving 43 stitches apart

β€” Right Fin :

Round 1 :

make chain of 30 stitches, from the 2nd stitch from the hook: 28 sc, 4 sc in the 1 stitch, on the other side of the chain - 28 sc [60]

Round 2 :

ch, turn, from the 2nd stitch from the hook: 28 sc, 4 inc, 3 sc, 7 hdc, 7 dc, 2 inc-dc, 4 dc, 2 hdc, 3 sc [66]

Round 3 :

ch, turn, from the 2nd stitch from the hook: 3 sc, 2 hdc, 5 dc, 2 inc-dc, 8 dc, 5 hdc, 3 sc, 14 sl st, 20 sc, 4 sl st [68]

β€” Left Fin :

Round 1 :

make chain of 30 stitches, from the 2nd stitch from the hook: 28 sc, 4 sc in the 1 stitch, on the other side of the chain - 28 sc [60]

β€” Lower Jaw :

Round 1 :

make chain of 28 stitches, from the 2nd stitch from the hook: 26 sc, 3 sc in the 1 stitch, on the other side of the chain - 26 sc [55]

β€” Tail :

Round 1 :

make chain of 13 stitches, from the 2nd stitch from the hook: 12 sc [12]

β€” White Spot on Abdomen :

Round 1 :

make chain of 70 stitches, from the 2nd stitch from the hook: 68 sc, 4 sc in the 1 stitch, on the other side of the chain - 68 sc [140]

Assembly Instructions

  • Pin and sew the lower jaw to the head, ensuring proper alignment with the mouth opening
  • Insert wire armature into each fin before attaching to provide structure and poseability
  • Attach the right and left fins to the body sides between rounds 38-39, below the eye placement
  • Sew the tail securely to the back of the body, ensuring it's centered and properly aligned
  • Pin the white spot to the abdomen and sew carefully, maintaining the natural whale belly shape
  • Complete assembly by adding embroidery details to both the white and blue sections for realistic texture

Important Notes

  • πŸ’‘Use stitch markers consistently throughout to maintain proper stitch counting and shaping
  • πŸ’‘Insert safety eyes between rounds 29-30 before closing the head completely
  • πŸ’‘Handle wire carefully during insertion and always wrap ends with bandage to prevent injury
  • πŸ’‘Stuff firmly but not overly tight to maintain the whale's natural curved body shape
  • πŸ’‘Use invisible color change technique for clean transitions between blue and white sections
  • πŸ’‘Work in continuous spiral without slip stitches, using shifting stitches when markers drift

This spectacular whale amigurumi pattern brings the ocean's most majestic creature into your hands! With intricate wire-supported fins and beautiful color work, this advanced project offers both challenge and incredible satisfaction. The detailed embroidery and realistic proportions make this whale a stunning display piece. πŸ‹ Happy crocheting! 🌊✨

You ask,

we answer.

FAQs

What type of wire should I use for the fins?

Use 0.89mm or 1mm craft wire that's flexible enough to pose but strong enough to hold shape. Always wrap the ends with adhesive bandage for safety.

Can I make this whale without the wire armature?

Yes, but the fins won't be poseable. You can stuff them lightly with polyfill instead, though they may be more floppy.

How do I achieve clean color changes?

Use the invisible color change technique described in the pattern. Complete the last stitch of the old color until 2 loops remain, then pull through with the new color.

What size will the finished whale be?

The finished whale measures approximately 35-40cm in length, depending on your tension and yarn choice.

Is this pattern suitable for beginners?

This is an advanced pattern requiring experience with complex shaping, wire insertion, and detailed assembly. Beginners should start with simpler amigurumi projects first.