๐Ÿงถ Beautiful โœจ Detailed ๐Ÿ’ Adorable

Storm the Deer Amigurumi Pattern

Storm the Deer Amigurumi Pattern
4.8โ˜… Rating
8-10 Hours Time Needed
4.2K Made This
โœ‚๏ธ

Intermediate Level

Ideal for those with basic knitting experience, featuring slightly more advanced stitches and techniques to expand your skills.

โฑ๏ธ

All-Day Adventure

Requires 8-10 hours, ideal for a full day of immersive knitting.

๐ŸŽ„

Holiday Cheer

Festive fun for the season, bringing handmade magic to celebrations and creating new family traditions.

About This Storm the Deer Amigurumi Pattern

Storm the Deer is a charming holiday amigurumi that combines traditional crochet techniques with festive Christmas spirit. This pattern features a unique body-and-head construction method that creates a seamless, professional finish. The deer's distinctive teal blue coloring with orange accents makes it a standout piece for any holiday collection.

Storm the Deer Amigurumi Pattern crochet pattern - detailed view of completed project

With detailed step-by-step instructions and helpful assembly photos, this pattern guides you through creating antlers with wire reinforcement, a flowing scarf, and delicate embroidered snowflake details that add that special magical touch.

Why You'll Love This Storm the Deer Amigurumi Pattern

I absolutely love this pattern because it brings together everything that makes holiday crafting special - the joy of working with beautiful colors, the satisfaction of creating something truly magical, and the excitement of gifting a handmade treasure. The combination of textures and the adorable expression you'll create makes every stitch worthwhile, and I find myself smiling throughout the entire process!

Storm the Deer Amigurumi Pattern step 1 - construction progress Storm the Deer Amigurumi Pattern step 2 - assembly progress Storm the Deer Amigurumi Pattern step 3 - details and accessories Storm the Deer Amigurumi Pattern step 4 - final assembly and finishing

Switch Things Up

I love experimenting with different color combinations for this deer pattern! Try making Storm in traditional Christmas colors like red and green, or go for an elegant winter look with white and silver accents. You could even create a whole family of deer in different sizes by adjusting your hook size - a smaller hook creates a mini version that's perfect for ornaments, while a larger hook makes a statement piece for your mantel.

The scarf is another great place to add personality - try stripes, color changes, or even a different stitch pattern like the shell stitch for texture. I've also seen crafters add small jingle bells to the scarf ends for extra holiday charm, or embroider the deer's name on the scarf for a personalized touch that makes it extra special!

Common Mistakes & How to Fix Them

โœ— Not using stitch markers when working in spiral rounds can cause you to lose track of your place โœ— Stuffing too loosely will result in a floppy deer that won't hold its shape properly โœ— Forgetting to insert wire in the antlers before closing makes them too flexible and unstable โœ— Rushing the embroidery details can make the snowflakes look uneven and unprofessional

Storm the Deer Amigurumi Pattern

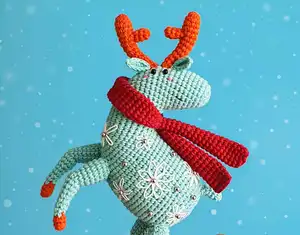
Create your own adorable Christmas deer with this delightful amigurumi pattern! Storm the Deer features charming teal blue coloring, festive orange antlers, and a cozy scarf that brings holiday magic to life. This loveable woodland creature stands approximately 20cm tall and makes the perfect seasonal decoration or gift for crochet enthusiasts who love creating magical holiday companions.

Intermediate 8-10 Hours

Materials Needed for Storm the Deer Amigurumi Pattern

โ€” Main Fabric

  • 01
    Gazzal Jeans yarn (58% cotton, 42% polyacrylic 170m/50g) in beige, teal blue, and pink colors
  • 02
    Scraps of yarn in different colors for embroidery work

โ€” Tools Required

  • 01
    B-1/2mm crochet hook
  • 02
    Sewing needle
  • 03
    Yarn needle
  • 04
    Pins
  • 05
    Stitch markers
  • 06
    Fiberfill for stuffing
  • 07
    Approximately 12cm of wire for antlers
  • 08
    Black glass beads 2mm (optional for eyes)

Progress Tracker

0% Complete

โ€” Body and Head :

Foundation :

Ch 11 in beige

Round 1 :

start in second ch from hook, inc, 8 sc, 4 sc in next st, 8 sc, inc [24]

Round 2 :

2 inc, 8 sc, 4 inc, 8 sc, 2 inc [32]

Round 3 :

(sc, inc) x 2, 8 sc, (sc, inc) x 4, 8 sc, (sc, inc) x 2 [40]

Round 4 :

sc in all 40 st [40]

Round 5 :

(sc, inc) x 3, 8 sc, (sc, inc) x 6, 8 sc, (sc, inc) x 3 [52]

Round 6 :

sc in all 52 st [52]

Round 7 :

(sc, inc) x 3, 40 sc, (sc, inc) x 3 [58]

Round 8 :

26 sc, (2 sc, inc) x 2, 26 sc [60]

Round 9 :

(sc, inc) x 3, 48 sc, (sc, inc) x 3 [66]

Round 10-12 :

sc in all 66 st [66]

Info :

Divide the work into 4 parts with stitch markers, using 20 stitches for the head, 5 stitches for the neck, 36 stitches for the body and another 5 stitches for the neck

Round 13 :

(5 sc, inc) x 3, skip 30 sc, (5 sc, inc) x 3 [42]

Round 14-25 :

sc in all 42 st [42]

Info :

Stuff the body firmly with fiberfill and continue stuffing as you go

Round 26 :

(5 sc, dec) x 6 [36]

Round 27 :

sc in all 36 st [36]

Round 28 :

9 sc, (sc, dec) x 6, 9 sc [30]

Round 29 :

6 sc, (sc, dec) x 6, 6 sc [24]

Round 30 :

sc, (dec, 2 sc) x 5, dec, sc [18]

Round 31 :

(sc, dec) x 6 [12]

Round 32 :

6 dec [6]

Info :

Fasten off leaving a tail about 10 cm long and cut the yarn

โ€” Head :

Round 1 :

sc in all 20 st [20]

Round 2-4 :

sc in all 20 st [20]

Round 5 :

dec, 14 sc, dec, 2 sc [18]

Round 6-7 :

sc in all 18 st [18]

Round 8 :

(sc, dec) x 6 [12]

Round 9 :

6 dec [6]

โ€” Legs (Make 4) :

Round 1 :

6 sc in a MR [6]

Round 2 :

BLO, sc in all 6 st [6]

Round 3 :

sc in all 6 st [6]

Info :

Change to beige yarn

Round 4 :

inc, 5 sc [7]

Round 5-6 :

sc in all 7 st [7]

Round 7 :

2 inc, 5 sc [9]

Round 8-9 :

sc in all 9 st [9]

Round 10 :

4 slst, sc, 3 hdc, sc [9]

Round 11 :

sc, 2 inc, 6 sc [11]

Round 12-13 :

sc in all 11 st [11]

Round 14 :

3 sc, inc, 7 sc [12]

Round 15-16 :

sc in all 12 st [12]

โ€” Antler Part 1 :

Round 1 :

6 sc in a MR [6]

Round 2 :

(sc, inc) x 3 [9]

Round 3-4 :

sc in all 9 st [9]

Round 5 :

7 sc, dec [8]

Round 6-7 :

sc in all 8 st [8]

Round 8 :

6 sc, dec [7]

Round 9-10 :

sc in all 7 st [7]

Round 11 :

5 sc, dec [6]

Round 12-13 :

sc in all 6 st [6]

Round 14 :

4 sc, dec [5]

โ€” Antler Part 2 :

Round 1 :

6 sc in a MR [6]

Round 2-3 :

sc in all 6 st [6]

โ€” Ears (Make 2) :

Foundation :

Ch 6 in beige

Round 1 :

start in second ch from hook, slst, 2 sc, hdc, 4 hdc in next st, continue on the other side of the foundation chain, hdc, 2 sc, slst [12]

โ€” Tail :

Round 1 :

5 sc in a MR [5]

Round 2 :

inc, 4 sc [6]

Round 3 :

inc, 5 sc [7]

Round 4 :

inc, 6 sc [8]

โ€” Scarf :

Foundation :

Ch 5 in pink

Round 1 :

start in second ch from hook, inc, 2 sc, 4 sc in next st, 2 sc, inc [12]

Round 2-3 :

sc in all 12 st [12]

Round 4 :

10 sc, dec [11]

Round 5-6 :

sc in all 11 st [11]

Round 7 :

9 sc, dec [10]

Round 8-9 :

sc in all 10 st [10]

Round 10 :

8 sc, dec [9]

Round 11-12 :

sc in all 9 st [9]

Round 13 :

7 sc, dec [8]

Round 14-15 :

sc in all 8 st [8]

Round 16 :

6 sc, dec [7]

Round 17-18 :

sc in all 7 st [7]

Round 19 :

5 sc, dec [6]

Round 20 :

sc in all 6 st [6]

Round 21 :

(sc, inc) x 3 [9]

Round 22-23 :

sc in all 9 st [9]

Round 24 :

(2 sc, inc) x 3 [12]

Round 25-53 :

sc in all 12 st [12]

Round 54 :

(2 sc, dec) x 3 [9]

Round 55-56 :

sc in all 9 st [9]

Round 57 :

(sc, dec) x 3 [6]

Round 58 :

sc in all 6 st [6]

Round 59 :

5 sc, inc [7]

Round 60-61 :

sc in all 7 st [7]

Round 62 :

6 sc, inc [8]

Round 63-64 :

sc in all 8 st [8]

Round 65 :

7 sc, inc [9]

Round 66-67 :

sc in all 9 st [9]

Round 68 :

8 sc, inc [10]

Round 69-70 :

sc in all 10 st [10]

Round 71 :

9 sc, inc [11]

Round 72-73 :

sc in all 11 st [11]

Round 74 :

10 sc, inc [12]

Round 75-76 :

sc in all 12 st [12]

Round 77 :

Flatten the scarf and work through both layers to close, sc in all 6 st [6]

Assembly Instructions

  • Attach the head to the body using the beige starting yarn tail to sew the gap on the neck closed
  • Sew the legs to the bottom part of the body - front legs between rounds 5 and 12, back legs between rounds 21 and 27
  • Sew part 2 of the antler to part 1 between rounds 4 and 7, then attach antlers to the top of the head between rounds 8 and 11
  • Attach ears to the head under the antlers, making a couple of stitches on the ear before sewing
  • Sew the tail to the back of the body between rounds 28 and 30
  • Attach the scarf around the deer's neck using pink yarn
  • Glue or embroider eyes on the head between the ears with 1-2 stitches spacing from each other

Important Notes

  • ๐Ÿ’กMost pieces are crocheted in spiral, use stitch markers to mark the beginning of each round
  • ๐Ÿ’กCrochet tightly to avoid stuffing showing through the stitches
  • ๐Ÿ’กAdd stuffing in small portions so it is distributed evenly throughout
  • ๐Ÿ’กUse pins to hold pieces in place before sewing for proper positioning
  • ๐Ÿ’กInsert wire into antlers before closing to maintain their shape and stability

This adorable Storm the Deer pattern brings festive magic to your holiday decorating! With its charming teal blue body, bright orange antlers, and cozy scarf, this woodland friend captures the spirit of winter wonderland perfectly. The detailed embroidered snowflakes add that special touch that makes this deer truly enchanting. Perfect for gifting or adding to your own seasonal collection! ๐ŸฆŒโ„๏ธโœจ

You ask,

we answer.

FAQs

What yarn weight should I use for this pattern?

The pattern calls for Gazzal Jeans yarn which is a DK weight (3) yarn. You can substitute with any similar weight cotton or cotton blend yarn.

Can I make this deer without the wire in the antlers?

Yes, but the antlers may be more flexible and not hold their shape as well. The wire helps them stay upright and positioned properly.

How do I add the snowflake embroidery details?

Use scraps of teal blue yarn to embroider simple snowflake patterns on the body as shown in the photos. A water-soluble marker can help you plan the placement first.

Is this pattern suitable for beginners?

This is an intermediate pattern that requires knowledge of basic crochet stitches, working in rounds, and amigurumi assembly techniques.

Can I change the colors of the deer?

Absolutely! You can customize the colors to match your holiday decor or personal preference while following the same construction method.