🧢 Beautiful ✨ Detailed πŸ’ Adorable

Striped Star Pillow Crochet Pattern

Striped Star Pillow Crochet Pattern
3.9β˜… Rating
10-12 Hours Time Needed
3.7K Made This
βœ‚οΈ

Intermediate Level

Ideal for those with basic knitting experience, featuring slightly more advanced stitches and techniques to expand your skills.

⏱️

Slow & Steady

A 10-12 hour projectβ€”great for savoring the process over several sessions.

🏑

Cozy Accent

A warm touch for your space that transforms ordinary corners into inviting nooks filled with handmade charm.

About This Striped Star Pillow Crochet Pattern

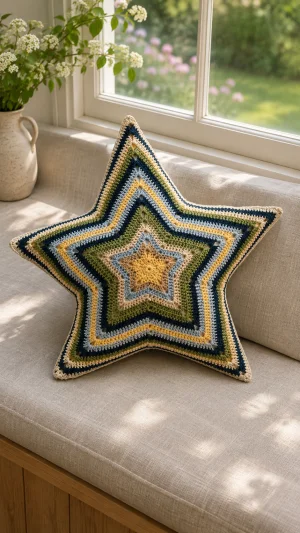
This original, photo-inspired pillow is made from two matching five-point stars, worked in single crochet from the center outward. Each round builds the points with increases and shapes the dips by skipping stitches, while bands of yellow, tan, pale blue, olive, navy, and cream echo the photographed design. The panels are joined around their edges and filled with stuffing, giving the flat stars a soft, rounded shape. Choose yarns of similar weight so the stripes behave consistently, and use markers to keep the five points easy to identify as the rounds grow.

Striped Star Pillow Crochet Pattern crochet pattern - detailed view of completed project

The pattern uses US crochet terms and includes a complete color sequence for both sides, although you can make the back in one color if you prefer. Gauge is flexible for a decorative pillow, but matching tension between the panels will make the edges much easier to join.

Why You'll Love This Striped Star Pillow Crochet Pattern

I love how the star shape turns straightforward single crochet into a cushion with a strong graphic outline. The work begins with a small center, so you can settle into the repeated point and valley shaping before the rounds become longer. Color changes divide the project into manageable stages, and each new stripe gives you a chance to see the design take shape. I also like that the two panels can be made separately and checked against each other before joining. Allow time to weave in the color-change ends and distribute the stuffing carefully, especially inside the points. Once finished, the pillow makes a cheerful accent on a sofa, reading chair, or bed, and its palette is easy to adapt to the room where it will live.

Striped Star Pillow Crochet Pattern step 1 - construction progress Striped Star Pillow Crochet Pattern step 2 - assembly progress Striped Star Pillow Crochet Pattern step 3 - details and accessories Striped Star Pillow Crochet Pattern step 4 - final assembly and finishing

Switch Things Up

I would start by changing the palette to suit the room: warm rust, ochre, and cream create an autumnal look, while soft blue, gray, and white feel quieter. Choose six yarns of similar weight and follow the same round-by-round placement so the star retains its balanced bands. For a simpler version, I would work both panels in one color and let the five-point outline and textured stitches carry the design. You can also make the front striped and the back plain, which reduces the number of ends to weave in while keeping the same stitch counts on both sides.

If I wanted a bolder focal point, I would use a high-contrast color for the center and repeat it near the outer edge to tie the design together. For a softer effect, choose neighboring shades for adjacent rounds and reserve the darkest yarn for just a few stripes. Changing the width of a color band is easy: continue the same yarn for an additional scheduled round, then change colors later, without altering that round's shaping. Keep the total number of rounds identical for both panels, even if their colors differ, so their points and valleys line up.

I would also consider the practical feel of the pillow when choosing yarn: washable acrylic is convenient for a frequently used sofa cushion, while a soft cotton blend gives a different hand and may feel firmer. Make a small swatch with your chosen hook and stuffing to see whether the fabric is dense enough to keep fibers inside. If you prefer a plumper cushion, add stuffing gradually and spread it into each point before filling the center; a lighter fill gives a flatter decorative star. Whatever combination you choose, keep the five increases, five skipped valleys, and stitch counts as written on every round to preserve the shape.

Common Mistakes & How to Fix Them

βœ— The points drift out of alignment when their center stitches are missed. Place a marker in the middle stitch of each five-stitch point as you work, then check that all five markers radiate outward from the center.βœ— A star that curls or develops uneven valleys may have extra or missing skipped stitches. Skip exactly two stitches between the sides of neighboring points, and count five skips around the completed round.βœ— A panel that ripples can result from loose tension or misplaced increases. Check that each marked point receives exactly five single crochets, then compare the five sections for similar size before continuing.βœ— If the two panels do not line up, one may have a different round count or noticeably different tension. Count both outer edges and lay the panels together before joining; redo the final rounds if necessary.βœ— Loose color-change ends can work through the fabric after the pillow is filled. Weave each tail through several stitches on the inside, change direction, and gently tug the fabric to check that the end stays hidden.βœ— Empty or lumpy points make the finished star look uneven. Add small pieces of stuffing into each point before filling the center, then feel both sides and redistribute the filling before closing the opening.βœ— A tight joining edge can pull the points out of shape. Work the seam with relaxed tension and add the specified extra stitch at each tip; flatten the joined edge periodically to check for puckering.

Striped Star Pillow Crochet Pattern

Bring a burst of color to your sofa with a five-point crochet star pillow inspired by bands of golden yellow, blue, green, and cream. You will make two matching star panels from the center outward, then join and stuff them for a soft, sculptural finish. The repeating rounds make the color changes easy to plan and give you plenty of room to make the palette your own.

Intermediate 10-12 Hours

Materials Needed for Striped Star Pillow Crochet Pattern

β€” Main Fabric

  • 01
    Worsted-weight yarn in golden yellow, tan, pale blue, olive green, dark navy, and cream; approximately 900–1,100 meters total, with extra if your tension is loose or you add rounds
  • 02
    Polyester fiberfill or another washable cushion stuffing, enough to fill the finished star

β€” Tools Required

  • 01
    5 mm crochet hook, or a size that produces a firm fabric
  • 02
    Five removable stitch markers
  • 03
    Yarn needle
  • 04
    Scissors
  • 05
    Tape measure
  • 06
    Pins or clips for aligning the panels

Progress Tracker

0% Complete

β€” Star Panels: Make 2

Info:

Work in joined rounds without turning. The starting ch 1 does not count as a stitch. Join each round with a sl st to the first sc. Mark the middle sc of each five-sc point group as the new point stitch. Stitch counts exclude joining slip stitches and chains.

Round 1:

With golden yellow, make an MR, ch 1, and work 5 sc into the ring. Pull the ring closed and join. (5 sc)

Round 2:

Ch 1, work 3 sc in each st around; join. Mark the middle sc of each three-sc group. (15 sc)

Round 3:

Sl st into the first marked point, ch 1. Five times: work 5 sc in the marked point, then skip the next 2 sts. Join; mark the middle sc of each five-sc group. (25 sc)

Info:

For every remaining panel round, sl st along the previous round to the first marked point and start there. At each point work 5 sc in the marked stitch; work the stated number of sc down the first side, skip 2 sts at the valley, and work the same number of sc up the next side. Repeat around, join, and move each marker to the middle sc of its new five-sc point. Change color at the start of the specified round.

Round 4:

Change to tan. Ch 1; five times: 5 sc in marked point, 1 sc, skip 2 sts, 1 sc. Join. (35 sc)

Round 5:

Ch 1; five times: 5 sc in marked point, 2 sc, skip 2 sts, 2 sc. Join. (45 sc)

Round 6:

Change to pale blue. Ch 1; five times: 5 sc in marked point, 3 sc, skip 2 sts, 3 sc. Join. (55 sc)

Round 7:

Change to cream. Ch 1; five times: 5 sc in marked point, 4 sc, skip 2 sts, 4 sc. Join. (65 sc)

Round 8:

Change to olive green. Ch 1; five times: 5 sc in marked point, 5 sc, skip 2 sts, 5 sc. Join. (75 sc)

Round 9:

Ch 1; five times: 5 sc in marked point, 6 sc, skip 2 sts, 6 sc. Join. (85 sc)

Round 10:

Change to dark navy. Ch 1; five times: 5 sc in marked point, 7 sc, skip 2 sts, 7 sc. Join. (95 sc)

Round 11:

Ch 1; five times: 5 sc in marked point, 8 sc, skip 2 sts, 8 sc. Join. (105 sc)

Round 12:

Change to pale blue. Ch 1; five times: 5 sc in marked point, 9 sc, skip 2 sts, 9 sc. Join. (115 sc)

Round 13:

Change to golden yellow. Ch 1; five times: 5 sc in marked point, 10 sc, skip 2 sts, 10 sc. Join. (125 sc)

Round 14:

Change to pale blue. Ch 1; five times: 5 sc in marked point, 11 sc, skip 2 sts, 11 sc. Join. (135 sc)

Round 15:

Change to dark navy. Ch 1; five times: 5 sc in marked point, 12 sc, skip 2 sts, 12 sc. Join. (145 sc)

Round 16:

Ch 1; five times: 5 sc in marked point, 13 sc, skip 2 sts, 13 sc. Join. (155 sc)

Round 17:

Change to olive green. Ch 1; five times: 5 sc in marked point, 14 sc, skip 2 sts, 14 sc. Join. (165 sc)

Round 18:

Change to cream. Ch 1; five times: 5 sc in marked point, 15 sc, skip 2 sts, 15 sc. Join. (175 sc)

Round 19:

Change to dark navy. Ch 1; five times: 5 sc in marked point, 16 sc, skip 2 sts, 16 sc. Join. (185 sc)

Round 20:

Change to cream. Ch 1; five times: 5 sc in marked point, 17 sc, skip 2 sts, 17 sc. Join. (195 sc)

Finish panels:

Fasten off each panel, leaving the five point markers in place. Weave all yarn tails into the wrong side.

β€” Join and Finish

Align:

Place the panels wrong sides together, matching the five marked points and corresponding edge stitches. Clip or pin the edges together.

Join:

With cream, attach yarn through both layers at a valley. Ch 1 and sc through both corresponding edge stitches around, working 2 sc through the paired marked point stitches at each tip. Stop with an opening along one side large enough for stuffing.

Stuff:

Place small amounts of stuffing into each point, then fill the center evenly. Shape the pillow by hand without stretching the stitches apart.

Close:

Continue the joining sc through both layers across the opening. Join with a sl st to the first joining sc, fasten off, and weave the tail securely into the seam.

Assembly Instructions

  • Place the two finished star panels wrong sides together, aligning their marked points and matching edge stitches.
  • Pin or clip the panels together around the perimeter.
  • Join with cream single crochet through both layers, working two joining stitches at each marked tip and leaving an opening for stuffing.
  • Fill each point with small pieces of stuffing, then fill the center evenly.
  • Single crochet the opening closed and slip stitch to the first joining stitch.
  • Fasten off, weave in the final tail, and gently shape the five points.

Important Notes

  • πŸ’‘This is an original pattern inspired by the photographs; the images do not provide written pattern instructions.
  • πŸ’‘The estimated working time and yarn quantity vary with tension, yarn choice, and experience.
  • πŸ’‘Use a hook that creates a sufficiently dense fabric to contain the stuffing; adjust hook size if needed.
  • πŸ’‘The starting chain and joining slip stitch do not count toward the stitch totals.
  • πŸ’‘Move the five point markers to the center stitch of each new five-sc group on every round.
  • πŸ’‘Each skip of two stitches forms a valley and is not included in the stitch count.
  • πŸ’‘Make both panels with the same number of rounds and similar tension so their edges match.
  • πŸ’‘Follow the yarn and stuffing care labels when cleaning the finished pillow.

Your striped star pillow is ready to bring a little handmade color to a favorite corner. Before closing the final opening, check that each point has enough stuffing and that the two panels sit evenly together. Secure the seam, weave in every end, and gently shape the points with your fingers. Set your finished star on a sofa or chair and enjoy the texture and color you chose.
You ask,

we answer.

FAQs

How do I keep the five points lined up?

Mark the middle stitch of every point group as soon as you make it. On the next round, work the five-stitch increase into that marked stitch, then move the marker to the middle of the new group. Lay the panel flat occasionally and check that each point continues outward from the center.

Can I make the back in a single color?

Yes. Follow all the same rounds, increases, valley skips, and stitch counts, but use one yarn throughout the second panel. The two pieces should have the same number of rounds and similar tension so that their points and edge stitches match when you join them.

What if stuffing shows through the crochet?

Try a smaller hook or a yarn that produces a denser fabric, and make both panels with the same hook. Fill the pillow gradually rather than packing it so tightly that the stitches spread apart. A fabric lining is another option if your chosen yarn naturally makes an open fabric.

Should I block the star panels before joining them?

Blocking can help the points and valleys lie evenly, especially if the panels curl. Follow the yarn label, dampen or steam only as appropriate for the fiber, and shape both panels to match without overstretching them. Let them dry completely before joining and adding stuffing.

Can I make the pillow larger or smaller?

Yes. For a smaller pillow, stop both panels after the same earlier round. For a larger one, continue the established repeat, adding one single crochet to each side between the point and valley on every new round; each round adds 10 stitches overall. Extra rounds require more yarn and stuffing.

How should I wash the finished pillow?

Check the care instructions for both the yarn and the stuffing before washing. If both are machine washable, use the gentlest shared settings and protect the pillow in a laundry bag; otherwise, spot-clean as directed. Reshape the points and let the pillow dry thoroughly before using it again.