🧢 Beautiful ✨ Detailed πŸ’ Adorable

The Gourmet Beret Crochet Pattern

The Gourmet Beret Crochet Pattern
3.9β˜… Rating
5-7 Hours Time Needed
1.7K Made This
βœ‚οΈ

Intermediate Level

Ideal for those with basic knitting experience, featuring slightly more advanced stitches and techniques to expand your skills.

⏱️

Weekend Treat

Takes 5-7 hours, making it an enjoyable project to finish over a couple of days.

✨

Stylish Touch

An elegant detail to elevate any look, combining traditional techniques with contemporary design sensibilities.

About This The Gourmet Beret Crochet Pattern

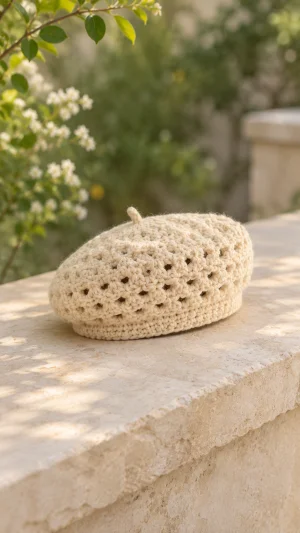
I designed this beret from the crown down, starting with a flat circle of double crochet increases before adding an openwork section of three-stitch groups. Single crochet rounds between the groups give the fabric definition, while decreases draw the wider crown into a comfortable band. The pictured inspiration has a creamy color, a gently slouching shape, a narrow band, and a small stem at the top. A soft worsted-weight yarn gives this version body while allowing the crown to drape; you’ll need to be comfortable working in the round, increasing, decreasing, and counting stitches.

The Gourmet Beret Crochet Pattern crochet pattern - detailed view of completed project

The pattern is written in US crochet terms for an adult-sized beret, with fit checked against your own head before finishing. Gauge and yarn choice affect both the crown’s drape and the band’s circumference, so make a swatch and adjust your hook if needed.

Why You'll Love This The Gourmet Beret Crochet Pattern

I love how this beret turns a few familiar stitches into an accessory with plenty of personality. The crown begins as a straightforward circle, so you can settle into the rhythm of the increases before moving on to the openwork. The textured section adds visual interest without requiring separate motifs, and the decreases bring everything together in one piece. I also like that the band gives you a natural place to check the fit before you fasten off: add a round for more depth, or adjust the hook if the circumference needs attention. A small crocheted stem supplies the finishing touch, and there are only a few ends to weave in. Wear the finished beret tilted to one side, pair it with a favorite coat, or make one as a thoughtful handmade gift.

The Gourmet Beret Crochet Pattern step 1 - construction progress The Gourmet Beret Crochet Pattern step 2 - assembly progress The Gourmet Beret Crochet Pattern step 3 - details and accessories The Gourmet Beret Crochet Pattern step 4 - final assembly and finishing

Switch Things Up

I love the creamy neutral look of the pictured beret, but a solid charcoal, deep red, or moss green would make the openwork equally easy to see. To introduce a second color, change yarn at the start of any complete round and carry neither color across the openings; leave tails long enough to weave securely into the denser stitches. You could give the band its own contrasting shade by changing color after the final decrease round, while keeping all 60 band stitches and the same number of rounds. For a subtle striped crown, alternate colors on the plain single crochet rounds and the openwork rounds, checking that each color change happens at a joined round. I would keep the stitch counts and increase placement unchanged so the circle still grows evenly.

Fiber choice can change the finished mood as much as color: a soft wool or wool blend adds spring, while a supple cotton blend can produce a lighter-feeling accessory with less elasticity. Whichever yarn you choose, make a gauge swatch and check the band against your head, because matching the yarn weight on the label alone does not guarantee the same fit. For a deeper band, work one or two extra single crochet rounds after Round 20, keeping 60 stitches in each round and allowing enough yarn for the addition. If you prefer a cleaner crown, omit the small stem and close the starting ring neatly; the crown shaping remains exactly the same. I would also experiment with styling rather than changing the stitch pattern: ease the crown toward one side for a relaxed look, or settle it evenly around the head for a more classic silhouette.

Common Mistakes & How to Fix Them

βœ— A wavy crown can mean extra increases have slipped in. Count the stitches at the end of each increase round and undo any extras; the total should rise by exactly 12 each time.βœ— A cupped crown can result from missing increases or crocheting too tightly. Check the round count and stitch total first, then try a larger hook if a correctly counted circle still pulls inward.βœ— Uneven openwork often comes from placing a group in the wrong stitch. Work each three-double-crochet group into one stitch and skip the next two; count 36 groups around.βœ— An accidental extra stitch at the join can make the pattern drift. Join to the first stitch, not the beginning chain, and use a marker to identify that stitch on every round.βœ— A tight or loose band may feel uncomfortable even when the crown looks right. Check your gauge and try the band on before fastening off; change hook size if its circumference needs adjustment.βœ— Visible gaps at the crown can occur when the magic ring is left loose. Pull its tail firmly to close the center, then weave the tail through several stitches and check that the opening stays shut.βœ— A distorted shape after blocking can come from stretching the band or crown too firmly. Reshape the damp beret gently and let it dry flat, checking that the band retains its comfortable fit.

The Gourmet Beret Crochet Pattern

Make a fabulously floppy crochet beret with a soft crown, openwork texture, and a neat band. I designed this top-down pattern with a simple sequence of increases, textured rounds, and decreases, followed by an optional little stem. Choose a soft worsted-weight yarn and check the band as you work for a painter-inspired accessory you can enjoy wearing every day.

Intermediate 5-7 Hours

Materials Needed for The Gourmet Beret Crochet Pattern

β€” Main Fabric

  • 01
    Approximately 200–250 yards of worsted-weight yarn in cream or a color of your choice; choose a soft wool, wool blend, or cotton blend.

β€” Tools Required

  • 01
    5 mm crochet hook, or size needed to obtain gauge
  • 02
    Stitch marker
  • 03
    Yarn needle
  • 04
    Scissors
  • 05
    Measuring tape

Progress Tracker

0% Complete

β€” Before You Begin :

Gauge :

12 sc and approximately 14 rows = 4 inches in single crochet. Make a swatch and change hook size if needed.

Fit :

The 60-stitch band measures approximately 20 inches around at the stated stitch gauge. Check it against your head before fastening off; the yarn’s stretch affects the fit.

Info :

Use US terms. Work in joined rounds without turning. Beginning chains do not count as stitches; join each round with a sl st to the first stitch, not the chain. Mark the first stitch of each round.

Info :

To sc2tog, insert the hook into the next st and pull up a loop, insert it into the following st and pull up a loop, then yarn over and draw through all three loops.

β€” Crown :

Round 1 :

Make a magic ring, ch 2, and work 12 dc into the ring. Pull the ring closed and join. (12 dc)

Round 2 :

Ch 2, 2 dc in each st around; join. (24 dc)

Round 3 :

Ch 2, rep (1 dc in next st, 2 dc in next st) 12 times; join. (36 dc)

Round 4 :

Ch 2, rep (1 dc in each of next 2 sts, 2 dc in next st) 12 times; join. (48 dc)

Round 5 :

Ch 2, rep (1 dc in each of next 3 sts, 2 dc in next st) 12 times; join. (60 dc)

Round 6 :

Ch 2, rep (1 dc in each of next 4 sts, 2 dc in next st) 12 times; join. (72 dc)

Round 7 :

Ch 2, rep (1 dc in each of next 5 sts, 2 dc in next st) 12 times; join. (84 dc)

Round 8 :

Ch 2, rep (1 dc in each of next 6 sts, 2 dc in next st) 12 times; join. (96 dc)

Round 9 :

Ch 2, rep (1 dc in each of next 7 sts, 2 dc in next st) 12 times; join. (108 dc)

β€” Openwork :

Round 10 :

Ch 2, rep (3 dc in next st, skip next 2 sts) 36 times; join. (36 groups; 108 dc)

Round 11 :

Ch 1, sc in each dc around; join. (108 sc)

Round 12 :

Ch 2, rep (3 dc in next st, skip next 2 sts) 36 times; join. (36 groups; 108 dc)

Round 13 :

Ch 1, sc in each dc around; join. (108 sc)

Round 14 :

Ch 2, rep (3 dc in next st, skip next 2 sts) 36 times; join. (36 groups; 108 dc)

Round 15 :

Ch 1, sc in each dc around; join. (108 sc)

β€” Shaping and Band :

Round 16 :

Ch 1, rep (1 sc in next st, sc2tog) 36 times; join. (72 sc)

Round 17 :

Ch 1, rep (1 sc in each of next 4 sts, sc2tog) 12 times; join. (60 sc)

Round 18 :

Ch 1, sc in each st around; join. (60 sc)

Round 19 :

Ch 1, sc in each st around; join. (60 sc)

Round 20 :

Ch 1, sc in each st around; join. (60 sc)

Fit check :

Try the band on before fastening off. If the circumference is uncomfortable, check your gauge and adjust the hook size as needed; a different hook size may require reworking earlier rounds.

Finish band :

Fasten off and leave a tail for weaving in.

β€” Optional Stem :

Stem :

With the right side of the crown facing, join yarn with a sl st near the closed center. Ch 5, sl st in the second ch from the hook and in each remaining ch, then sl st into the crown beside the join. Fasten off, leaving a tail for weaving in.

β€” Finishing :

Secure :

Weave in all yarn ends, including the starting-ring tail and both stem tails.

Shape :

If needed, gently dampen and reshape the crown according to the yarn label, then lay flat to dry without stretching the band.

Assembly Instructions

  • Join the optional stem at the center of the crown and secure it with a slip stitch as directed.
  • Weave the stem tails into the crown so the attachment is secure.
  • Weave in the remaining yarn ends, including the starting-ring tail and the band tail.
  • Gently reshape the beret and allow it to dry flat if blocking is needed.

Important Notes

  • πŸ’‘This is an original pattern inspired by the pictured beret; the reference images do not include written instructions.
  • πŸ’‘The time estimate is approximate and will vary with your pace and finishing choices.
  • πŸ’‘Beginning chains do not count as stitches; join to the first stitch of each round.
  • πŸ’‘Count the 36 openwork groups as well as the stitches to keep the pattern even.
  • πŸ’‘The band circumference depends on your gauge and the stretch of your yarn.
  • πŸ’‘Follow the yarn label for washing and drying.

I hope this Gourmet Beret brings a little handmade flair to your wardrobe. Once the band fits comfortably, weave in the ends and gently shape the crown so the openwork can shine. Add the little stem if you love that classic painter-hat detail, then try the beret at a few different angles to find your favorite way to wear it. Happy crocheting!
You ask,

we answer.

FAQs

How do I know whether the band will fit?

Measure around your head where you want the band to sit, then compare that measurement with the band before fastening off. At the stated gauge, 60 single crochet stitches measure approximately 20 inches before stretching. Yarn elasticity and your preferred snugness matter, so try the beret on and adjust your hook size if needed.

Can I use a different yarn?

Yes. Choose a worsted-weight yarn with a pleasant feel against your skin, and make a gauge swatch before starting. Wool blends tend to have more spring, while cotton blends can have less stretch and a different drape. You may need a different hook to match the stitch gauge, and yardage can vary with the yarn.

Why is my crown rippling or curling?

First count the stitches in your current round: each increase round should add 12 stitches. Extra stitches can cause rippling, while missed increases can make the crown cup. If the count is correct, your tension or yarn may be influencing the shape; try a gauge swatch with a different hook and compare the fabric.

How do I keep the openwork rounds even?

Each repeat uses three stitches from the previous round: work three double crochets into the first, then skip the next two. Mark the first stitch of the round and count 36 groups before joining. On the following single crochet round, work into each double crochet, giving you 108 stitches again.

Do I need to block the finished beret?

Blocking is optional, but gentle shaping can help the crown settle and open the textured stitches. Follow the care instructions for your yarn, dampen the beret if appropriate, and arrange it flat without pulling the band out of shape. Let it dry completely before trying it on again.

How should I care for my beret?

Use the washing instructions on your yarn label, since wool, cotton, and acrylic blends can have different care needs. Reshape the beret while damp and dry it flat to help protect its crown and band. Avoid hanging a wet beret, as the weight of the water can stretch the fabric.