๐Ÿงถ Beautiful โœจ Detailed ๐Ÿ’ Adorable

Tofi the Mushroom Amigurumi Pattern

Tofi the Mushroom Amigurumi Pattern
4.1โ˜… Rating
8-10 Hours Time Needed
3.1K Made This
โœ‚๏ธ

Intermediate Level

Ideal for those with basic knitting experience, featuring slightly more advanced stitches and techniques to expand your skills.

โฑ๏ธ

All-Day Adventure

Requires 8-10 hours, ideal for a full day of immersive knitting.

๐Ÿงธ

Cute Companion

An adorable friend to cherish, handcrafted with love to bring comfort and joy for years to come.

About This Tofi the Mushroom Amigurumi Pattern

Tofi the Mushroom is a delightful amigurumi character that brings woodland charm to your crochet collection. Standing at 25cm tall, this sweet mushroom friend features a golden yellow cap with white spots, a beige stem with an adorable face, and tiny green feet. The pattern includes instructions for creating his special mug accessory and decorative grass embroidery around the base for added charm.

Tofi the Mushroom Amigurumi Pattern crochet pattern - detailed view of completed project

This pattern uses super bulky yarn and a 6mm hook to create a cuddly, substantial toy that's perfect for display or play. The detailed face construction and assembly instructions ensure your Tofi will have plenty of personality.

Why You'll Love This Tofi the Mushroom Amigurumi Pattern

I absolutely love how Tofi combines classic amigurumi techniques with creative details that make him truly special. The way his little hands cradle the tiny mug is simply heartwarming, and the grass embroidery adds such a lovely woodland touch. What I find most rewarding is watching his personality emerge as you add each facial feature and see his sweet expression come to life.

Tofi the Mushroom Amigurumi Pattern step 1 - construction progress Tofi the Mushroom Amigurumi Pattern step 2 - assembly progress Tofi the Mushroom Amigurumi Pattern step 3 - details and accessories Tofi the Mushroom Amigurumi Pattern step 4 - final assembly and finishing

Switch Things Up

I love how versatile this Tofi pattern can be with just a few creative tweaks! You could easily change up the color scheme to create different mushroom varieties - imagine a red cap with white spots for a classic toadstool look, or go wild with purple and blue for a fantasy mushroom friend. The mug could become a different accessory entirely, perhaps a tiny flower pot or a small basket. I've seen crafters add little mushroom patches or flowers to the grass embroidery section for extra woodland charm.

Consider varying the spots too - fewer spots for a cleaner look, or different sized spots for more variety. You could even add small embroidered details like tiny hearts or stars on the cap. The face expression is another area where you can get creative - adjusting the eyebrow placement can change his whole personality from sweet and innocent to mischievous and playful. Some makers have added little accessories like a tiny scarf or hat for seasonal variations.

Common Mistakes & How to Fix Them

โœ— Not stuffing the beige stem section firmly enough before adding the face details, causing shape distortion โœ— Placing the amigurumi eyes incorrectly - they should align between rows 3-4 where eyebrows meet โœ— Overstuffing the brown section of the stem which should remain mostly empty for proper proportions โœ— Missing the back loop only rows which create important texture changes between color sections โœ— Sewing arms too high on the body preventing proper mug positioning and realistic holding pose

Tofi the Mushroom Amigurumi Pattern

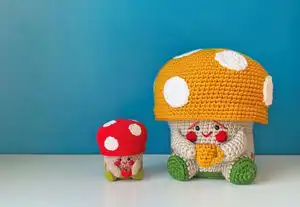
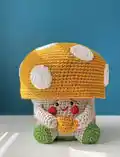
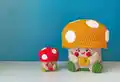
Create your own adorable Tofi the Mushroom with this comprehensive amigurumi pattern! This delightful character sits comfortably at 25cm tall and comes complete with his tiny mug, perfect for cozy moments. The pattern features detailed step-by-step instructions for crafting a charming mushroom friend with expressive eyes, rosy cheeks, and cute grass embroidery around the base. Using super bulky yarn and a 6mm hook, this project combines simple techniques with engaging details to bring this whimsical woodland character to life.

Intermediate 8-10 Hours

Materials Needed for Tofi the Mushroom Amigurumi Pattern

โ€” Main Fabric

  • 01
    Himalaya Everyday Big yarn in Green (70818), Beige (70804), Warm Brown (70825), Yellow (70806), White (70801), and Red (70815)
  • 02
    Super bulky weight 100% anti-pilling acrylic yarn in various quantities from 20g to 250g per color

โ€” Tools Required

  • 01
    Crochet hook size 6mm (10/0)
  • 02
    Amigurumi eyes 1cm (0.3 inch) in black
  • 03
    Yarn needle
  • 04
    Scissors
  • 05
    Stitch markers
  • 06
    Polyester stuffing
  • 07
    Small amount of black yarn for bee embroidery

Progress Tracker

0% Complete

โ€” MUG (Brown, Yellow) :

Round 1 :

Start with a magic circle, 6sc in the loop. [6st]

Round 2 :

1 sc, 1 inc. Repeat. [9st]

Info :

Change to YELLOW yarn

Round 3 :

[YELLOW] BACK LOOP this row, sc all around. [9st]

Round 4-7 :

Sc all around. [9st]

Round 8 :

1 sc, 1 dec. Repeat [6sc] Fasten off with a very long tail

Info :

Push brown part in as inside of cup, stuff lightly, weave tail through stitches and pull close, create handle with chain 9

โ€” SPOTS (x6) (White) :

Round 1 :

Start with a magic circle, 8sc in the loop. [8st]

Round 2 :

Increase each stitch. [16st]

Round 3 :

1 sc, 1 inc. Repeat. [24st]

Info :

Fasten off with long tail, make at least six spots

โ€” CHEEKS (x2) (Red) :

Info :

Chain 3, make bobble stitch of 3 columns to first stitch, yarn over multiple times to create rounded cheek shape

โ€” LEGS (x2) (Green, Beige) :

Round 1 :

Start with a magic circle, 6sc in the loop. [6st]

Round 2 :

Increase all stitches. [12st]

Round 3 :

1 sc, 1 inc. Repeat. [18st]

Round 4 :

BACK LOOP this row, sc all around. [18 st]

Info :

Change to BEIGE yarn

Round 5-7 :

[BEIGE] Sc all around. [18st]

Info :

Make two, stuff firmly

โ€” ARMS (x2) (Beige) :

Round 1 :

Start with a magic circle, 6sc in the loop. [6st]

Round 2 :

1 sc, 1 inc. Repeat. [9st]

Round 3-10 :

Sc all around. [9st]

Info :

Stuff firmly at hands, lightly towards arm, fold half and sc across top to close

โ€” MUSHROOM STEM (Green, Beige, Brown) :

Round 1 :

Start with a magic circle, 8sc in the loop. [8st]

Round 2 :

Increase all stitches. [16st]

Round 3 :

1 sc, 1 inc. Repeat. [24st]

Round 4 :

2 sc, 1 inc. Repeat. [32st]

Round 5 :

3 sc, 1 inc. Repeat. [40st]

Round 6 :

4 sc, 1 inc. Repeat. [48st]

Round 7 :

5 sc, 1 inc. Repeat. [56st]

Round 8 :

BACK LOOP this row, sc all around. [56st]

Round 9 :

Sc all around. [56st] Change to BEIGE yarn

Round 10-24 :

[BEIGE] 15 rows of sc all around. [56st] Change to BROWN yarn

Round 25 :

[BROWN] 6 sc, 1 inc. Repeat. [64st]

Round 26 :

7sc, 1 inc. Repeat. [72st]

Round 27 :

8sc, 1 inc. Repeat. [80st]

Round 28 :

19sc, 1 inc. Repeat. [84st]

โ€” MUSHROOM CAP (Yellow) :

Round 1 :

Start with a magic circle, 6sc in the loop. [6st]

Round 2 :

Increase all stitches. [12st]

Round 3 :

1 sc, 1 inc. Repeat. [18st]

Round 4 :

2 sc, 1 inc. Repeat. [24st]

Round 5 :

3 sc, 1 inc. Repeat. [30st]

Round 6 :

4 sc, 1 inc. Repeat. [36st]

Round 7 :

5 sc, 1 inc. Repeat. [42st]

Round 8 :

6 sc, 1 inc. Repeat. [48st]

Round 9 :

7 sc, 1 inc. Repeat. [54st]

Round 10 :

8 sc, 1 inc. Repeat. [60st]

Round 11 :

9 sc, 1 inc. Repeat. [66st]

Round 12 :

10 sc, 1 inc. Repeat. [72st]

Round 13 :

11 sc, 1 inc. Repeat. [78st]

Round 14 :

12 sc, 1 inc. Repeat. [84st]

Round 15-26 :

12 rows of sc all around. [84st]

Round 27 :

Sandwich this row and the last BROWN row of mushroom stem together, sc all around. [84st]

Round 28-30 :

Continue only with YELLOW, 3 rows of sc all around. [84st]

Assembly Instructions

  • Sew white spots evenly distributed around the yellow mushroom cap, starting from left side of face
  • Position and sew the mug between both hands so it stays upright and secure
  • Attach arms between top beige rows 4-7, positioned like /\ shape, 2 stitches past the cheeks
  • Sew legs at the bottom 9 rows starting from green back loop, ensuring Tofi can sit without falling forward
  • Add face details: place eyebrows between rows 1-2 and 3-4, eyes between rows 3-4, cheeks between rows 5-7
  • Embroider grass details using green back loop stitches, adding white flowers and brown cattail plants
  • Create optional bee embroidery with yellow and black yarn, adding white V-shaped wings

Important Notes

  • ๐Ÿ’กStuff the beige stem section very firmly but leave the brown section mostly empty for proper proportions
  • ๐Ÿ’กUse stitch markers to track your position, especially during color changes and assembly
  • ๐Ÿ’กPlace face elements carefully using the row guidelines to ensure proper expression and symmetry
  • ๐Ÿ’กThe mug handle is created with a chain 9 loop and shaped into a half-S curve for realistic appearance
  • ๐Ÿ’กBack loop only rows are crucial for creating texture changes between different colored sections

This charming Tofi the Mushroom pattern brings woodland magic to your crochet collection with his sweet expression and tiny mug companion. The detailed instructions guide you through creating not just an amigurumi, but a character full of personality and charm. From his spotted golden cap to the delicate grass embroidery at his base, every detail adds to his whimsical appeal. Perfect for display or as a treasured gift for mushroom and nature lovers! ๐Ÿ„โœจ

You ask,

we answer.

FAQs

What size will my finished Tofi be?

When using the recommended super bulky yarn and 6mm hook, Tofi will measure approximately 25cm (9.8 inches) in height.

Can I use different yarn weights for this pattern?

Yes, but your finished size will vary. The pattern mentions a mini version made with 2.5mm hook that creates a much smaller Tofi.

How do I create the bobble stitch for the cheeks?

Chain 3, then work multiple yarn over and pull through sequences in the same stitch to create a rounded bobble effect before pulling through all loops.

Is the grass embroidery necessary?

The grass embroidery is optional but adds lovely detail. You can customize it with your own creative touches or skip it entirely.

Why does the brown section need to stay mostly empty?

Leaving the brown section unstuffed helps maintain proper proportions and allows the mushroom cap to sit correctly on the stem.