๐Ÿงถ Beautiful โœจ Detailed ๐Ÿ’ Adorable

Wallace and Wanda Whale Amigurumi Pattern

Wallace and Wanda Whale Amigurumi Pattern
4.8โ˜… Rating
4-5 Hours Time Needed
2.5K Made This
โœ‚๏ธ

Intermediate Level

Ideal for those with basic knitting experience, featuring slightly more advanced stitches and techniques to expand your skills.

โฑ๏ธ

Weekend Treat

Takes 5-7 hours, making it an enjoyable project to finish over a couple of days.

๐Ÿ‹

Whimsical Buddy

Playful characters full of personality, designed to spark imagination and become cherished playtime favorites.

About This Wallace and Wanda Whale Amigurumi Pattern

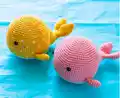
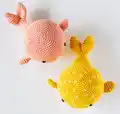
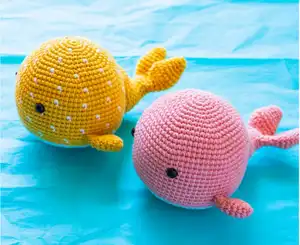
This Wallace and Wanda whale pattern brings the magic of the ocean right into your hands with its perfectly round, squishy body and charming details. The pattern offers flexibility to create either a solid-colored whale like sweet Wanda or add playful fair isle dots like cheerful Wallace. With clear round-by-round instructions and helpful assembly guidance, you'll craft an approximately 6.5-inch ocean friend that's perfect for little hands to hold and big hearts to love.

Wallace and Wanda Whale Amigurumi Pattern crochet pattern - detailed view of completed project

The whales work up beautifully in soft DK weight cotton yarn, creating a cuddly texture that's perfect for both display and play. The construction method from top to bottom makes shaping easy and ensures your whale has that perfect round, huggable silhouette.

Why You'll Love This Wallace and Wanda Whale Amigurumi Pattern

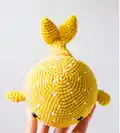
I absolutely love how these whales turn out so perfectly round and squishy, making them irresistible to squeeze! The fair isle color dot technique on Wallace adds such a fun challenge without being overwhelming, and seeing those little dots emerge as you crochet is incredibly satisfying. What really makes my heart happy is how the separate tail fins join together to create that gorgeous whale tail - it's such a clever construction method. These whales work up relatively quickly for their impressive size, and the white belly detail gives them such a professional, polished look. Plus, there's something magical about creating an ocean creature that brings smiles to everyone who sees it!

Wallace and Wanda Whale Amigurumi Pattern step 1 - construction progress Wallace and Wanda Whale Amigurumi Pattern step 2 - assembly progress Wallace and Wanda Whale Amigurumi Pattern step 3 - details and accessories Wallace and Wanda Whale Amigurumi Pattern step 4 - final assembly and finishing

Switch Things Up

I love experimenting with different color combinations for Wallace and Wanda - imagine a galaxy whale with deep purple and sparkly silver dots, or a sunset whale with coral and golden yellow! You could even add embroidered details like little eyelashes to give your whale extra personality.

For a nautical themed nursery, try making a family of whales in graduated sizes using different hook sizes. The pattern scales beautifully, and a mama whale with baby whales creates the sweetest scene.

If you want to add extra texture, consider working some rounds in the back loops only to create subtle ridges along the body, or add a small embroidered smile using black thread for even more character.

I've also made versions with a small felt bow attached to the top of the head for a girl whale, or a tiny captain's hat for a boy whale. These little accessories take just minutes but add so much charm!

For advanced crocheters, try incorporating a gradient effect by gradually changing shades from light to dark across the body. This works especially beautifully with blue tones to mimic the ocean depths.

Common Mistakes & How to Fix Them

โœ— Not using a stitch marker to track rounds can lead to losing your place especially during the fair isle color dot pattern sections โœ— Understuffing the body results in a floppy whale instead of a firm round shape so make sure to overstuff slightly before closing โœ— Forgetting to insert safety eyes between rounds 17 and 18 at the correct spacing of 13 stitches apart affects the whale's sweet expression โœ— Rushing the tail assembly without properly positioning and pinning first can result in a crooked tail that sits unevenly on the body โœ— Not carrying the yarn properly on the wrong side during fair isle work creates loose strands that can snag or show through โœ— Placing the side fins asymmetrically or not parallel to the eyes makes the whale look unbalanced from the front view

Wallace and Wanda Whale Amigurumi Pattern

Dive into the ocean of creativity with Wallace and Wanda, two absolutely adorable whale companions that will steal your heart! This charming pattern features a round, huggable body design with sweet little fins and a gorgeous tail that's perfect for cuddling. Wallace sports a delightful fair isle dot pattern in sunny tangerine and crisp white, while Wanda keeps it simple and sweet in solid colors. Whether you're crafting for a nursery, a ocean-loving friend, or just because these whales are irresistibly cute, this pattern delivers pure joy in every stitch.

Intermediate 4-5 Hours

Materials Needed for Wallace and Wanda Whale Amigurumi Pattern

โ€” Main Fabric

  • 01
    Rico creative Ricorumi DK cotton yarn in Tangerine (2 balls of 0.9 oz each)
  • 02
    Rico creative Ricorumi DK cotton yarn in White (1 ball of 0.9 oz)
  • 03
    Any DK or worsted weight cotton or acrylic yarn can be substituted

โ€” Tools Required

  • 01
    Crochet hook size 2.75mm (US size C)
  • 02
    Safety eyes 8mm
  • 03
    Tapestry needle
  • 04
    Stitch marker
  • 05
    Fiberfill stuffing
  • 06
    Scissors

Progress Tracker

0% Complete

โ€” Body :

Round 1 :

6 sc in MR [6]

Round 2 :

(inc in each st) x 6 [12]

Round 3 :

(sc, inc) x 6 [18]

Round 4 :

(2 sc, inc) x 6 [24]

Round 5 :

(3 sc, inc) x 6 [30]

Round 6 :

(4 sc, inc) x 6 [36]

Round 7 :

(5 sc, inc) x 6 [42]

Round 8 :

(6 sc, inc) x 6 [48]

Round 9 :

(7 sc, inc) x 6 [54]

Round 10 :

(8 sc, inc) x 6 [60]

Round 11 :

sc in each st around [60]

Round 12 :

(9 sc, inc) x 6 [66]

Round 13 :

(10 sc, inc) x 6 [72]

Round 14-24 :

sc in each st around [72]

Round 25 :

(10 sc, dec) x 6 [66]

Info :

Insert the safety eyes between rounds 17 and 18, approx 13 sts apart. Stuff and shape the body as you work. F/O color A (Tangerine) yarn, join and continue in color B (White) yarn.

Round 26 :

sc in each st through BLO around [66]

Round 27 :

(9 sc, dec) x 6 [60]

Round 28 :

(8 sc, dec) x 6 [54]

Round 29 :

(7 sc, dec) x 6 [48]

Round 30 :

(6 sc, dec) x 6 [42]

Round 31 :

(5 sc, dec) x 6 [36]

Round 32 :

(4 sc, dec) x 6 [30]

Round 33 :

(3 sc, dec) x 6 [24]

Round 34 :

(2 sc, dec) x 6 [18]

Round 35 :

(1 sc, dec) x 6 [12]

Round 36 :

(dec) x 6 [6]

Info :

Fill the body with fiberfill firmly. F/O and thread tail end of yarn onto a tapestry needle, insert the needle in and out of the remaining sts, pull tight to close, and weave in end.

โ€” Tail (Make 2 Fins First) :

Round 1 :

6 sc in MR [6]

Round 2 :

(sc, inc) x 3 [9]

Round 3 :

sc in each st around [9]

Round 4 :

(2 sc, inc) x 3 [12]

Round 5 :

(3 sc, inc) x 3 [15]

Round 6 :

(4 sc, inc) x 3 [18]

Round 7 :

sc in each st around [18]

Round 8 :

(4 sc, dec) x 3 [15]

Round 9 :

(3 sc, dec) x 3 [12]

Round 10 :

(1 sc, dec) x 4 [8]

Info :

For the first fin, you make, F/O and cut the yarn. For the second fin, stop after round 10 and follow the joining instructions.

Round 11 (Joining Round) :

Insert your hook into the st next to the closing st of the first fin and draw up a loop and yarn through as you would for any sc stitch. Mark this as the first sc of this round and continue crocheting around through both fins. You should have 16 sts by the end of this round.

Round 12 :

(2 sc, dec) around [12]

Round 13 :

sc in each st around [12]

Round 14 :

(inc) x 2; sc in next 9 sts; inc around [15]

Round 15 :

(1 sc, inc) x 2; sc in next 10 sts; inc around [18]

Round 16 :

(2 sc, inc) around [24]

Round 17 :

sc in each st around [24]

Round 18 :

(inc) x 6 times; sc in next 18 sts around [30]

Round 19 :

(inc, 2 sc) x 4; sc in next 4 sts; hdc in next 10 sts; sc in next 4 sts around [34]

Round 20 :

sc in next 20 sts; hdc in next 10 sts; sc in next 4 sts around [34]

Info :

Sl st into the next stitch and F/O leaving a long tail for sewing.

โ€” Side Fins (Make 2) :

Round 1 :

6 sc in MR [6]

Round 2 :

(1 sc; inc) x 3 [9]

Round 3 :

(2 sc, inc) x 3 [12]

Round 4 :

(3 sc, inc) x 3 [15]

Round 5 :

sc in each st around [15]

Round 6 :

(3 sc, dec) x 3 [12]

Round 7 :

(1 sc, dec) x 4 [8]

Round 8 :

sc in each st around [8]

Info :

Sl st into the next stitch and F/O leaving a long tail for sewing. Do not stuff the fins.

โ€” Fair Isle Color Dot Pattern (For Wallace Only) :

Round 1 :

sc in color A around

Round 2 :

sc in color A around

Round 3 :

(5 sc in color A, 1 sc in color B) around

Round 4 :

sc in color A around

Round 5 :

sc in color A around

Round 6 :

2 sc in color A, (1sc in color B, 5 sc in color A) around until last four stitches. End with 1sc in color B, 3 sc in color A.

Info :

Repeat Rounds 1โ€“6 for the color dot pattern.

Assembly Instructions

  • Position the side fins evenly on each side of the body on rounds 24 and 25 beginning from the top.
  • Before sewing the fins on, ensure that they are symmetrically placed and are parallel to the eyes for a balanced look.
  • Use fiberfill to stuff only the front of the tail, not the individual tail fins themselves.
  • Using the side fins as a guide, pin the tail centrally to the back of the body with the hdc side facing down as the bottom.
  • Sew the tail neatly and carefully to the body, ensuring it sits straight and centered.
  • Weave in all remaining yarn ends securely on the inside of the pieces.

Important Notes

  • ๐Ÿ’กUse a stitch marker to keep track of the beginning of each round especially during the fair isle pattern sections
  • ๐Ÿ’กWork in continuous rounds without joining with a slip stitch unless the pattern specifically directs you to
  • ๐Ÿ’กUse invisible decreases to avoid gaps in your stitches for a smoother finish
  • ๐Ÿ’กFirmly stuff as you work and overstuff slightly before finishing each section to achieve the perfect round shape
  • ๐Ÿ’กFor the fair isle dots carry the yarn on the wrong side instead of cutting and rejoining each time
  • ๐Ÿ’กPin all parts in place before sewing to ensure correct positioning and symmetry
  • ๐Ÿ’กThe size may vary depending on your tension and the specific yarn and hook size you use

Wallace and Wanda are here to bring ocean magic into your crafting world with their perfectly round, squishy bodies and sweet little smiles! This pattern gives you the freedom to create either a cheerful dotted whale or keep things simple with solid colors. The clever construction method from top to bottom makes shaping easy, while the separate tail fin technique creates that gorgeous whale tail we all love. Whether you're making them for a nursery, as a gift for an ocean lover, or simply because whales make everyone smile, these adorable amigurumi friends are sure to make a splash in your heart and home!

You ask,

we answer.

FAQs

Can I make the whale in different colors?

Absolutely! While the pattern uses tangerine and white, you can choose any colors you love. Popular choices include blue and white for a classic whale look, pink and white for a sweet baby whale, or even rainbow colors for a magical narwhal-inspired friend.

How do I carry the yarn for the fair isle dots without it showing through?

Work over the unused strand every few stitches with your working color, keeping the carried yarn on the inside of your work. Keep moderate tension on the carried strand so it doesn't show through but isn't too tight. The stuffing will also help hide any slight show-through.

What if my whale isn't perfectly round?

Make sure you're stuffing firmly and evenly as you work, especially in the increase rounds. Overstuff slightly before closing, as the stuffing compresses over time. You can also gently shape and massage the whale after stuffing to achieve a rounder appearance.

Can I make the whale larger or smaller?

Yes! Use a larger hook and bulkier yarn for a bigger whale, or a smaller hook and thinner yarn for a mini version. Just make sure to adjust your safety eye size accordingly and keep your tension consistent throughout.

Do I have to make the fair isle dots?

Not at all! The dots are optional. You can make a solid-colored whale like Wanda by simply working all rounds in your main color. The pattern works beautifully both ways, so choose whichever style you prefer.

How do I join the two tail fins together smoothly?

After completing the first fin, fasten off and set aside. Complete the second fin through round 10, then insert your hook into the stitch next to the closing of the first fin and continue working around both fins as directed. Using a stitch marker helps track where you started this joining round.