🧢 Beautiful ✨ Detailed πŸ’ Adorable

Winnie the Pooh Phone Pouch Crochet Pattern

Winnie the Pooh Phone Pouch Crochet Pattern
4.6β˜… Rating
8-10 Hours Time Needed
1.9K Made This
βœ‚οΈ

Intermediate Level

Ideal for those with basic knitting experience, featuring slightly more advanced stitches and techniques to expand your skills.

⏱️

All-Day Adventure

Requires 8-10 hours, ideal for a full day of immersive knitting.

🎁

Tiny Treasure

Small, sweet, and gift-worthy creations that fit perfectly in the palm of your hand with detailed charm.

About This Winnie the Pooh Phone Pouch Crochet Pattern

This Winnie the Pooh phone pouch pattern combines practical functionality with Disney charm. The crossbody design keeps your phone secure while the adorable Pooh character adds personality to any outfit. The pattern features a unique mesh-like stitch pattern for the pouch body and includes detailed instructions for creating Pooh's head, honey pot, and dangling legs. The finished pouch measures 17cm in length and 10cm in width, making it perfect for most smartphone sizes.

Winnie the Pooh Phone Pouch Crochet Pattern crochet pattern - detailed view of completed project

Featuring a button closure and adjustable shoulder strap, this pouch is both stylish and practical. The Pooh character is attached using fabric glue for a clean, professional finish.

Why You'll Love This Winnie the Pooh Phone Pouch Crochet Pattern

I absolutely love this pattern because it brings childhood nostalgia into everyday functionality. The combination of practical design and beloved character makes it a joy to create and even more delightful to use. The mesh texture adds visual interest while keeping the project engaging throughout the process.

Winnie the Pooh Phone Pouch Crochet Pattern step 1 - construction progress Winnie the Pooh Phone Pouch Crochet Pattern step 2 - assembly progress Winnie the Pooh Phone Pouch Crochet Pattern step 3 - details and accessories Winnie the Pooh Phone Pouch Crochet Pattern step 4 - final assembly and finishing

Switch Things Up

I love how this pattern perfectly balances function with whimsy - it's not just another phone case, it's a conversation starter that brings smiles wherever you go. The mesh texture on the pouch body adds such beautiful visual interest while keeping the stitching engaging throughout the project. What makes this pattern special to me is how the dangling legs create movement and personality, making Pooh feel alive even as a functional accessory.

The genius lies in the construction method - using fabric glue for the appliquΓ© elements ensures a professional finish that won't pull or distort over time. I've found that the button closure system is both secure and easy to use one-handed, which is perfect for busy daily life. The shoulder strap length is just right for crossbody wear, keeping your phone safe while leaving your hands free.

This pattern taught me that crochet accessories can be both practical and enchanting, proving that everyday items don't have to be boring to be functional.

Common Mistakes & How to Fix Them

βœ— Forgetting to place safety eyes before stuffing the head completely - mark eye placement early βœ— Skipping stitch markers when working in spirals leads to uneven shaping and miscounts βœ— Over-stuffing the honey pot makes it too rigid and difficult to attach properly βœ— Not checking button hole size before sewing - test fit the button first

Winnie the Pooh Phone Pouch Crochet Pattern

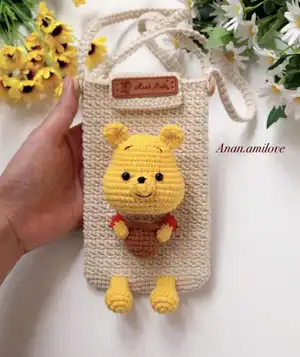
Create an adorable Winnie the Pooh phone pouch that combines functionality with charm. This delightful crossbody pouch features the beloved honey-loving bear with his signature honey pot, complete with dangling legs and a secure button closure. Perfect for keeping your phone safe while adding a touch of Disney magic to your daily adventures. The pattern includes detailed instructions for both the functional pouch and the charming Pooh appliquΓ©.

Intermediate 8-10 Hours

Materials Needed for Winnie the Pooh Phone Pouch Crochet Pattern

β€” Main Fabric

  • 01
    Sport weight yarn in yellow (for Pooh's head, legs, arms, and honey)
  • 02
    Sport weight yarn in brown (for honey pot)
  • 03
    Sport weight yarn in red (for Pooh's shirt)
  • 04
    Sport weight yarn in beige/cream (for phone pouch body)
  • 05
    YarnArt Jeans yarn recommended for durability and texture

β€” Tools Required

  • 01
    Crochet hook size 2.3mm
  • 02
    Two 6mm safety eyes
  • 03
    Two 15mm buttons
  • 04
    Polyester fiberfill stuffing
  • 05
    Stitch markers
  • 06
    Yarn needle
  • 07
    Scissors
  • 08
    Fabric glue

Progress Tracker

0% Complete

β€” Phone Pouch :

Foundation :

Make 24 ch, start in the second ch from hook

Round 1 :

22 sc, 3 sc in the last stitch, continue on the other side of the foundation chain, 21 sc, inc (48)

Round 2 :

inc, 21 sc, 3 inc, 21 sc, 2 inc (54)

Round 3 :

inc, 24 sc, 3 inc, 24 sc, 2 inc (60)

Round 4 :

60 sc (60)

Round 5 :

(1 ch, skip 1 stitch, 1 sc in the next stitch)*30 (60)

Round 6 :

(1 sc in the space of 1 ch, 1 sc in the next stitch)*30 (60)

Rounds 7-48 :

Continue alternating between round 5 pattern (odd rounds) and round 6 pattern (even rounds)
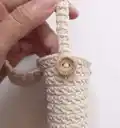
β€” Pouch Lid :

Round 1 :

Identify 14 stitches in middle of 46th round, work 14 sc, turn

Rounds 2-13 :

14 sc each round

Info :

Cut and weave yarn, sew button to lid

β€” Shoulder Strap :

Foundation :

Make 3 ch, start in second ch from hook: 2 sc, turn

All Rows :

2 sc, turn - repeat until strap measures 113 cm
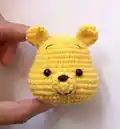
β€” Pooh Head :

Round 1 :

6 sc in magic ring (6)

Round 2 :

6 inc (12)

Round 3 :

(1 sc, inc)*6 (18)

Round 4 :

(inc, 2 sc)*6 (24)

Round 5 :

(3 sc, inc)*6 (30)

Round 6 :

1 sc, inc, (4 sc, inc)*5, 3 sc (36)

Rounds 7-10 :

36 sc (36)

Round 11 :

7 sc, 7 inc, 7 sc, 7 inc, 8 sc (50)

Rounds 12-15 :

50 sc (50)

Round 16 :

7 sc, dec, 10 sc, dec, 7 sc, dec, 10 sc, dec, 8 sc (46)

Round 17 :

7 sc, dec, 8 sc, dec, 7 sc, (dec, 8 sc)*2 (42)

Round 18 :

7 sc, (dec, 2 sc)*2, dec, 7 sc, (dec, 2 sc)*2, dec, 8 sc (36)

Round 19 :

(dec, 4 sc)*6 (30)

Round 20 :

(3 sc, dec)*6 (24)

Info :

Stuff the head

Round 21 :

12 dec (12)

Round 22 :

6 dec, slst (6)

Info :

Place safety eyes between rows 11-12 with 6 stitches between them

β€” Ears (Make 2) :

Round 1 :

6 sc in magic ring (6)

Round 2 :

6 inc (12)

Rounds 3-4 :

12 sc (12)

Round 5 :

(1 sc, dec)*4, slst (8)

Info :

Don't stuff, flatten and attach between rows 3-7

β€” Muzzle :

Round 1 :

6 sc in magic ring (6)

Round 2 :

6 inc (12)

Round 3 :

12 sc, slst (12)

Info :

Embroider nose and mouth, attach between rows 11-16

β€” Legs (Make 2) :

Round 1 :

6 sc in magic ring (6)

Round 2 :

6 inc (12)

Round 3 :

(2 sc, inc)*4 (16)

Rounds 4-5 :

16 sc (16)

Round 6 :

(2 sc, dec)*4 (12)

Round 7 :

(2 sc, dec)*3 (9)

Rounds 8-9 :

9 sc (9)

Info :

Stuff up to 5th row, attach at row 4 of pouch

β€” Arms (Make 2) :

Round 1 :

7 sc in magic ring (7)

Rounds 2-4 :

7 sc (7)

Rounds 5-7 :

Change to red, 7 sc (7)

Info :

Don't stuff arms

β€” Honey Pot :

Honey Top :

Yellow: 7 sc in magic ring, 7 inc (14)

Jar Base Round 1 :

Brown: 8 sc in magic ring (8)

Jar Round 2 :

8 inc (16)

Jar Round 3 :

(3 sc, inc)*4 (20)

Jar Rounds 4-6 :

20 sc (20)

Jar Round 5 :

(3 sc, dec)*4 (16)

Jar Round 6 :

(dec, 6 sc)*2 (14)

Jar Round 7 :

Work through front loop of honey and back loop of jar: 14 inc (28)

Assembly Instructions

  • Sew the legs to the phone pouch at row 4 for proper positioning
  • Use fabric glue to attach the honey pot to the center of the pouch
  • Sew the arms to connect both the pouch and honey pot for secure attachment
  • Use fabric glue to attach Pooh's head to the top of the pouch
  • Sew the shoulder strap securely to both sides of the pouch
  • Attach the button to the lid and ensure proper closure alignment

Important Notes

  • πŸ’‘Use stitch markers to track rounds, especially during color changes
  • πŸ’‘Stuff head and honey pot firmly but not too tightly for best shape
  • πŸ’‘Place safety eyes before completing head stuffing for easier installation
  • πŸ’‘Test button fit before sewing to ensure proper closure function
  • πŸ’‘Use fabric glue sparingly for clean, professional-looking attachment

This adorable Winnie the Pooh phone pouch brings childhood magic into everyday practicality. With its charming dangling legs and secure crossbody design, it's perfect for Disney lovers who want to carry a piece of the Hundred Acre Wood wherever they go. The combination of functional design and beloved character detail makes this pattern a treasure to create and a joy to use daily.

You ask,

we answer.

FAQs

What size phone will fit in this pouch?

The finished pouch measures 17cm x 10cm, which fits most standard smartphones including iPhone and Samsung Galaxy models.

Can I use different yarn weights for this pattern?

The pattern is designed for sport weight yarn. Using different weights will change the finished size and may affect the overall proportions.

How do I achieve the mesh-like texture shown in the pattern?

The texture comes from alternating between chain spaces (odd rounds) and single crochet stitches (even rounds) as detailed in rounds 5 and 6.

Is fabric glue necessary or can I sew everything?

While fabric glue provides a cleaner finish, you can sew all pieces if preferred. Just ensure secure attachment for durability.