๐Ÿงถ Beautiful โœจ Detailed ๐Ÿ’ Adorable

Adorable Christmas Snowman Amigurumi Pattern

Adorable Christmas Snowman Amigurumi Pattern
4.5โ˜… Rating
6-8 Hours Time Needed
3.8K Made This
โœ‚๏ธ

Intermediate Level

Ideal for those with basic knitting experience, featuring slightly more advanced stitches and techniques to expand your skills.

โฑ๏ธ

Weekend Treat

Takes 5-7 hours, making it an enjoyable project to finish over a couple of days.

โ„๏ธ

Winter Warmth

Cozy layers for chilly nights that combine practical warmth with beautiful, intricate stitch patterns.

About This Adorable Christmas Snowman Amigurumi Pattern

This enchanting snowman pattern brings the magic of winter indoors with its classic design and festive details. The pattern creates a perfectly proportioned snowman with a traditional three-section body, complete with charming accessories that capture the spirit of the season. Every stitch is carefully planned to ensure your snowman has the perfect shape and adorable personality that will make everyone smile.

Adorable Christmas Snowman Amigurumi Pattern crochet pattern - detailed view of completed project

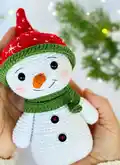
The finished snowman stands approximately 15cm tall, making it the perfect size for holiday displays, gift-giving, or as a delightful addition to your seasonal decorations. The combination of white, green, and red colors creates a classic Christmas look that never goes out of style.

Why You'll Love This Adorable Christmas Snowman Amigurumi Pattern

I absolutely love how this pattern captures the pure joy and nostalgia of building snowmen as a child. The way the pointed red hat sits perfectly atop the round head, and how the green scarf wraps snugly around the neck, creates such an authentic winter character. What makes me smile most is seeing the personality come alive when you add those sparkling safety eyes and the cheerful embroidered smile - it's like watching magic happen with every stitch!

Adorable Christmas Snowman Amigurumi Pattern step 1 - construction progress Adorable Christmas Snowman Amigurumi Pattern step 2 - assembly progress Adorable Christmas Snowman Amigurumi Pattern step 3 - details and accessories Adorable Christmas Snowman Amigurumi Pattern step 4 - final assembly and finishing

Switch Things Up

I love how versatile this snowman pattern can be with just a few creative tweaks! Sometimes I'll swap out the traditional red hat for a cozy blue one, or add a tiny knitted scarf in rainbow colors for a more whimsical look. What really excites me is experimenting with different textures - I've made versions using fuzzy yarn for extra coziness, or even added metallic thread to the hat for some holiday sparkle.

The beauty of this pattern is that you can easily customize the facial expression too. I've created serious-looking snowmen with straight-line mouths, and others with big grins using a wider curved smile. Adding small embroidered details like rosy cheeks with pink thread, or tiny eyebrows for extra personality, makes each snowman unique. Sometimes I'll even create a whole family by adjusting the hook size - using a smaller hook creates adorable mini snowmen perfect for ornaments!

Common Mistakes & How to Fix Them

โœ— Not stuffing firmly enough during construction can result in a floppy snowman that won't hold its shape properly โœ— Placing safety eyes too close together or too far apart will affect the snowman's charming facial expression โœ— Skipping the back loop only rounds can cause the hat brim to not sit flat against the head โœ— Forgetting to secure yarn ends properly may cause seams to come apart over time with handling

Adorable Christmas Snowman Amigurumi Pattern

Create your own charming Christmas companion with this delightful snowman amigurumi pattern! This festive little friend features a classic white body, cozy green scarf, and adorable red pointed hat decorated with white embroidered snowflakes. Perfect for holiday decorating, gift-giving, or adding a touch of winter magic to your home. The pattern includes detailed instructions for creating the snowman's cheerful facial features, including safety eyes and an orange carrot nose that brings this winter character to life.

Intermediate 6-8 Hours

Materials Needed for Adorable Christmas Snowman Amigurumi Pattern

โ€” Main Fabric

  • 01
    White yarn suitable for 1.80-2.00mm hook (body and head)
  • 02
    Green yarn for scarf and hat brim
  • 03
    Red yarn for pointed hat
  • 04
    Orange yarn for carrot nose
  • 05
    YarnArt Jeans brand yarn recommended for best results

โ€” Tools Required

  • 01
    Crochet hook size 1.80-2.00mm
  • 02
    8mm safety eyes
  • 03
    White and black sewing thread
  • 04
    2 small decorative buttons
  • 05
    Tapestry needle
  • 06
    Fiberfill stuffing
  • 07
    Scissors
  • 08
    Stitch markers

Progress Tracker

0% Complete

โ€” Snowman Body :

Round 1 :

15 ch, starting from 2nd ch inc, 12 sc, 3 sc in 1 stitch (work on the other side of the chain) 13 sc. (30)

Round 2 :

2 inc, 12 sc, 3 inc, 12 sc, inc. (36)

Round 3 :

(sc, inc) 2 times, 13 sc, (inc, sc) 3 times, 12 sc, inc. (42)

Round 4 :

(2 sc, inc) 2 times, 14 sc, (inc, 2 sc) 3 times,12 sc, inc. (48)

Round 5 :

BLO sc around. (48)

Round 6 :

sc around. (48)

Round 7 :

(7 sc, inc) 6 times. (54)

Round 8-14 :

sc around. (54)

Round 15 :

(7 sc, dec) 6 times. (48)

Round 16-17 :

sc around. (48)

Round 18 :

(6 sc,dec) 6 times. (42)

Round 19-20 :

sc around. (42)

Round 21 :

(5 sc, dec) 6 times. (36)

Round 22-23 :

sc around. (36)

Round 24 :

(4 sc, dec) 6 times. (30)

Round 25-26 :

sc around. (30)

Round 27 :

(3 sc, dec) 6 times. (24)

Round 28-29 :

sc around. (24)

Round 30 :

(3sc, inc) 6 times. (30)

Round 31 :

(4 sc, inc) 6 times.(36)

Round 32 :

(5 sc, inc) 6 times.(42)

Round 33 :

(6 sc,inc) 6 times. (48)

Round 34 :

(7 sc,inc) 6 times. (54)

Round 35 :

(8 sc,inc) 6 times. (60)

Round 36-48 :

sc around. (60)

Round 49 :

(8 sc,dec) 6 times. (54)

Round 50 :

(7 sc,dec) 6 times. (48)

Round 51 :

(6 sc,dec) 6 times.(42)

Round 52 :

(5 sc,dec) 6 times.(36)

Round 53 :

(4 sc,dec) 6 times. (30)

Round 54 :

(3 sc,dec) 6 times. (24)

Round 55 :

(2 sc,dec) 6 times. (18)

Round 56 :

(sc,dec) 6 times. (12)

Info :

Attach the eyes to the 43rd and 44th rows, 9 stitches apart

โ€” Nose :

Round 1 :

4 sc into a magic ring. (4)

Round 2 :

(sc,inc) 2 times. (6)

Round 3 :

sc around. (6)

Round 4 :

(2 sc,inc) 2 times. (8)

Round 5 :

sc around. (8)

Round 6 :

(3 sc,inc) 2 times. (10)

Round 7 :

sc around. (10)

โ€” Arms :

Round 1 :

6 sc into a magic ring. (6)

Round 2 :

(inc) 6 times. (12)

Round 3 :

(sc,inc) 6 times. (18)

Round 4 :

BLO sc around. (18)

Round 5-7 :

sc around. (18)

Round 8 :

(4 sc,dec) 3 times. (15)

Round 9-11 :

sc around. (15)

Round 12 :

(3 sc,dec) (12)

Info :

Crochet the two edges together at the same time

โ€” Scarf :

Instructions :

98 ch, starting from 3rd ch 96 dc

โ€” Hat :

Round 1 :

6 sc into a magic ring. (6)

Round 2 :

5 sc, inc. (7)

Round 3 :

6 sc, inc. (8)

Round 4 :

7 sc, inc. (9)

Round 5 :

8 sc, inc. (10)

Round 6 :

9 sc, inc. (11)

Round 7 :

10 sc, inc. (12)

Round 8 :

11 sc, inc. (13)

Round 9 :

12 sc, inc. (14)

Round 10 :

13 sc, inc. (15)

Round 11 :

14 sc,inc. (16)

Round 12 :

15 sc, inc. (17)

Round 13 :

16 sc, inc. (18)

Round 14 :

(2 sc, inc) 6 times. (24)

Round 15 :

(3sc, inc) 6 times. (30)

Round 16 :

(4 sc, inc) 6 times.(36)

Round 17 :

(5 sc, inc) 6 times.(42)

Round 18 :

(6 sc,inc) 6 times. (48)

Round 19 :

(7 sc,inc) 6 times. (54)

Round 20 :

(8 sc,inc) 6 times. (60)

Round 21 :

(9 sc, inc) 6 times.(66)

Round 22-30 :

sc around. (66)

Info :

Change color to green

Round 31-32 :

sc around. (66)

Round 33 :

BLO Go back, 2 chains, 66 dc

Assembly Instructions

  • Attach safety eyes to the head between rounds 43-44, spacing them 9 stitches apart for proper facial proportions
  • Sew the orange carrot nose securely to the center of the face between the eyes using matching thread
  • Embroider the mouth using black thread, creating a gentle curved smile below the nose
  • Stuff the body firmly but not too tightly, ensuring the snowman maintains its rounded shape
  • Attach arms to the sides of the body using strong stitches, positioning them symmetrically
  • Wrap the green scarf around the neck area where the head meets the body, securing with hidden stitches
  • Place the completed hat on the head and sew small decorative buttons to the front of the body for authentic snowman details

Important Notes

  • ๐Ÿ’กUse stitch markers to keep track of rounds, especially when changing colors between red and green sections
  • ๐Ÿ’กStuff each section as you work to maintain proper shape and prevent difficulty accessing narrow openings later
  • ๐Ÿ’กWhen embroidering snowflake details on the hat, use white thread and keep stitches small and delicate
  • ๐Ÿ’กEnsure safety eyes are securely fastened, especially if making this for children under 3 years old
  • ๐Ÿ’กThe BLO (back loops only) rounds are crucial for creating proper definition between body sections

This delightful snowman amigurumi pattern brings the cozy magic of winter holidays right into your hands! With his cheerful smile, festive red hat adorned with tiny white snowflakes, and classic green scarf, he's ready to spread holiday joy wherever he goes. The pattern combines traditional amigurumi techniques with charming seasonal details that make this little fellow absolutely irresistible. Perfect for gifting, decorating, or simply enjoying the meditative process of creating something beautiful for the winter season.

You ask,

we answer.

FAQs

What size will my finished snowman be?

The completed snowman will be approximately 15cm (about 6 inches) tall when using the recommended hook size and yarn weight.

Can I use different colors for the hat and scarf?

Absolutely! While red and green create a classic Christmas look, you can customize the colors to match your decor or personal preferences.

Are safety eyes necessary, or can I embroider them?

Safety eyes give the best professional look, but you can certainly embroider the eyes with black thread if making for very young children or if you prefer an all-fabric construction.

How do I make the hat stay upright and pointed?

The graduated increases in the hat pattern create the natural pointed shape. Light stuffing in the tip helps maintain the upright position.

What if my snowman seems too soft or floppy?

Add more fiberfill stuffing, making sure to pack it firmly but not so tight that it distorts the shape. Proper stuffing is key to a well-shaped snowman.