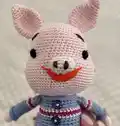
Create the sweetest little pig companion with this charming amigurumi pattern! This delightful pink pig features a cheerful smile, adorable outfit with blue sweater and magenta pants, and comes complete with a cute corn basket accessory. Perfect for gifting or adding to your collection, this lovable character brings farmyard charm to any space. The pattern includes detailed instructions for creating the pig's expressive face, cozy clothing, and charming corn basket with individual corn cobs.
Progress Tracker
0% Complete
— Head and Torso :
Ring 1 :
work a magic ring with a color thread Make 8 sc into a 1ch ring pull the rope tightly carry the looper in each ring
Ring 2 :
ring increments inside each sc (16 sc)
Ring 3 :
8 times (sc into next sc, inc next sc) 24 sc
Ring 4 :
8 times (sc into next 2sc inc next) 32 sc
Ring 5 :
8 times (sc in the next 3 sc in the next) 40 sc
Ring 6 :
sc into next sc inc next sc (7 times)
Ring 7 :
6 times (sc in each of the next 7 scs, inc in the next) 54 sc
Ring 8-17 :
(10 loops) sc 54 sc in each sc along the ring
Ring 18 :
sc in each of the next 14 scs (inc 12 sc in each of the next 6 scs) sc in each of the next 14 scs (inc 12 sc in each of the next 6 scs) sc on each of the remaining 13 scs (66 sc)
Ring 19-27 :
(9 loops) sc in each sc 66 grains sc
Ring 28 :
5 times (sc in each of the next 11 sc in the next dec) 61 sc
Ring 29 :
5 times (sc in every 10 sc in the next dec)
Ring 30 :
5 times (dec the next sc into each 9 sc)
Ring 31 :
5 times (sc in each 8 sc in the next dec)
Ring 32 :
8 times (sc in each 4 sc dec the next)
Ring 33 :
5 times (dec the next sc into each 5sc)
Info :
start filling the head fill as you progress
Info :
place the safe eyes between rings 15-16 with 14 scoops between them
Ring 34-35 :
last two loops sc into each sc finish 32 sc fo finish leave a long thread to sew
— Torso :
Round 1 :
Make 8 sc into the loop do not connect, pull the rope tightly
Round 2 :
Inc (16 sc) in each sc
Round 3 :
sc into the next sc in the next sc in the next 4 sc in the next 4 scs (inc each of the next 4 scs) in the next 4 sc in the next sc in the next 22 sc
Round 4-6 :
(3 loops) sc 22 sc in each sc along the ring
Round 7 :
sc in each of the next 7 sc (4 times sc dec) sc in each of the next 7 scs 18 sc
Round 8 :
sc into next 5 scs (4 times sc dec) sc in each of next 5 scs switch to color c leave out color b
Round 9 :
Work back loops only sc 14 sc in each sc across the loop
Round 10 :
sc in each of the next 3 scs inc the next sc in each of the next 6 sc inc in the next sc in each of the next 3 scs 16 sc in each
Info :
start filling the leg fill as it progresses
Round 11 :
sc into each sc along the ring (16 sc)
Round 12 :
2 times (sc in each of the next 7 scs, inc in the next) 18 sc in the loop
Round 13-14 :
(2 loops) sc into each sc along the ring (18 sc)
Round 15 :
sc in each of the next 4 scs incl the next sc in each of the next 8 scs incl the next sc in the next sc in the next sc in each of the next 4 scs (20 sc)
Round 16-17 :
(2 loops) sc into each sc along the ring (20 sc)
Round 18 :
sc in next 14 sc in next do not try to finish fill the leg tightly
— Arms :
Ring 1 :
work 1 magic ring with the main color thread make 6 sc into the ring pull the rope tightly
Ring 2-4 :
times (sc into next 2 sc, inc next one) 10 sc
Ring 3-7 :
(5 loops) sc in each sc 10 sc in
Ring 8 :
2 times (sc into next 5 sc, inc next one) 12 sc
Ring 9 :
work only back loops sc into each sc (12 sc)
Ring 10-15 :
(6 loops) sc into each sc 12 sc switch to d color sc into each sc
Ring 16-17 :
(12 sc) switch to color C sc into each sc along the 17-ring (12 sc) Switch to color D sc into each sc through the 18-ring in the ring (12 sc) Switch to color A
Ring 19-20 :
(2 loops) sc into each sc across the ring (12 sc)
Info :
straighten the last loop crochet in both layers make 6 sc finish fo finish leave a long thread end to sew the sleeves do not fill
— Tail :
Ring 1 :
work 1 magic ring with the main color thread make 6 sc into the ring pull the rope tightly
Ring 2 :
sc into each sc along the 2-ring of the ring (6 sc)
Ring 3 :
2 times sc inc (8 sc)
Ring 4 :
sc into each sc through the 4-ring (8 sc)
Ring 5 :
3 times (2 sc in next 2 sc in next) 12 sc in
Ring 6 :
sc into each sc (12 sc)
Ring 7 :
3 times (sc in the next 3 sc in the next) 15 sc
Ring 8 :
sc into each sc (15 sc)
Ring 9 :
3 times (sc in next 3 sc in inc next) 18 sc
Ring 10 :
sc into each sc (18 sc)
Ring 11 :
3 times (sc in the next 3 sc in the next dec) 15 sc
Ring 12 :
3 times (sc in the next 3 sc in the next dec) 12 sc
Ring 13-14 :
(2 loops) sc in each sc 12 sc
Info :
don't fill the tail too tight straighten the last loop dip both layers of the crochet do 6sc fo finish leave a long thread end to sew
— Nose :
Ring 1 :
5 ch make 2 sc in the 2nd ch from the crochet sc in the next 3 sc in the next sc 2 sc in the next sc work in the unworked loops of ch (7 sc)
Ring 2 :
sc in first st in 2 sc in each of next 4 sc in next sc in next 4 sc in 2 sc in last sc (12 sc)
Ring 3 :
4 times (sc in next 3 sc in inc next) 16 sc
Info :
Leave the long thread end to sew Finish the sc into each sc (16 sc) fo through the 4-ring in the ringof the crochet do 6sc fo finish leave a long thread end to sew
— Legs :
Ring 1 :
make 8 sc into the ring do not join together pull the rope tightly
Ring 2 :
inc (16 sc) inside each sc
Ring 3 :
sc into next sc in next sc in next 4 scs (inc each of next 4 scs) sc into next 4 scs inc next sc in next 22 sc
Ring 4-6 :
(3 rings) sc 22 sc in each sc along the ring
Ring 7 :
sc in each of next 7 sc (4 times sc dec) sc in each of next 7 scs 18 sc
Ring 8 :
sc into next 5 scs (4 times sc dec) sc in each of next 5 scs switch to color c leave out color b
Ring 9 :
work only back loops sc 14 sc in each sc across the ring
Ring 10 :
sc in each of the next 3scs inc the next sc in each of the next 6sc include the next sc in each of the next 3 scs 16 sc in each
Info :
start filling the leg fill as it progresses
Ring 11 :
sc into each sc (16 sc)
Ring 12 :
2 times (sc in each of the next 7 scs, inc in the next) 18 sc in the loop
Ring 13-14 :
(2 loops) sc into each sc along the ring (18 sc)
Ring 15 :
sc in each of the next 4 scs inc the next sc in each of the next 8 sc in the next sc in the next sc in each of the next 4 scs (20 sc)
Ring 16-17 :
(2 loops) sc into each sc along the ring (20 sc)
Ring 18 :
sc in next 14 sc in next do not try to finish fill the leg tightly
Ring 19 :
sc in each of the next 6 scs, do not try to sc left sc
— Ears :
Round 1 :
Work a magic ring with the main color yarn, make 6 sc into the ring, pull the rope tightly, do not connect
Round 2 :
3 times sc inc (sc in 2 sc inc next to inc) 9 sc in each loop move the loop marker
Round 3 :
sc in each sc along the length of the ring 9 sc in each sc
Round 4 :
3 times sc inc (sc in each 2 sc in the next
Round 6 :
6 times (sc in next 2 sc in inc in next sc) 24 sc
Round 7 :
6 times (sc in each of the next 3 sc in next sc inc) 30 sc
Round 8-11 :
(4 loops) sc in each sc along the ring) 30 sc
Round 12 :
6 times sc dec (3 sc into each of the next dec) 24 sc
Round 13 :
6 times (sc into 2 sc in the next dec) 18 sc
Round 14 :
6 times (sc into 2sc dec the next) 12 sc
Round 15 :
sc into each sc along the ring, 12 sc
Round 16 :
2 times (5sc each sc dec the next) 10 sc
Round 17 :
10 sc in each sc along the ring
Info :
Finish FO leave a long thread end to sew
— Basket :
Ring 6 :
8 times (sc in each of next sc, inc next sc) (48 sc)
Ring 7-11 :
(5 loops) sc in each sc along the ring (48 sc)
Ring 12 :
Make 9 ch. Leave 4 sc in between Immerse in 5th sc in each of next 19 sc, then make 9 ch in between Leave 4 sc in between Immerse in 5th sc in next sc in next 19 sc (48 sc)
Ring 13 :
Fill the top of 9 ch with 9 sc. (9 times) skip one sc. 2 hdc into 1sc 9 sc on top of 9 ch. (9 times) Skip 2 hdc 1 sc into 1 sc.
— Corn :
Ring 1 :
Work 1 magic ring with f color thread Make 12 sc into the ring Do not join, pull the rope tightly.
Ring 2 :
make 1 hdc inside each sc. (12 hdc)
Ring 3-7 :
(5 rings) hdc (12 hdc) into each hdc through the ring
Ring 8 :
hdc dec (next hdc, dec hdc to each remaining hdc) (11 hdc)
Ring 9 :
next hdc to each of the remaining hdc hdc to dec hdc (10 hdc)
Ring 10 :
next hdcyi dec to each of the remaining hdc hdc hdc (9 hdc)
Ring 11 :
each hdc to hdc (9 hdc)
Ring 12 :
1hdc dec (8 hdc)
Info :
Fill the corn and keep filling as it progresses.
Ring 13 :
1 hdc dec (7 hdc)
Ring 14 :
1hdc dec (6 hdc)
Info :
Finish clean the thread ends.
— Leaves :
Info :
Make 10 ch with thread E color. Make 1 hdc in each ring of 10 ch. Make 10 ch. Make 1 hdc in each ring of ch. Finish fo. leave a long thread end to sew.
This adorable Pinky Pig pattern brings countryside charm to your amigurumi collection with its sweet smile and cozy outfit. The detailed instructions guide you through creating not just the pig, but also a charming corn basket filled with individual corn cobs. Perfect for both beginners looking to advance their skills and experienced crafters wanting a delightful project. This lovable character will bring joy to anyone who receives it! 🧶 Happy crocheting! 🐷✨