๐Ÿงถ Beautiful โœจ Detailed ๐Ÿ’ Adorable

Adorable Rabbit Amigurumi Pattern

Adorable Rabbit Amigurumi Pattern
4.1โ˜… Rating
4-6 Hours Time Needed
2.1K Made This
โœ‚๏ธ

Intermediate Level

Ideal for those with basic knitting experience, featuring slightly more advanced stitches and techniques to expand your skills.

โฑ๏ธ

Weekend Treat

Takes 5-7 hours, making it an enjoyable project to finish over a couple of days.

๐Ÿงธ

Cute Companion

An adorable friend to cherish, handcrafted with love to bring comfort and joy for years to come.

About This Adorable Rabbit Amigurumi Pattern

This delightful rabbit amigurumi pattern creates an 18cm tall bunny that's perfect for cuddling and display. The pattern features a combined head and body construction, making it sturdy and huggable. With its charming floppy ears and sweet expression, this little rabbit will quickly become a beloved companion.

Adorable Rabbit Amigurumi Pattern crochet pattern - detailed view of completed project

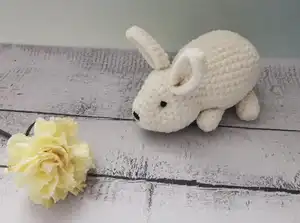
The pattern uses basic amigurumi techniques including magic ring, single crochet, increases, and decreases. Safety eyes and a crocheted nose give this bunny its endearing personality.

Why You'll Love This Adorable Rabbit Amigurumi Pattern

I absolutely love this pattern because it creates such a timeless, classic toy that never goes out of style! The simple construction makes it perfect for learning new techniques while still creating something truly special. The finished rabbit has such a sweet, innocent expression that melts hearts instantly.

Adorable Rabbit Amigurumi Pattern step 1 - construction progress Adorable Rabbit Amigurumi Pattern step 2 - assembly progress Adorable Rabbit Amigurumi Pattern step 3 - details and accessories Adorable Rabbit Amigurumi Pattern step 4 - final assembly and finishing

Switch Things Up

I love how versatile this basic rabbit pattern can be! You can easily customize your bunny by changing colors - imagine a soft pink or lavender rabbit, or even a realistic brown and white combination. For a more whimsical touch, try adding a small crocheted flower behind one ear or a tiny bow around the neck.

The ears are perfect for experimentation too - make them extra long and floppy for a lop-eared bunny look, or add some wire inside to make them poseable. You could even crochet a small carrot accessory or create a whole family of rabbits in different sizes using various hook sizes.

For holiday versions, consider adding seasonal elements like a small Santa hat for Christmas or pastel colors for Easter. The basic construction is so solid that it can handle all sorts of creative additions while maintaining that classic, timeless appeal that makes this pattern so special.

Common Mistakes & How to Fix Them

โœ— Forgetting to stuff gradually as you work - stuff lightly as you go for better shaping and easier assembly โœ— Placing safety eyes too far apart or at wrong height - position between rounds 6-7, 9 stitches apart for proper proportions โœ— Not leaving long enough yarn tails for sewing - always leave at least 30cm for secure attachment of all pieces โœ— Overstuffing the body which makes it hard to shape - stuff firmly but not too tight to maintain the rabbit's natural proportions

Adorable Rabbit Amigurumi Pattern

Create your own cuddly rabbit friend with this charming amigurumi pattern! This sweet bunny measures 18cm tall and features adorable floppy ears, safety eyes, and a fluffy tail. Perfect for beginners and intermediate crocheters, this pattern uses basic stitches to create a timeless companion that will bring joy for years to come. The detailed instructions guide you through every step.

Intermediate 4-6 Hours

Materials Needed for Adorable Rabbit Amigurumi Pattern

โ€” Main Fabric

  • 01
    Himalaya Dolphin Baby yarn in off-white color (or equivalent soft chunky yarn)
  • 02
    Approximately half a skein of main color yarn for complete project

โ€” Tools Required

  • 01
    Crochet hook size 4mm
  • 02
    Stitch markers
  • 03
    Safety eyes 6mm
  • 04
    Small safety nose or contrasting yarn for embroidered nose
  • 05
    Tapestry needle with large eye
  • 06
    Lighter for sealing yarn ends
  • 07
    Polyester fiberfill stuffing (hypoallergenic recommended)
  • 08
    Scissors

Progress Tracker

0% Complete

โ€” Head with Body :

Round 1 :

6 sc in magic ring (6)

Round 2 :

inc x 6 (12)

Round 3 :

(3 sc, inc) x 3 (15)

Round 4 :

(4 sc, inc) x 3 (18)

Round 5 :

(2 sc, inc) x 6 (24)

Round 6 :

(3 sc, inc) x 6 (30)

Rounds 7-10 :

30 sc (30) โ€“ 4 rounds

Round 11 :

(3 sc, dec) x 6 (24)

Round 12 :

(2 sc, dec) x 6 (18)

Info :

Place eyes between rounds 6 and 7, 9 sc apart

Round 13 :

(2 sc, inc) x 6 (24), gradually stuff

Round 14 :

(3 sc, inc) x 6 (30)

Round 15 :

(4 sc, inc) x 6 (36)

Rounds 16-25 :

36 sc (36) โ€“ 10 rounds

Round 26 :

(4 sc, dec) x 6 (30)

Round 27 :

(3 sc, dec) x 6 (24)

Round 28 :

(2 sc, dec) x 6 (18)

Round 29 :

(1 sc, dec) x 6 (12)

Round 30 :

dec x 6 (6), cut yarn leaving 30cm, thread needle and pull through front loops to close

โ€” Ears (Make 2) :

Chain :

Make 10 ch, insert in 2nd ch from hook

Round 2 :

8 hdc, 3 hdc in 1 stitch, 8 hdc (19)

Round 3 :

1 dsl, 19 sc (19), sew shorter edge together, leave 30cm tail

โ€” Paws (Make 4) :

Round 1 :

6 sc in magic ring (6)

Round 2 :

(2 sc, inc) x 2 (8)

Rounds 3-6 :

8 sc (8) โ€“ 4 rounds

Finishing :

Stuff, fold in half, sc 3 together, leave 30cm yarn tail

โ€” Tail :

Round 1 :

6 sc in magic ring (6)

Round 2 :

(1 sc, inc) x 3 (9)

Round 3 :

9 sc (9)

Round 4 :

(1 sc, dec) x 3 (6), stuff lightly, leave 30cm tail

โ€” Nose (Optional) :

Round 1 :

2 sc in magic ring (2), leave 30cm tail

Assembly Instructions

  • Sew ears to head 2 sc above the eyes, secure thread ends inside the head
  • Position nose piece just above the middle where head and body meet
  • Attach tail to center back of body as shown in photos
  • Sew paws to body to provide stable support - 2 in front, 2 in back
  • Create face definition by threading yarn below eyes, pull to create slight indentation, tie securely and hide ends

Important Notes

  • ๐Ÿ’กUse stitch markers to keep track of rounds and maintain consistent tension
  • ๐Ÿ’กStuff gradually as you work, not too tightly to maintain proper shape
  • ๐Ÿ’กLeave adequate yarn tails (30cm) for secure sewing of all components
  • ๐Ÿ’กPosition safety eyes carefully between specified rounds for best expression
  • ๐Ÿ’กTest stuffing firmness - should be cuddly but hold its shape well

This sweet rabbit amigurumi pattern brings timeless charm to your crochet collection! With its classic design and huggable size, this little bunny captures hearts with its innocent expression and floppy ears. The pattern combines simple techniques with careful construction details to create a truly special handmade treasure. Perfect for gifting or keeping as your own companion! ๐Ÿงถ Happy crocheting! ๐Ÿฐโœจ

You ask,

we answer.

FAQs

What yarn weight is best for this pattern?

The pattern calls for chunky weight yarn like Himalaya Dolphin Baby. You can substitute with any soft chunky (5) weight yarn for similar results.

Can I make the rabbit smaller or larger?

Yes! Use a smaller hook and thinner yarn for a mini version, or a larger hook with bulky yarn for a bigger bunny. Just maintain consistent gauge throughout.

How do I attach the ears securely?

Sew ears 2 single crochet rows above the eyes, making sure to anchor the thread well inside the head and hide all ends securely for safety.

Can I embroider the nose instead of using safety nose?

Absolutely! The pattern includes instructions for a crocheted nose, or you can embroider with contrasting yarn for a softer look.

What's the best way to stuff the rabbit?

Stuff gradually as you work, using small amounts at a time. The rabbit should be firm enough to hold its shape but still cuddly and squeezable.