🧢 Beautiful ✨ Detailed πŸ’ Adorable

Autumn Maple Leaf Wall Hanging Crochet Pattern

Autumn Maple Leaf Wall Hanging Crochet Pattern
4.2β˜… Rating
10-12 Hours Time Needed
3.8K Made This
βœ‚οΈ

Intermediate Level

Ideal for those with basic knitting experience, featuring slightly more advanced stitches and techniques to expand your skills.

⏱️

Slow & Steady

A 10-12 hour projectβ€”great for savoring the process over several sessions.

🍁

Autumn Vibes

Earthy tones with cozy textures inspired by falling leaves and the rich, warm colors of harvest season.

About This Autumn Maple Leaf Wall Hanging Crochet Pattern

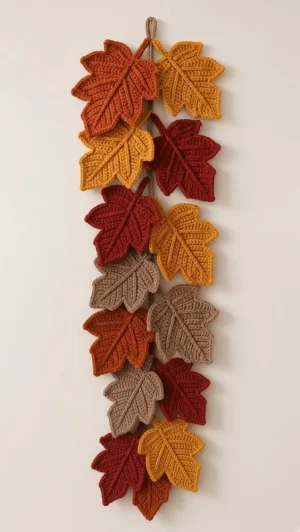
This original Hook Vibes pattern interprets the photograph through fourteen assembled leaves, each combining a central lobe, two side lobes, two lower lobes, and a separate stem.
The lobes are crocheted flat, with back loop stitches from Row 2 creating ridges that emphasize their tapered shapes.
DK cotton gives the stitch texture definition, while firm but flexible tension helps the pointed outlines remain visible after joining and hanging.
The intermediate work centers on shaping, arranging overlapping pieces, sewing discreet seams, and embroidering relaxed veins; consistent finishing matters as much as the crochet itself.

Autumn Maple Leaf Wall Hanging Crochet Pattern crochet pattern - detailed view of completed project

Make and finish one complete leaf before preparing all fourteen, so you can judge how your chosen yarn holds the ridges and pointed outline.
Keep each leaf’s five lobes and stem together as a set; checking those pieces before assembly helps avoid mixing the side and lower shapes.

Why You'll Love This Autumn Maple Leaf Wall Hanging Crochet Pattern

I love the way the back loop ridges and embroidered veins give these leaves detail without requiring a different stitch pattern for every color. The separate lobes offer clear stopping points, so you can divide the work into crochet, blocking, joining, and embroidery sessions rather than keeping the whole project in progress at once.

I also appreciate how much the arrangement contributes to the result: rotating a leaf slightly or moving a mustard leaf beside burgundy changes the balance of the cascade. There are plenty of tails and seams to finish, so I would leave time for that stage instead of treating assembly as a quick final task. Once complete, the hanging offers a seasonal accent for a narrow wall or an autumn gift.

Autumn Maple Leaf Wall Hanging Crochet Pattern step 1 - construction progress Autumn Maple Leaf Wall Hanging Crochet Pattern step 2 - assembly progress Autumn Maple Leaf Wall Hanging Crochet Pattern step 3 - details and accessories Autumn Maple Leaf Wall Hanging Crochet Pattern step 4 - final assembly and finishing

Switch Things Up

I would begin by exploring color placement within the existing fourteen leaves, keeping the four rust, four mustard, four burgundy, and two taupe leaves while rearranging their order before sewing. For a brighter upper section, I would position more mustard leaves near the hanging loop and distribute burgundy farther down, checking that the lower section still feels visually balanced. A more evenly mixed display appeals to me when the surrounding room already has strong colors, because repeating each shade along the cord avoids one dominant patch. I would also separate the two taupe leaves to create quieter pauses between warmer shades, comparing the arrangement from a distance before committing to the attachment points.

The cord offers another choice already allowed by the pattern, and I would select its color from the project yarn according to the wall behind the display. Taupe would keep the support visually quiet against a pale background, while a warmer cord could connect with the leaves wherever small sections remain visible between their edges. I would retain the same cord construction and hanging loop, then judge the color with several completed leaves laid over it so the decision reflects the assembled decoration.

For a more irregular cascade, I would rotate individual leaves slightly while preserving the overlapping arrangement, keeping firm fabric against the cord and leaving the pointed tips clearly visible. If I wanted a tidier outline, I would balance the left and right spread more closely, checking the full arrangement before sewing each leaf at its two attachment points. I also like individual completed leaves as seasonal gift toppers, as suggested for this design, because their existing stems, joined lobes, and embroidered veins provide detail without changing the crochet instructions.

Common Mistakes & How to Fix Them

βœ— Uneven lobe edges often begin with a missed first or final stitch. Mark the edge stitches and count each completed row against its stated total; correct any mismatch before continuing the shaping.βœ— Working through both loops after Row 1 interrupts the ridged texture. Check that each stitch, including increases and decreases, uses back loops only from Row 2; undo the affected section if the ridge pattern changes.βœ— Tight decreases can pull a lobe tip into a hard curl. Ease the loops while completing the decrease, then lay the piece flat and check its outline before fastening off or blocking.βœ— Joining lobes without pinning the complete outline can hide a lower tip or skew the leaf. Reposition all five pieces with their bases together, then check that every outer point remains distinct before sewing.βœ— Embroidery that draws the fabric inward makes a flat leaf pucker. Loosen or replace the tight vein stitches, leaving relaxed carries on the back; the leaf should lie flat without being stretched.βœ— Sewing through the upper edges of overlapping lobes can flatten the separate points. Keep joining stitches along the intended lower overlaps and secure the base, then check that the outer tips remain free.βœ— A leaf attached only by its stem can rotate away from the cascade. Sew firm fabric on its back to the cord at two separated points, then hang the piece briefly to check stability.βœ— Firm slip stitches can shorten and stiffen the hanging cord. Work the return row loosely and check its flexibility as you go; if it bunches, undo that section and remake it with easier tension.

Autumn Maple Leaf Wall Hanging Crochet Pattern

Create an autumn maple leaf wall hanging with pointed leaves in rust, mustard, burgundy, and taupe, arranged in a gently overlapping cascade. You will crochet each leaf from five shaped lobes, join the pieces, add a stem, and embroider veins before attaching everything to a hanging cord. The small components make this seasonal decoration easy to divide into sessions, while the final arrangement gives you room to balance color and texture.

Intermediate 10-12 Hours

Materials Needed for Autumn Maple Leaf Wall Hanging Crochet Pattern

β€” Main Fabric

  • 01
    DK-weight cotton yarn in rust, mustard, burgundy, and taupe; allow approximately 300-400 g total for fourteen leaves, including joining and embroidery.
  • 02
    Suggested color allocation: four rust leaves, four mustard leaves, four burgundy leaves, and two taupe leaves.
  • 03
    Approximately 20-30 g of the total yarn allowance in taupe or another chosen color for the hanging cord.

β€” Tools Required

  • 01
    3.5 mm crochet hook, or a size that produces firm but flexible fabric
  • 02
    Tapestry needle for joining pieces and embroidering veins
  • 03
    Scissors
  • 04
    Removable stitch markers
  • 05
    Sewing pins
  • 06
    Blocking mat
  • 07
    Rustproof blocking pins
  • 08
    Measuring tape

Progress Tracker

0% Complete

β€” Before You Begin :

Info :

This is an original pattern inspired by the supplied photograph. Its assembled five-lobe construction is an interpretation of the pictured leaves.

Info :

Use US crochet terminology. Make fourteen leaves: four rust, four mustard, four burgundy, and two taupe.

Info :

For each leaf, make one central lobe, two side lobes, two lower lobes, and one stem, all in the same color.

Info :

Work lobes flat. Beginning with Row 2, work every stitch, including increases and decreases, through back loops only. Chain 1 and turn before each new row; this chain never counts as a stitch.

Info :

The starting end of each lobe is its base; the final decrease forms its outer tip. Leave a 20 cm starting tail on each lobe for assembly.

Info :

No exact finished dimensions are specified. Yarn, tension, blocking, and the amount of overlap determine the final size. Keep the fabric firm enough to hold its outline.

β€” Central Lobe: Make One Per Leaf :

Foundation :

Leaving a 20 cm tail, ch 2.

Row 1 :

Sc in the second ch from the hook. (1)

Row 2 :

Ch 1, turn. Work 3 sc in the only st, BLO. (3)

Row 3 :

Ch 1, turn. Inc, sc in next st, inc. (5)

Row 4 :

Ch 1, turn. Inc, sc in next 3 sts, inc. (7)

Row 5 :

Ch 1, turn. Inc, sc in next 5 sts, inc. (9)

Row 6 :

Ch 1, turn. Sc in each st. (9)

Row 7 :

Ch 1, turn. Sc in each st. (9)

Row 8 :

Ch 1, turn. Sc in each st. (9)

Row 9 :

Ch 1, turn. Sc in each st. (9)

Row 10 :

Ch 1, turn. Sc in each st. (9)

Row 11 :

Ch 1, turn. Sc in each st. (9)

Row 12 :

Ch 1, turn. Sc in each st. (9)

Row 13 :

Ch 1, turn. Sc in each st. (9)

Row 14 :

Ch 1, turn. Sc2tog, sc in next 5 sts, sc2tog. (7)

Row 15 :

Ch 1, turn. Sc2tog, sc in next 3 sts, sc2tog. (5)

Row 16 :

Ch 1, turn. Sc2tog, sc in next st, sc2tog. (3)

Row 17 :

Ch 1, turn. Sc3tog. (1)

Fasten Off :

Cut the yarn and draw the end through the final loop. Weave the finishing tail into the back; retain the starting tail for joining.

β€” Side Lobes: Make Two Per Leaf :

Foundation :

Leaving a 20 cm tail, ch 2.

Row 1 :

Sc in the second ch from the hook. (1)

Row 2 :

Ch 1, turn. Work 3 sc in the only st, BLO. (3)

Row 3 :

Ch 1, turn. Inc, sc in next st, inc. (5)

Row 4 :

Ch 1, turn. Inc, sc in next 3 sts, inc. (7)

Row 5 :

Ch 1, turn. Sc in each st. (7)

Row 6 :

Ch 1, turn. Sc in each st. (7)

Row 7 :

Ch 1, turn. Sc in each st. (7)

Row 8 :

Ch 1, turn. Sc in each st. (7)

Row 9 :

Ch 1, turn. Sc in each st. (7)

Row 10 :

Ch 1, turn. Sc in each st. (7)

Row 11 :

Ch 1, turn. Sc2tog, sc in next 3 sts, sc2tog. (5)

Row 12 :

Ch 1, turn. Sc2tog, sc in next st, sc2tog. (3)

Row 13 :

Ch 1, turn. Sc3tog. (1)

Fasten Off :

Cut the yarn and draw the end through the final loop. Weave the finishing tail into the back; retain the starting tail for joining.

β€” Lower Lobes: Make Two Per Leaf :

Foundation :

Leaving a 20 cm tail, ch 2.

Row 1 :

Sc in the second ch from the hook. (1)

Row 2 :

Ch 1, turn. Work 3 sc in the only st, BLO. (3)

Row 3 :

Ch 1, turn. Inc, sc in next st, inc. (5)

Row 4 :

Ch 1, turn. Sc in each st. (5)

Row 5 :

Ch 1, turn. Sc in each st. (5)

Row 6 :

Ch 1, turn. Sc in each st. (5)

Row 7 :

Ch 1, turn. Sc in each st. (5)

Row 8 :

Ch 1, turn. Sc2tog, sc in next st, sc2tog. (3)

Row 9 :

Ch 1, turn. Sc3tog. (1)

Fasten Off :

Cut the yarn and draw the end through the final loop. Weave the finishing tail into the back; retain the starting tail for joining.

β€” Leaf Stem: Make One Per Leaf :

Foundation :

Leaving a 15 cm starting tail, ch 9.

Row 1 :

Sl st in the second ch from the hook and each remaining ch. (8 sl sts)

Fasten Off :

Cut the yarn, leaving a 20 cm sewing tail, and draw it through the final loop.

β€” Shape and Join Each Leaf :

Block the Lobes :

Lightly dampen the pieces according to the yarn care instructions. Pin each piece flat, gently defining its final tip, and let it dry completely.

Position the Central Lobe :

Place the central lobe with its preferred face upward, starting end at the bottom and final tip pointing upward.

Position the Side Lobes :

Place one side lobe on each side, with their bases meeting the central lobe's base. Angle their tips approximately 40 degrees outward from the central tip. Tuck their inner edges beneath the central lobe, overlapping roughly the lower third of their length.

Position the Lower Lobes :

Place one lower lobe on each side, with their bases meeting the same base junction. Angle their tips approximately 75 degrees outward from the central tip. Tuck their inner edges beneath the adjacent side lobes, overlapping roughly the lower third. Pin all five pieces in place.

Join the Lobes :

Use the starting tails to sew through both fabric layers along each overlap with small running stitches. Secure the common base junction. Keep the five outer tips and the upper portions of the edges free.

Attach the Stem :

Place one end of the stem behind the common base junction, with its remaining length extending downward, away from the central tip. Sew the attached end securely to the back.

Embroider the Main Vein :

Thread a separate length of matching yarn. Secure it on the back at the base junction. Backstitch up the center of the central lobe to one row below its tip, using stitches about one or two rows long. Keep the embroidery relaxed.

Embroider the Branch Veins :

Backstitch one vein from the base junction along the center of each side and lower lobe, ending one row below each tip. Carry yarn between veins on the back without pulling it tight.

Finish the Leaf :

Secure and weave in every remaining tail on the back. Remove all pins and gently flatten the joined leaf.

Repeat :

Complete the same lobe, stem, joining, and embroidery instructions for all fourteen leaves.

β€” Hanging Cord :

Foundation :

Using taupe or your chosen cord color, chain until the relaxed chain measures approximately 110 cm. Add more length now if you prefer a longer display.

Row 1 :

Sl st in the second ch from the hook and each remaining ch. Work loosely so the cord stays flexible. The number of slip stitches equals the foundation chain count minus one.

Fasten Off :

Cut the yarn, leaving a 25 cm tail, and draw it through the last loop.

Make the Hanging Loop :

Fold approximately 6 cm of one end back onto the cord. Sew the end firmly to the cord with the tail to create a hanging loop. Weave in both cord tails.

β€” Assemble the Wall Hanging :

Arrange the Leaves :

Lay the cord flat with the hanging loop at the top. Position one rust leaf at the bottom, its main tip pointing down. Arrange the remaining thirteen leaves above it, alternating left and right of the cord and allowing their edges to overlap.

Suggested Color Order :

Above the bottom rust leaf, arrange leaves upward in this order: burgundy, mustard, taupe, burgundy, rust, taupe, burgundy, mustard, burgundy, mustard, rust, mustard, rust. Rotate individual leaves to create a gently irregular cascade.

Pin the Arrangement :

Keep the top loop exposed. Adjust the spacing so the cord runs behind the leaves and every leaf has a firm section of fabric touching it. Pin each attachment point.

Attach Each Leaf :

Using matching yarn, sew the cord to the back of each leaf at two points, approximately 1-2 cm apart, near its main vein or joined base. Catch the back of the crochet fabric without making prominent stitches on the front.

Stabilize Overlaps :

Where an overlapping leaf swings away from the arrangement, add one small stitch between the backs of the touching leaves. Keep their outer tips free.

Finish the Cord :

Fold any excess lower cord behind the bottom leaf and stitch it securely to the back.

Final Finishing :

Weave in all assembly tails, remove every pin, and hang the piece by its loop. Adjust the leaf tips gently by hand.

Assembly Instructions

  • Block the individual lobes flat and allow them to dry completely.
  • Arrange each leaf with its central lobe upright, side lobes angled outward, and lower lobes spread more widely.
  • Sew the overlapping lower portions of the lobes and secure their common base junction.
  • Attach a stem behind each base junction, extending away from the central tip.
  • Embroider a central vein and four branch veins, then weave in the leaf tails.
  • Make the cord and hanging loop, then arrange fourteen leaves in an overlapping vertical cascade.
  • Sew each leaf to the cord at two points, stabilize loose overlaps, secure excess cord, and weave in all remaining tails.

Important Notes

  • πŸ’‘The supplied image contains no readable pattern instructions; this is an original photo-inspired design.
  • πŸ’‘The five-lobe assembly produces a stylized maple silhouette rather than an exact reproduction of the photographed construction.
  • πŸ’‘All stitches use US terminology, and turning chains do not count as stitches.
  • πŸ’‘Work all lobe stitches through back loops only beginning with Row 2.
  • πŸ’‘Yarn quantities and the 10-12 hour completion time are estimates; individual tension and pace will affect both.
  • πŸ’‘Use the same yarn weight and hook throughout for a consistent set of leaves.
  • πŸ’‘Follow the yarn manufacturer's care instructions when blocking or cleaning the finished decoration.
  • πŸ’‘This wall hanging is intended as a decorative item; hang its long cord out of reach of young children and pets.

Build your autumn display one finished leaf at a time, giving the blocking, joining, and embroidery the same attention as the crochet.
Before sewing the cascade together, lay out all fourteen leaves and check how their colors and pointed edges sit against one another.
Once the attachments are secure, weave in the remaining tails, remove every pin, and hang the piece to inspect its balance.
A few gentle adjustments to the free tips will help the leaf shapes show clearly.
You ask,

we answer.

FAQs

What skills should I practice before starting the leaves?

Practice working into back loops, making the increases and decreases used to shape the lobes, and keeping your row counts consistent. The other important skills are blocking flat pieces, sewing overlapping sections without flattening the tips, and embroidering veins without pulling the fabric inward. A single completed leaf lets you check those finishing techniques before assembling the full cascade.

Are the leaves crocheted in one piece?

Each leaf contains five separate lobes: one central lobe, two side lobes, and two lower lobes. You block these pieces, overlap their lower sections, and sew them together at a shared base. A separate stem and embroidered veins complete the leaf before it is attached to the hanging cord.

Can I use acrylic yarn instead of cotton?

DK cotton is the specified yarn, and it helps define the ridges and leaf outlines. If you choose the acrylic substitution discussed for this pattern, use a similar DK thickness and maintain firm but flexible fabric. Expect the drape to differ, and follow the acrylic yarn's care instructions when blocking rather than applying heat automatically.

How many separate crochet pieces do I need?

For the full fourteen-leaf display, make fourteen central lobes, twenty-eight side lobes, twenty-eight lower lobes, and fourteen stems, plus the hanging cord. Keep the two lobe sizes separate while organizing your work. Grouping the components for each leaf before joining helps prevent accidentally pairing a side lobe with a lower lobe.

How big will the finished wall hanging be?

The foundation chain for the cord measures approximately 110 cm before the slip stitch return row and hanging loop are completed. That measurement does not establish the finished height or width. Your tension, blocked leaf shapes, angles, overlap, and treatment of the lower cord all affect the final dimensions, so assess the complete layout before sewing.

Can I make a shorter version?

The complete design uses fourteen leaves, but the suggested shorter variation uses fewer complete leaves with the same lobe, stem, and embroidery instructions. Arrange those finished leaves first to establish the length you need. Then make a cord that accommodates that layout and the hanging loop, keeping two attachment points behind each leaf.

Why do my leaves twist or swing away from the cord?

Check whether each leaf has two separated attachment points through firm fabric near its main vein or joined base. A single attachment allows it to pivot. Add or reposition the second attachment, then inspect the hanging vertically; where an overlap still swings outward, use the small hidden joining stitch described in the assembly instructions.