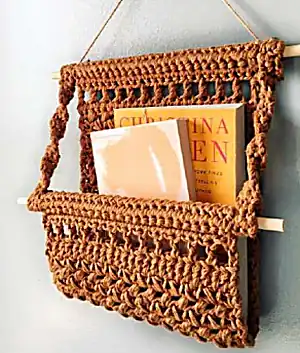
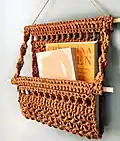
Create your own beautiful boho-style hanging basket perfect for displaying books, plants, or decorative items. This stunning wall organizer features intricate texture work with mini bean stitches and elegant mesh sections that give it that coveted bohemian aesthetic. The pattern creates a functional piece that measures approximately 12 inches wide and 11 inches long, making it the perfect accent for any room seeking that cozy, handcrafted touch.
Progress Tracker
0% Complete
— Pocket :
Row 1 :
Fsc 25 (alternatively, ch 26, sc in second ch and across). (25 sc)
Row 2 :
Ch 1 and turn. Sc in same st and each st across. Piece should measure 9 inches long. (25 sc)
Row 3-5 :
Ch 1 and turn. Sc in same st and each st across. (25 sc)
Info :
Check that the piece will fit around your dowel rod. If it is still short, add or subtract sc rows as needed
Row 6 :
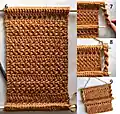
Ch 1 and turn. Sc through both loops of row 5 and bottom loops of row 1 to create a tube. (25 sc)
Row 7 :
Ch 4 (counts as dc + ch 1) and turn. Sk same st and next st, dc in next st, *ch 1, sk 1, dc in next st* to end. (13 dc, 12 ch 1 sp)
Row 8 :
Ch 1 and turn. Sc in same st, sc in each st and ch sp across, sc in 3rd ch of ch 4 from previous row. (25 sc)
Row 9 :
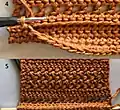
Ch 1 and turn. Sc in same st, ch 1, sk 1, mini bean in next st, *sk 1 st, mini bean in next st* across until there are 2 stitches left, sk 1 st, sc in last st. (2 sc, 11 beans)
Row 10-13 :
Repeat row 9. (2 sc, 11 beans)
Row 14 :
Ch 3 (counts as dc) and turn. Sk same st, dc in next st and each st across. (25 dc)
Row 15 :
Ch 1 and turn. Sc in same st, ch 1, sk 1, mini bean in next st, *sk 1 st, mini bean in next st* across until there are 2 stitches left, sk 1 st, sc in ch 3 from previous row. (2 sc, 11 beans)
Row 16-19 :
Repeat row 9. (2 sc, 11 beans)
Row 20 :
Repeat row 14. (25 dc)
Row 21 :
Repeat row 15. (2 sc, 11 beans)
Row 22-25 :
Repeat row 9. (2 sc, 11 beans)
Row 26 :
Repeat row 14. (25 dc)
Row 27 :
Repeat row 15. (2 sc, 11 beans)
Row 28-31 :
Repeat row 9. (2 sc, 11 beans)
Row 32 :
Repeat row 14. (25 dc)
Row 33 :
Ch 4 (counts as dc + ch 1) and turn. Sk same st and next st, dc in next st, *ch 1, sk 1, dc in next st* to end. (13 dc, 12 ch 1 sp)
Row 34 :
Ch 1 and turn. Sc in same st, sc in each st and ch sp across, sc in 3rd ch of ch 4 from previous row. (25 sc)
Row 35 :
Ch 1 and turn. Sc in same st in blo, sc in each st across in blo (you will be using the unused loops for row 40). (25 sc)
Row 36-39 :
Ch 1 and turn. Sc in same st and across. (25 sc)
Row 40 :
Using the unused loops from row 35, sl st through both loops of row 39 and the loops from row 35 across to create the end tube. Tie off. Weave in all ends.
— Arms (make two) :
Row 1 :
Ch 3, sc in second ch and last ch. (2 sc)
Row 2-5 :
Ch 1 and turn. Sc in same st and last st. (2 sc)
Row 6 :
Ch 1 and turn. Sc through both loops of row 5 and bottom loops of row 1 to create a tube. (2 sc)
Row 7-18 :
Ch 1 and turn. Sc in same st and last st. (2 sc)
Row 19 :
Ch 1 and turn. Sc in same st in blo, sc in last st in blo (you will be using the unused loops for row 24). (2 sc)
Row 20-23 :
Ch 1 and turn. Sc in same st and last st. (2 sc)
Row 24 :
Using the unused loops from row 19, sl st through both loops of row 23 and the loops from row 19 across to create the end tube. Tie off. Weave in all ends.
This gorgeous Boho Book Nook hanging basket brings together the perfect blend of style and functionality that every maker dreams of! The textural mini bean stitches create beautiful dimension while the mesh sections add that coveted bohemian flair. What makes this pattern truly special is its thoughtful construction that eliminates tedious seaming, making it both enjoyable to create and stunning to display. 🏡 Happy crocheting! 🧶✨