๐Ÿงถ Beautiful โœจ Detailed ๐Ÿ’ Adorable

Bulbasaur Pokemon Amigurumi Pattern

Bulbasaur Pokemon Amigurumi Pattern
4.1โ˜… Rating
4-5 Hours Time Needed
3.7K Made This
โœ‚๏ธ

Intermediate Level

Ideal for those with basic knitting experience, featuring slightly more advanced stitches and techniques to expand your skills.

โฑ๏ธ

Weekend Treat

Takes 5-7 hours, making it an enjoyable project to finish over a couple of days.

๐Ÿงธ

Cute Companion

An adorable friend to cherish, handcrafted with love to bring comfort and joy for years to come.

About This Bulbasaur Pokemon Amigurumi Pattern

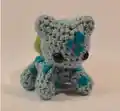
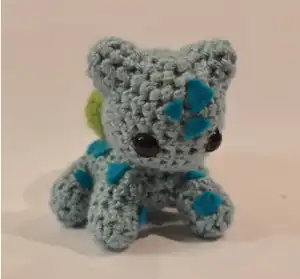
This delightful Bulbasaur amigurumi pattern captures the essence of everyone's favorite Grass-type starter Pokemon. With clear instructions and helpful visual guides, you'll create a charming companion featuring Bulbasaur's signature light teal body, adorable ears, and distinctive bulb pod. The pattern includes detailed steps for each component, from the rounded head to the sturdy little legs, ensuring your finished Bulbasaur has that perfect cuddly appeal that fans love.

Bulbasaur Pokemon Amigurumi Pattern crochet pattern - detailed view of completed project

Each section is carefully designed with beginner-friendly techniques while incorporating enough detail to create an authentic-looking Bulbasaur. The pattern includes assembly guidance and marking placement to achieve that perfect Pokemon look.

Why You'll Love This Bulbasaur Pokemon Amigurumi Pattern

I absolutely love how this pattern brings childhood memories to life through crochet! The satisfaction of watching Bulbasaur take shape stitch by stitch is incredibly rewarding, and the final result is so huggable and authentic-looking. What I find most enjoyable is how the pattern balances simplicity with detail โ€“ it's challenging enough to keep you engaged but not overwhelming. The joy on someone's face when they receive this handmade Pokemon creation makes every hour spent crafting absolutely worth it.

Bulbasaur Pokemon Amigurumi Pattern step 1 - construction progress Bulbasaur Pokemon Amigurumi Pattern step 2 - assembly progress Bulbasaur Pokemon Amigurumi Pattern step 3 - details and accessories Bulbasaur Pokemon Amigurumi Pattern step 4 - final assembly and finishing

Switch Things Up

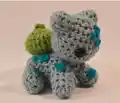
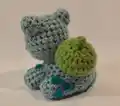
I love how versatile this Bulbasaur pattern can be! Sometimes I experiment with different yarn weights to create mini versions that fit perfectly on keychains, or I use chunky yarn for an oversized cuddle buddy. I've discovered that changing the felt marking placement creates unique personalities โ€“ some look sleepy, others appear more alert and ready for adventure.

What really excites me is customizing the colors. I've made shiny versions using sparkly silver-green yarn, autumn-themed ones with burnt orange pods, and even pastel rainbow variants that look absolutely magical. The pattern adapts beautifully to seasonal themes too โ€“ imagine a winter Bulbasaur with white markings like snow!

I also enjoy adding personal touches like tiny crocheted accessories. A miniature Pokeball nearby, a small flower crown, or even a tiny trainer hat can transform your Bulbasaur into a storytelling piece. The possibilities are endless when you let your creativity bloom!

Common Mistakes & How to Fix Them

โœ— Forgetting to stuff the head adequately before closing can result in a flat appearance โœ— Placing the safety eyes too close together makes Bulbasaur look cross-eyed instead of friendly โœ— Not securing the pod firmly to the back can cause it to droop or fall off โœ— Overstuffing the limbs makes them too rigid and less cuddly than intended

Bulbasaur Pokemon Amigurumi Pattern

Create your very own adorable Bulbasaur with this charming amigurumi pattern! This beloved Pokemon starter comes to life with soft curves, distinctive markings, and that iconic bulb on its back. Perfect for Pokemon fans of all ages, this cuddly companion features detailed instructions for the head, body, ears, pod, and limbs. The pattern includes helpful photos to guide your assembly and placement. Whether you're crafting for yourself or as a gift for a fellow trainer, this Bulbasaur will bring joy and nostalgia to any collection.

Intermediate 4-5 Hours

Materials Needed for Bulbasaur Pokemon Amigurumi Pattern

โ€” Main Fabric

  • 01
    Worsted weight yarn in green and light teal/aqua colors
  • 02
    Polyfil or another soft stuffing material for filling

โ€” Tools Required

  • 01
    3.5mm crochet hook
  • 02
    Scissors
  • 03
    Tapestry needle
  • 04
    Glue gun or fabric glue
  • 05
    Dark teal felt
  • 06
    1 pair 10mm safety eyes

Progress Tracker

0% Complete

โ€” Head :

Row 1 :

CH 2, SC 8 in first stitch. (8 stitches) Alternatively, SC 8 into a magic circle

Row 2 :

INC x 8 (16 stitches)

Row 3 :

*SC, INC* x 8 (24 stitches)

Row 4-6 :

SC x 24 (24 stitches)

Row 7 :

*SC x 9*, INC, *SC x 4*, INC, *SC x 9* (26 stitches)

Info :

Place eyes 5 stitches apart (in between each of the increases)

Row 8 :

SC x 26 (26 stitches)

Row 9 :

*SC x 2*, DEC x 11*, *SC x 2* (15 stitches)

Info :

Stuff as much of the head as you can

Row 10 :

*SC x 4*, *DEC x 3*, *SC x 5*

Info :

Finish stuffing head, FO with SlSt

โ€” Body :

Row 1 :

CH 2, SC 6 in first stitch. (6 stitches) Alternatively, SC 6 into a magic circle

Row 2 :

INC x 6 (12 stitches)

Row 3 :

*SC, INC* x 6 (18 stitches)

Row 4-6 :

SC x 18 (18 stitches)

Row 7 :

*SC x 5*, INC, *SC x 6*, INC, *SC x 5* (20 stitches)

Row 8-10 :

SC x 20 (20 stitches)

Row 11 :

DEC to close, stuffing the body as you go. FO with a SlSt

Info :

Sew head onto body (row 1 is the front of the body, and the increases done face the upwards)

โ€” Ears :

Row 1 :

CH 2, SC 6 in first stitch. (6 stitches) Alternatively, SC 6 into a magic circle

Row 2 :

*SC, INC* x 3

Row 3 :

*SC 2, INC* x 3

Info :

FO with SlSt. Sew ears onto head

โ€” Pod :

Row 1 :

CH 12, join the ends into a loop with a SlSt. (You're just making a crochet ring with 12 stitches around.) (12 stitches)

Row 2 :

INC x 12 (24 stitches)

Row 3-4 :

SC x 24 (24 stitches)

Row 5 :

*SC 4, DEC* x 4 (20 stitches)

Row 6 :

DEC x 10 (10 stitches)

Row 7 :

DEC x 5 (5 stitches)

Row 8 :

SC 4, SlSt, FO

Info :

Stuff pod (from the bottom). Sew pod to the back of your Bulbasaur

โ€” Arms and Legs :

Row 1 :

CH 2, SC 10 in first stitch. (10 stitches) Alternatively, SC 10 into a magic circle

Row 2-5 :

SC x 10 (10 stitches)

Info :

FO with SlSt. Stuff legs lightly, and sew them onto body

โ€” Markings :

Final Step :

Cut out triangles and other angled shapes of varying sizes from dark teal felt and using fabric glue or hot glue gun, fasten them to your Bulbasaur

Assembly Instructions

  • Sew the completed head onto the body with row 1 as the front and increases facing upward
  • Attach the ears to the head using the provided placement guide photos
  • Securely sew the stuffed pod to the back of Bulbasaur's body
  • Attach all four limbs (arms and legs) to the body, stuffing them lightly for shape
  • Cut triangular and angled felt pieces in various sizes for Bulbasaur's distinctive markings
  • Use fabric glue or hot glue gun to carefully attach the dark teal felt markings across the body

Important Notes

  • ๐Ÿ’กPlace safety eyes between rows as specified before stuffing the head completely
  • ๐Ÿ’กStuff each section firmly but not too tightly to maintain the proper rounded shape
  • ๐Ÿ’กUse the provided photos as placement guides for ears, pod, and limb positioning
  • ๐Ÿ’กTake your time with the felt markings as they define Bulbasaur's authentic appearance

This adorable Bulbasaur amigurumi pattern brings the beloved Pokemon starter to life in soft, cuddly form! Perfect for fans of all ages, this pattern combines simple techniques with authentic details to create a charming companion. Whether displayed on a shelf or used as a beloved stuffed animal, your handmade Bulbasaur will capture hearts and spark nostalgic smiles. The pattern's clear instructions and helpful photos make it an enjoyable project that results in a truly special creation. ๐Ÿงถ Happy crocheting! ๐Ÿงตโœจ

You ask,

we answer.

FAQs

What size will my finished Bulbasaur be?

The finished Bulbasaur will be approximately 4-5 inches tall, making it a perfect desk companion or pocket-sized friend.

Can I use different colored yarns for my Bulbasaur?

Absolutely! While the pattern uses traditional light teal and green, you can create shiny variants or your own unique color combinations.

Do I need to use safety eyes, or can I embroider them?

Safety eyes give the best result, but you can embroider the eyes if making this for a very young child or if you prefer that look.

How do I prevent the pod from drooping?

Make sure to stuff the pod firmly and sew it securely to the back using strong stitches around the entire base.

Can I make the markings with yarn instead of felt?

Yes, you can crochet small triangular pieces or use surface crochet techniques, though felt gives a cleaner, more defined look.