🧢 Beautiful ✨ Detailed πŸ’ Adorable

Crab Memory Game Amigurumi Pattern

Crab Memory Game Amigurumi Pattern
4.9β˜… Rating
8-10 Hours Time Needed
3.4K Made This
βœ‚οΈ

Beginner Friendly Level

Perfect for those just starting their sewing journey, with clear instructions and simple techniques

⏱️

All-Day Adventure

Requires 8-10 hours, ideal for a full day of immersive knitting.

🧸

Cute Companion

An adorable friend to cherish, handcrafted with love to bring comfort and joy for years to come.

About This Crab Memory Game Amigurumi Pattern

This delightful Crab Memory Game pattern brings the ocean to your living room with a charming mother crab and her ten baby crabs. Each baby crab features a unique colored belly, creating an engaging memory game that's both educational and entertaining. The pattern uses basic amigurumi techniques with clear step-by-step instructions, making it perfect for beginners wanting to create something special. The mother crab opens up to store all the baby crabs inside, adding an extra element of play and organization.

Crab Memory Game Amigurumi Pattern crochet pattern - detailed view of completed project

The finished set includes one large mother crab (8.5 inches diameter) and ten smaller baby crabs (3 inches each), all crafted in vibrant red with colorful accent bellies. This versatile pattern works beautifully as both a toy and home decoration.

Why You'll Love This Crab Memory Game Amigurumi Pattern

I absolutely love how this pattern combines creativity with functionality - it's not just a beautiful crochet project, but an interactive game that brings families together. The satisfaction of watching each little crab come to life as you work through the simple stitches is incredibly rewarding. I'm always amazed at how the vibrant colors and adorable expressions make each piece feel like it has its own personality, and the joy on children's faces when they play the memory game makes every stitch worthwhile.

Crab Memory Game Amigurumi Pattern step 1 - construction progress Crab Memory Game Amigurumi Pattern step 2 - assembly progress Crab Memory Game Amigurumi Pattern step 3 - details and accessories Crab Memory Game Amigurumi Pattern step 4 - final assembly and finishing

Switch Things Up

I love experimenting with different color combinations for this crab family - imagine creating them in ocean blues and greens, or even making rainbow baby crabs for extra visual appeal. Sometimes I add small embroidered details like spots or stripes to make each baby crab even more unique and easier to distinguish during memory games.

For a more challenging version, I've made sets where the baby crabs have different textures on their bellies using various stitch patterns like bobbles or popcorn stitches. This adds a tactile element to the memory game that's especially engaging for younger children.

I also enjoy personalizing these sets by adding small embroidered initials or simple designs to each baby crab, making them perfect for gifts or family game collections. The pattern is so versatile that I've even created seasonal versions with holiday colors for special occasions.

Common Mistakes & How to Fix Them

βœ— Forgetting to change colors at the specified rounds when making baby crab bodies βœ— Not stuffing the crab bodies firmly enough, causing them to lose their shape over time βœ— Placing safety eyes too close together or at the wrong round positions βœ— Skipping stitch markers when working in rounds, leading to miscounted stitches and uneven shapes

Crab Memory Game Amigurumi Pattern

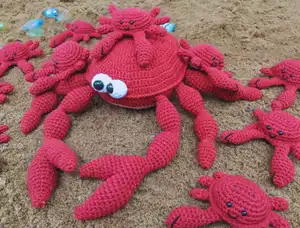
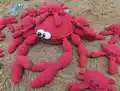
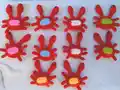
Create an adorable crab family with this charming memory game pattern featuring one large mother crab and ten colorful baby crabs. This engaging amigurumi project combines fun gameplay with beautiful handcrafted pieces, perfect for children and adults alike. Each baby crab features a different colored belly, making this both a delightful toy and an educational memory-building game that will provide hours of entertainment.

Beginner Friendly 8-10 Hours

Materials Needed for Crab Memory Game Amigurumi Pattern

β€” Main Fabric

  • 01
    5 ply 100% cotton yarn, approximately 10g pink color for mother crab bottom
  • 02
    4 ply 100% cotton yarn, approximately 250g dark red or maroon for main bodies
  • 03
    2 yards each from 5 different colors for baby crab bellies
  • 04
    Approximately 5g each of black and white yarn for details

β€” Tools Required

  • 01
    3.00mm crochet hook
  • 02
    3.5mm crochet hook
  • 03
    Scissors
  • 04
    Stitch markers
  • 05
    Tapestry needle
  • 06
    Black safety eyes 15mm (1 pair for mother crab)
  • 07
    Black safety eyes 4mm (10 pairs for baby crabs)
  • 08
    Fiber filling
  • 09
    1cm button

Progress Tracker

0% Complete

β€” Baby Crabs Bottom Part :

Round 1 :

1 sc inc, 3 sc, 1 sc inc, work into other side of chs, 1 sc inc, 3 sc, 1 sc inc (14)

Round 2 :

2 sc inc, 3 sc, 4 sc inc, 3 sc, 2 sc inc (22)

Round 3 :

22 sc (22)

Round 4 :

(1 sc, 1 sc inc)x11 (33)

Round 5 :

33 sc (33)

β€” Baby Crabs Top Part :

Round 1 :

1 sc inc, 3 sc, 1 sc inc, work into other side of chs, 1 sc inc, 3 sc, 1 sc inc (14)

Round 2 :

2 sc inc, 3 sc, 4 sc inc, 3 sc, 2 sc inc (22)

Round 3 :

22 sc (22)

Round 4 :

(1 sc, 1 sc inc)x11 (33)

Round 5-7 :

33 sc (33)

Info :

Attach safety eyes (4mm) between rnd 4 and 5, 3 sts in between

Info :

Embroider mouth with black color on rnd 6

β€” Baby Crabs Small Legs :

Round 1 :

5 sc into magic ring (05)

Round 2-5 :

5 sc (05)

β€” Baby Crabs Large Front Legs :

Round 1 :

6 sc into magic ring (06)

Round 2 :

2 sc inc, 4 sc (08)

Round 3 :

8 sc (08)

Round 4 :

4 sc inc, 4 sc (12)

Round 5-7 :

12 sc (12)

Round 8 :

2 sc, 2 inv sc dec, 6 sc (10)

Round 9 :

2 sc, 1 inv sc dec, 6 sc (09)

Round 10 :

1 inv sc dec, 1 sc, 1 inv sc dec, 4 sc (07)

Round 11-14 :

7 sc (07)

β€” Mother Crab Bottom :

Round 1 :

12 dc into magic ring (12)

Round 2 :

1 dc inc to every st (24)

Round 3 :

*1 dc, 1 dc inc* rep 11 times (36)

Round 4 :

*2 dc, 1 dc inc* rep 11 times (48)

Round 5 :

*3 dc, 1 dc inc* rep 11 times (60)

Round 6 :

*4 dc, 1 dc inc* rep 11 times (72)

Round 7 :

*5 dc, 1 dc inc* rep 11 times (84)

Round 8 :

*6 dc, 1 dc inc* rep 11 times (96)

Round 9 :

*7 dc, 1 dc inc* rep 11 times (108)

β€” Mother Crab Top :

Round 1 :

12 dc into magic ring (12)

Round 2 :

1 dc inc to every st (24)

Round 3 :

*1 dc, 1 dc inc* rep 11 times (36)

Round 4 :

*2 dc, 1 dc inc* rep 11 times (48)

Round 5 :

*3 dc, 1 dc inc* rep 11 times (60)

Round 6 :

*4 dc, 1 dc inc* rep 11 times (72)

Round 7 :

*5 dc, 1 dc inc* rep 11 times (84)

Round 8 :

*6 dc, 1 dc inc* rep 11 times (96)

Round 9 :

*7 dc, 1 dc inc* rep 11 times (108)

β€” Mother Crab Small Legs :

Round 1 :

6 sc into magic ring (06)

Round 2 :

6 sc (06)

Round 3 :

(1 sc, 1 sc inc)x3 (09)

Round 4 :

9 sc (09)

Round 5 :

(2 sc, 1 sc inc)x3 (12)

Round 6-7 :

12 sc (12)

Round 8 :

(2 sc, 1 inv sc dec)x3 (09)

Round 9-10 :

9 sc (09)

Round 11 :

(2 sc, 1 sc inc)x3 (12)

Round 12 :

(3 sc, 1 sc inc)x3 (15)

Round 13 :

(4 sc, 1 sc inc)x3 (18)

Round 14-16 :

18 sc (18)

Round 17 :

(4 sc, 1 inv sc dec)x3 (15)

Round 18 :

(3 sc, 1 inv sc dec)x3 (12)

Round 19 :

(2 sc, 1 inv sc dec)x3 (09)

Round 20-21 :

9 sc (09)

β€” Mother Crab Eyes :

Round 1 :

6 sc into magic ring (06)

Round 2 :

6 sc inc (12)

Round 3-5 :

12 sc (12)

Info :

Attach safety eyes (15mm) between rnd 3 and 4

Round 6 :

6 inv sc dec (06)

Assembly Instructions

  • Join baby crab top and bottom parts by working slip stitches around the edge, stuffing before completing the round
  • Attach 6 small legs and 2 large front legs to each baby crab body, positioning them evenly around the bottom edge
  • Embroider V-shaped details on the inner side of large front legs using black yarn
  • Join mother crab top and bottom parts together, working 81 single crochet stitches, then add chain space for opening
  • Attach 6 small legs and 2 large front legs to mother crab body, spacing them evenly around the bottom
  • Sew button to bottom part of mother crab to create closure mechanism
  • Attach completed eyes to top part of mother crab using white yarn base and safety eyes

Important Notes

  • πŸ’‘Keep tension consistent throughout to ensure all pieces are uniform in size
  • πŸ’‘Use stitch markers to track your rounds, especially during color changes
  • πŸ’‘Stuff all pieces firmly but not too tightly to maintain proper shape
  • πŸ’‘Position safety eyes carefully before securing, as they cannot be repositioned once fastened
  • πŸ’‘Make sure to leave long tails when fastening off pieces for easier assembly
  • πŸ’‘Test the memory game mechanism before final assembly to ensure proper fit

This enchanting Crab Memory Game brings oceanic adventure to your home with a delightful mother crab and her ten colorful babies. Each piece is crafted with love using simple amigurumi techniques, creating both a beautiful display and an engaging educational toy. The vibrant colors and adorable expressions make this pattern perfect for gifts or family bonding time. πŸ¦€ Happy crocheting! 🧢✨

You ask,

we answer.

FAQs

What's the best way to keep track of all the different colored baby crabs?

Use small labeled bags or containers to keep each baby crab's pieces together during construction. This helps ensure you don't mix up the different colored belly pieces.

Can I make this pattern with different colors?

Absolutely! While the pattern calls for red crabs, you can use any color combination you prefer. Just maintain the contrast between the main body and belly colors for the memory game aspect.

How do I ensure the mother crab opens and closes properly?

The key is proper placement of the button and chain loop. Test the closure mechanism before final assembly and adjust the chain length if needed for a secure but easy-to-open fit.

What age group is this memory game suitable for?

This game is perfect for children 3 years and older, but the crocheted pieces should be made with securely attached safety eyes and parts for younger children's safety.

How should I clean the finished crab memory game?

Hand wash gently in cool water with mild detergent, then lay flat to dry. Avoid machine washing to preserve the shape and integrity of the safety eyes.