🧢 Beautiful ✨ Detailed πŸ’ Adorable

Cute Chick Amigurumi Pattern

Cute Chick Amigurumi Pattern
4.8β˜… Rating
2-3 Hours Time Needed
3.7K Made This
βœ‚οΈ

Beginner Friendly Level

Perfect for those just starting their sewing journey, with clear instructions and simple techniques

⏱️

Bite-Sized Project

Complete in under 2 hoursβ€”quick, fun, and perfect for a little creative escape.

🧸

Cute Companion

An adorable friend to cherish, handcrafted with love to bring comfort and joy for years to come.

About This Cute Chick Amigurumi Pattern

This delightful chick amigurumi pattern brings springtime joy to your crochet projects. The pattern features a perfectly round body and head design that creates the most huggable little bird. The sweet pink flower detail on top adds a feminine touch that makes this chick absolutely irresistible. Working in continuous rounds, you'll build this charming character piece by piece, creating something truly special.

Cute Chick Amigurumi Pattern crochet pattern - detailed view of completed project

The finished chick sits beautifully at about 10cm in length, making it perfect for display or gifting. With its cheerful yellow color and adorable orange accents, this pattern captures all the sweetness of a baby chick.

Why You'll Love This Cute Chick Amigurumi Pattern

I absolutely love how this pattern combines simplicity with incredible charm! The way the pink flower sits perfectly on top of the chick's head creates such a sweet personality. I'm constantly amazed by how just a few basic stitches can transform into something so full of character and joy. Every time I make this chick, I can't help but smile at those tiny orange feet and that precious little beak.

Cute Chick Amigurumi Pattern step 1 - construction progress Cute Chick Amigurumi Pattern step 2 - assembly progress Cute Chick Amigurumi Pattern step 3 - details and accessories Cute Chick Amigurumi Pattern step 4 - final assembly and finishing

Switch Things Up

I love experimenting with different color combinations for this adorable chick pattern! Instead of the classic yellow, I've tried making pastel versions in soft lavender, mint green, and even a sophisticated cream color that looks absolutely elegant. The flower on top offers endless possibilities too - I've created tiny sunflowers, cherry blossoms, and even little bows for special occasions.

Sometimes I add tiny embroidered details like rosy cheeks or closed sleepy eyes for a different personality. For holidays, I've made orange chicks for autumn, white ones for winter with little scarves, and even rainbow versions that bring such joy to any room. The beauty of this pattern is how versatile it is - each little change creates a completely unique character with its own special charm.

Common Mistakes & How to Fix Them

βœ— Not stuffing firmly enough which can cause the chick to lose its round adorable shape βœ— Placing safety eyes too close together making the chick look cross-eyed instead of sweet βœ— Making the flower too large which overwhelms the chick's delicate proportions and cute appearance βœ— Forgetting to secure thread ends properly causing pieces to come apart during assembly

Cute Chick Amigurumi Pattern

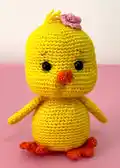
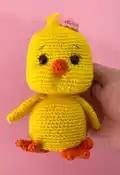
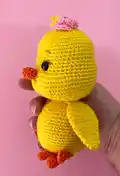
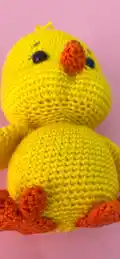
Create the most adorable baby chick amigurumi with this detailed pattern! This sweet yellow chick features a charming pink flower on top, tiny orange feet, and the cutest beak that will melt your heart. Perfect for spring decorations, Easter gifts, or simply adding sunshine to any room. The finished chick measures about 10cm in length and sits beautifully on any surface. This pattern combines simple stitches with delightful details that make crocheting both relaxing and rewarding.

Beginner Friendly 2-3 Hours

Materials Needed for Cute Chick Amigurumi Pattern

β€” Main Fabric

  • 01
    Cotton or acrylic yarn in yellow (main color), orange (beak and feet), and pink (flower)
  • 02
    Yellow yarn for body and head approximately 50g
  • 03
    Orange yarn for beak and feet details
  • 04
    Pink yarn for decorative flower accent

β€” Tools Required

  • 01
    Crochet hook size 2.5mm
  • 02
    Safety eyes (black)
  • 03
    Scissors
  • 04
    Tapestry needle
  • 05
    Stitch markers
  • 06
    Stuffing (polyester fiberfill)
  • 07
    Pins for assembly

Progress Tracker

0% Complete

β€” Head & Body :

Round 1 :

6 sc in magic ring

Round 2 :

6 inc (12)

Round 3 :

(6 times) 1 sc into sc next inc (18)

Round 4 :

(6 times) 2 sc into sc next inc (24)

Round 5 :

(6 times) 3 sc into sc next inc (30)

Round 6 :

(6 times) 4 sc into sc next inc (36)

Round 7 :

(6 times) 5 sc into sc next inc (42)

Round 8 :

(6 times) 6 sc into sc next inc (48)

Round 9 :

(6 times) 7 sc into sc next inc (54)

Round 10-19 :

(10 rings) sc into sc (54)

Info :

Place the safety eyes between round 17-18. There should be 8 sc in between.

Round 20 :

18 sc into sc (18 sc inc) 18 sc into sc (72)

Round 21-26 :

(6 rings) sc into sc (72)

Round 27 :

18 sc into sc (18 sc dec) 18 sc into sc (54)

Round 28 :

(6 times) 7 sc into sc next dec (48)

Round 29 :

(6 times) 6 sc into sc next dec (42)

Round 30 :

(6 times) 5 sc into sc next dec (36)

Round 31 :

(6 times) 4 sc into sc next dec (30)

Info :

Stuff the head tightly, keep filling as you go.

Round 32 :

(6 times) 3 sc into sc next dec (24)

Round 33 :

(6 times) 2 sc into sc next dec (18)

Round 34-35 :

(2 rings) sc into sc (18)

Round 35 :

(6 times) 2 sc into sc next inc (24)

Round 36 :

(6 times) 3 sc into sc next inc (30)

Round 37 :

(6 times) 4 sc into sc next inc (36)

Round 38 :

(6 times) 5 sc into sc next inc (42)

Round 39 :

(6 times) 6 sc into sc next inc (48)

Round 40-51 :

(12 rings) sc into sc (48)

Round 52 :

(6 times) 6 sc into sc next dec (42)

Round 53 :

(6 times) 5 sc into sc next dec (36)

Round 54 :

(6 times) 4 sc into sc next dec (30)

Round 55 :

(6 times) 3 sc into sc next dec (24)

Info :

Stuff the body tightly, keep filling as you go.

Round 56 :

(6 times) 2 sc into sc next dec (18)

Round 57 :

(6 times) 1 sc into sc next dec (12)

Round 58 :

6 sc dec fo, clean the end of the thread.

β€” Beak :

Round 1 :

6 sc in magic ring

Round 2 :

sc into sc (6)

Round 3 :

2 sc inc (8)

Round 4 :

5 (2 rings) sc into sc (8) fo, Leave a long thread end to sew.

β€” Wings :

Info :

Make 2

Round 1 :

6 sc in magic ring

Round 2 :

2 sc inc (8)

Round 3 :

sc into sc (8)

Round 4 :

2 sc inc (10)

Round 5 :

sc into sc (10)

Round 6 :

2 sc inc (12)

Round 7 :

2 sc inc (14)

Round 8 :

2 sc inc (16)

Round 9 :

2 sc inc (18)

Round 10 :

2 sc inc (20)

Round 11-13 :

(3 rings) sc into sc (20)

Round 14 :

2 sc dec (18)

Round 15 :

2 sc dec (16)

Round 16 :

2 sc dec (14)

Round 17 :

Straighten it, sink the needle into both layers, 7 sc fo.

Info :

Leave a long thread end to sew.

β€” Feet - Nails :

Info :

Make 2 feet, Make 3 nails each

Round 1 :

6 sc in magic ring

Round 2 :

4 (3 rings) sc into sc (6)

Round 5 :

Birleştirin sc into sc (18)

Round 6 :

8 (3 rings) sc into sc (18)

Round 9 :

Straighten it, sink the needle into both layers, 8 sc fo.

Info :

Leave a long thread end to sew.

β€” Flower :

Round 1 :

17 ch, turn

Round 2 :

(8 times) 1 ch into sc 1 ch into 4 cr fo, Leave a long thread end to sew.

Assembly Instructions

  • Sew the beak to the center of the head between the safety eyes, positioning it slightly below eye level
  • Attach wings to both sides of the body at the neck area where head meets body
  • Sew the three orange nails together to form each foot, then attach feet to the bottom of the body
  • Create the pink flower by rolling the crocheted strip and securing with stitches to form a rose shape
  • Attach the completed flower to the top of the head, positioning it slightly off-center for charm
  • Ensure all pieces are securely sewn and trim any excess thread ends

Important Notes

  • πŸ’‘Use safety eyes appropriate for the intended age group if making as a toy for children
  • πŸ’‘Stuff firmly but not overly tight to maintain the chick's adorable round shape
  • πŸ’‘Keep consistent tension throughout to ensure even stitches and professional appearance
  • πŸ’‘Position the flower slightly off-center on the head for a more natural, charming look
  • πŸ’‘Secure all thread ends properly as small pieces can come loose with handling

This precious little chick amigurumi brings pure sunshine and joy to any space! With its cheerful yellow color, sweet pink flower accent, and tiny orange details, it captures all the charm of spring in one adorable package. The perfect blend of simplicity and cuteness makes this pattern a delightful project that you'll want to make again and again. Whether for Easter decorations, baby gifts, or just because you need more sunshine in your life, this little chick will steal your heart. 🧢 Happy crocheting! πŸ₯✨

You ask,

we answer.

FAQs

What size hook should I use for this chick pattern?

Use a 2.5mm crochet hook as specified in the pattern. This size works perfectly with the recommended yarn weight to achieve the correct gauge and finished size.

Can I make this chick larger or smaller?

Yes! Use a larger hook and thicker yarn for a bigger chick, or a smaller hook with thinner yarn for a mini version. Just remember to adjust your safety eye size accordingly.

Is this pattern suitable for beginners?

Absolutely! This pattern uses basic stitches like single crochet, increases, and decreases. It's perfect for beginners who want to practice these fundamental techniques while creating something adorable.

How do I attach the safety eyes securely?

Place safety eyes between rounds 17-18 with 8 single crochets between them. Push the post through the fabric and secure with the washer on the inside before stuffing.

What if I can't find the exact yarn colors?

Feel free to substitute with similar colors! Any bright yellow, orange, and pink will work beautifully. You could even make creative color variations like a purple chick with a yellow flower.