🧶 Beautiful ✨ Detailed 💝 Adorable

Daisy the Duck Amigurumi Pattern

Daisy the Duck Amigurumi Pattern
4.6★ Rating
1.5-2 Hours Time Needed
2.1K Made This
✂️

Beginner Friendly Level

Perfect for those just starting their sewing journey, with clear instructions and simple techniques

⏱️

Bite-Sized Project

Complete in under 2 hours—quick, fun, and perfect for a little creative escape.

🐥

Charming Critter

Delightful animal designs with sweet details that capture the essence of your favorite woodland and farmyard friends.

About This Daisy the Duck Amigurumi Pattern

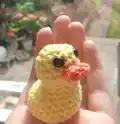
Daisy the Duck is a delightful pocket-sized amigurumi that's perfect for beginners and experienced crocheters alike. This adorable little duck works up quickly using simple increases and decreases to create her rounded body shape. The pattern includes detailed photo guides showing each stage of construction, making it easy to follow along and achieve perfect results. With her cheerful yellow body and bright orange beak, Daisy makes a wonderful handmade gift or personal companion.

Daisy the Duck Amigurumi Pattern crochet pattern - detailed view of completed project

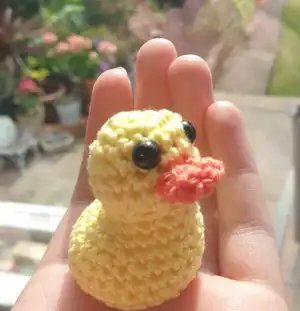
This miniature duck measures approximately 4cm by 3cm by 4cm when completed with 4ply yarn and a 3.5mm hook. The pattern uses basic amigurumi techniques including working in the round, strategic shaping for the duck's distinctive body, and simple assembly for the beak attachment.

Why You'll Love This Daisy the Duck Amigurumi Pattern

I absolutely love this pattern because it's perfect for using up small amounts of yarn from your stash! Daisy works up so quickly that you can make several in an afternoon, making her ideal for craft fairs, last-minute gifts, or building your own little duck family. The shaping is clever yet simple—those strategic increases create her adorable plump body that actually sits upright without any support. I find the process of watching her personality emerge with each round so satisfying, and adding those tiny safety eyes brings her to life instantly. Plus, there's something incredibly rewarding about creating such a cute companion in under two hours!

Daisy the Duck Amigurumi Pattern step 1 - construction progress Daisy the Duck Amigurumi Pattern step 2 - assembly progress Daisy the Duck Amigurumi Pattern step 3 - details and accessories Daisy the Duck Amigurumi Pattern step 4 - final assembly and finishing

Switch Things Up

I love experimenting with different color combinations to create unique duck personalities! While the classic yellow and orange creates a traditional duckling look, why not try making a white duck with a yellow beak for an elegant swan-like appearance? Or go bold with pastel pink and lavender for a magical fantasy duck that would delight any child.

You could also transform Daisy into different duck species by adjusting the colors—imagine a mallard with green head colors or a mandarin duck with multicolored sections. I've found that adding small details like a tiny bow made from ribbon or a miniature felt flower can give each duck its own personality, making them perfect for personalized gifts.

For seasonal variations, I like to create themed ducks: add a tiny red scarf for winter, a flower crown for spring, or miniature sunglasses for summer versions. The small size makes it easy to embellish without overwhelming the design. I've even made a whole family of ducks in graduating sizes by using different yarn weights—the 4ply creates the baby, DK makes mama duck, and chunky yarn produces papa duck!

Common Mistakes & How to Fix Them

✗ Not stuffing the back end heavily enough will cause your duck to tip forward instead of sitting upright properly ✗ Placing the safety eyes too high or too low will affect the duck's expression and overall cute factor ✗ Forgetting to reshape the body after stuffing can leave it looking round instead of duck-shaped with proper definition ✗ Sewing the beak at the wrong angle or position can throw off the entire face proportions and character

Daisy the Duck Amigurumi Pattern

Meet Daisy the Duck, your adorable pocket-sized companion ready to travel wherever you go! This charming mini amigurumi pattern creates a sweet little duck measuring just 4cm, perfect for keychains, bag charms, or as a delightful handmade gift. With her bright yellow body and cheerful orange beak, Daisy brings sunshine and smiles to anyone who meets her. This quick and rewarding project uses simple stitches and minimal materials to create a friend you'll treasure forever.

Beginner Friendly 1.5-2 Hours

Materials Needed for Daisy the Duck Amigurumi Pattern

— Main Fabric

  • 01
    King Cole Giza 4ply yarn in yellow (A) - 1 ball
  • 02
    King Cole Giza 4ply yarn in orange (B) - 1 ball
  • 03
    Or any 4ply weight yarn in yellow and orange colors

— Tools Required

  • 01
    Crochet hook 3.5mm
  • 02
    Plastic safety eyes 0.3cm (3mm)
  • 03
    Polyester stuffing
  • 04
    Yarn needle for sewing
  • 05
    Scissors
  • 06
    Stitch markers (optional but helpful)

Progress Tracker

0% Complete

— Duck Body (A):

Round 1:

Sc 6 into a magic ring (6)

Round 2:

Inc into each stitch (12)

Round 3:

[Sc, inc into next stitch] x6 (18)

Round 4-7:

Sc into each stitch round (18)

Round 8:

Dec into each stitch (9)

Round 9:

Inc 3, sc 6 (12)

Round 10:

Inc 6, sc 6 (18)

Round 11:

[Sc, inc] x6, sc 6 (24)

Round 12:

Sc 7, inc 4, sc 13 (28)

Round 13:

Sc 11, dec, sc 15 (27)

Round 14-15:

Sc into each stitch round (27)

Info:

Insert the safety eyes between row 4+5, 4/5 stitches apart

Round 16:

Sc 9, dec 4, sc 10 (23)

Info:

Now stuff the body. To ensure the duck does not overbalance, make sure you add a lot of stuffing to the back end.

Round 17:

Dec x11, sc (12)

Round 18:

Dec into each stitch (6)

Info:

Close the hole and cast off. In order for it to be shaped like a duck, you may have to squeeze it and reshape it a little.

— Duck Beak (B):

Initial Chain:

Chain 5

Row 1:

Starting from the 2nd chain from the hook, sc into each stitch along the chain (4)

Row 2:

Chain 1, sc into each stitch along the row (4)

Info:

Cast off. This has now formed a rectangle. Fold in half and stitch the two shorter edges shut.

Assembly Instructions

  • After completing the body, check if the duck sits flat. If not, turn it over and push both thumbs from the bottom up towards the head to reshape.
  • Take the completed beak rectangle and fold it in half lengthwise to create a triangular beak shape.
  • Stitch the two shorter edges of the beak shut to secure the folded shape.
  • Position the beak so the bottom edge aligns with the join between rounds 7 and 8 of the body.
  • Sew along the bottom edge of the beak first, then along the sides of the mouth opening.
  • Finish by stitching along the top of the mouth so it lines up with the join between rounds 6 and 7.
  • Make final adjustments by squeezing and reshaping the body to achieve the characteristic duck silhouette with a plump back end.

Important Notes

  • 💡Stuff the back end of the duck very firmly to prevent it from tipping forward when sitting
  • 💡Place safety eyes carefully between rounds 4 and 5, spacing them 4-5 stitches apart for best expression
  • 💡The body will look quite round initially—don't worry, the squeezing and reshaping step is essential for the duck shape
  • 💡Take photos at different stages (rounds 11, 12, 15, 17) to compare with the pattern photos and ensure correct shaping
  • 💡When attaching the beak, align it carefully with the specified rounds for the most realistic and adorable appearance

This adorable Daisy the Duck pattern was designed by FollowTheYarn to create a pocket-sized companion that's both quick to make and endlessly charming. The clever shaping techniques create a realistic duck silhouette that sits upright beautifully, while the simple construction makes it accessible for beginners. Whether you're making Daisy as a keychain, a gift, or starting your own little duck collection, this pattern delivers big personality in a tiny package. Did you know ducks can live up to 20 years? Your crocheted Daisy will last even longer as a treasured handmade keepsake! 🦆✨

You ask,

we answer.

FAQs

Can I use a different yarn weight for this pattern?

Yes! The pattern works with different yarn weights—just adjust your hook size accordingly. Using thicker yarn like super chunky will create a much larger duck, while thinner yarn will make an even tinier version. The 4ply yarn with 3.5mm hook creates a 4cm duck.

My duck keeps falling forward instead of sitting upright. What am I doing wrong?

This is usually a stuffing issue. Make sure to add significantly more stuffing to the back end (the tail area) than the front. The pattern specifically mentions this because the weight distribution is crucial for the duck to sit properly without tipping.

Can I make this pattern without safety eyes?

Absolutely! If you're making this for a small child or prefer not to use safety eyes, you can embroider eyes using black yarn or felt. Just make sure to position them between rounds 4-5 as specified, spaced 4-5 stitches apart.

The beak seems tricky to attach. Any tips?

The key is alignment! Use pins to hold the beak in position before sewing. The bottom edge should align with rounds 7/8 join, and the top with rounds 6/7 join. Sew the bottom edge first, then work your way around the mouth opening for the neatest result.

How do I reshape the duck body to look more duck-like?

After stuffing, gently squeeze the body to create definition. The pattern includes a specific tip: turn the duck over and push both thumbs from the bottom up toward the head. This helps create the characteristic duck shape with a fuller back end and defined chest area.