🧢 Beautiful ✨ Detailed πŸ’ Adorable

Daisy the Duck Amigurumi Pattern

Daisy the Duck Amigurumi Pattern
4.0β˜… Rating
2-3 Hours Time Needed
2.2K Made This
βœ‚οΈ

Beginner Friendly Level

Perfect for those just starting their sewing journey, with clear instructions and simple techniques

⏱️

Bite-Sized Project

Complete in under 2 hoursβ€”quick, fun, and perfect for a little creative escape.

🐾

Pocket Pal

A mini friend to carry anywhere, providing comfort and companionship in a perfectly portable size.

About This Daisy the Duck Amigurumi Pattern

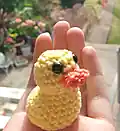
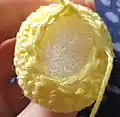
This delightful Daisy the Duck pattern creates a miniature amigurumi that measures just 4cm by 3cm by 4cm when finished. The pattern combines basic crochet techniques with clever shaping to create an authentic duck silhouette that sits perfectly upright. Using simple single crochet stitches, increases, and decreases, you'll craft both the body and beak separately before assembling your new feathered friend.

Daisy the Duck Amigurumi Pattern crochet pattern - detailed view of completed project

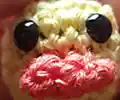
The finished duck features adorable safety eyes and requires minimal materials, making it an excellent starter project. Special attention to stuffing placement ensures Daisy sits balanced and maintains her charming duck-like posture.

Why You'll Love This Daisy the Duck Amigurumi Pattern

I absolutely love how this pattern teaches fundamental amigurumi techniques while creating something genuinely adorable. The satisfaction of watching Daisy's personality emerge as you work through each round is incredible, and I find the small size makes it perfect for testing new yarns or hook sizes. What really gets me excited is how the clever shaping techniques create such realistic proportions in such a tiny package!

Daisy the Duck Amigurumi Pattern step 1 - construction progress Daisy the Duck Amigurumi Pattern step 2 - assembly progress Daisy the Duck Amigurumi Pattern step 3 - details and accessories Daisy the Duck Amigurumi Pattern step 4 - final assembly and finishing

Switch Things Up

I love experimenting with different color combinations for this pattern! Try making Daisy in soft pastels like mint green and coral pink for a vintage look, or go bold with purple and teal for a more modern twist. You could even create a whole family of ducklings in rainbow colors - imagine how adorable a row of tiny ducks would look on your bookshelf!

For added personality, consider embroidering small details like eyelashes or rosy cheeks using embroidery floss. I've also seen crafters add tiny bow ties or flower crowns to make each duck unique. The small size makes it perfect for testing new techniques or using up yarn scraps from larger projects.

Common Mistakes & How to Fix Them

βœ— Forgetting to stuff the back end heavily enough can cause the duck to tip forward instead of sitting upright βœ— Placing safety eyes too far apart or too close together can affect the duck's expression and overall appearance
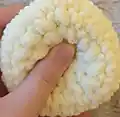
 βœ— Not reshaping the body after completion may result in a less duck-like silhouette that appears too round βœ— Overstuffing the entire body can make it difficult to achieve the proper flat-sitting position required for balance

Daisy the Duck Amigurumi Pattern

Meet Daisy, your adorable new travel companion! This charming mini duck amigurumi is perfect for beginners looking to create their first cute animal friend. With her bright yellow body and orange beak, Daisy brings sunshine wherever she goes. The pattern creates a perfectly sized pocket pal that's ideal for gifting or keeping as your own cheerful companion. Simple stitches and clear instructions make this project enjoyable from start to finish.

Beginner Friendly 2-3 Hours

Materials Needed for Daisy the Duck Amigurumi Pattern

β€” Main Fabric

  • 01
    King Cole Giza 4ply yarn in yellow (A) - 1 ball
  • 02
    King Cole Giza 4ply yarn in orange (B) - 1 ball

β€” Tools Required

  • 01
    Crochet hook 3.5mm
  • 02
    Plastic safety eyes 0.3cm
  • 03
    Polyester stuffing
  • 04
    Needle and thread
  • 05
    Scissors

Progress Tracker

0% Complete

β€” Duck Body (A) :

Round 1 :

Sc 6 into a magic ring

Round 2 :

Inc into each stitch (12)

Round 3 :

[Sc, inc into next stitch] x6 (18)

Round 4-7 :

Sc into each stitch round (18)

Round 8 :

Dec into each stitch (9)

Round 9 :

Inc 3, sc 6 (12)

Round 10 :

Inc 6, sc 6 (18)

Round 11 :

[Sc, inc] x6, sc 6 (24)

Round 12 :

Sc 7, inc 4, sc 13 (28)

Round 13 :

Sc 11, dec, sc 15 (27)

Round 14+15 :

Sc into each stitch round (27)

Round 16 :

Sc 9, dec 4, sc 10 (23)

Info :

Insert the safety eyes between row 4+5, 4/5 stitches apart. Now stuff the body. To ensure the duck does not overbalance, make sure you add a lot of stuffing to the back end.

Round 17 :

Dec x11, sc (12)

Round 18 :

Dec into each stitch (6)

Info :

Close the hole and cast off. In order for it to be shaped like a duck, you may have to squeeze it and re-shape it a little.

β€” Duck Beak (B) :

Chain :

Chain 5

Row 1 :

Starting from the 2nd chain from the hook, sc into each stitch along the chain (4)

Row 2 :

Chain 1, sc into each stitch along the row (4)

Info :

Cast off. This has now formed a rectangle. Fold in half and stitch the two shorter edges shut.

Assembly :

Stitch along the bottom edge of the beak so it is in-line with the join of row 7/8. Stitch along the edge of the mouth then along the top of the mouth so it lines up with the join between row 6/7.

Assembly Instructions

  • Fold the completed beak rectangle in half and stitch the two shorter edges together to form a triangular beak shape
  • Position the beak along the bottom edge so it aligns with the join between rounds 7 and 8 of the duck body
  • Secure the beak by stitching along the mouth edge and then along the top, aligning with the join between rounds 6 and 7
  • If the duck doesn't sit flat, turn it over and push both thumbs from the bottom up towards the head to reshape

Important Notes

  • πŸ’‘Add extra stuffing to the back end of the duck to prevent it from tipping forward when sitting
  • πŸ’‘Place safety eyes between rounds 4 and 5, spacing them 4-5 stitches apart for the best expression
  • πŸ’‘Reshape the body after completion by gently squeezing to achieve the proper duck silhouette
  • πŸ’‘Use the 4ply yarn for sewing the beak attachment for the most secure and neat finish

This sweet Daisy the Duck pattern brings joy in a perfectly portable size! Designed with beginners in mind, it teaches essential amigurumi techniques while creating an adorable companion that sits beautifully on any shelf. The clever construction creates authentic duck proportions that are sure to bring smiles wherever Daisy travels. πŸ¦† Happy crocheting! 🧢✨

You ask,

we answer.

FAQs

What size will my finished duck be?

The completed Daisy the Duck measures approximately 4cm by 3cm by 4cm, making her a perfect pocket-sized companion.

Why does my duck keep tipping forward?

Make sure to add plenty of stuffing to the back end of the duck as instructed. This extra weight prevents forward tipping and helps Daisy sit upright properly.

Can I use different yarn weights for this pattern?

Yes! The pattern shows an example made with super chunky yarn. Just remember that different yarn weights will create different sized ducks and may require hook size adjustments.

How do I get the proper duck shape?

After completing the body, you may need to gently squeeze and reshape it. The pattern includes specific guidance on reshaping techniques to achieve the perfect duck silhouette.