๐Ÿงถ Beautiful โœจ Detailed ๐Ÿ’ Adorable

Eira Owl Amigurumi Pattern

Eira Owl Amigurumi Pattern
4.6โ˜… Rating
8-10 Hours Time Needed
1.5K Made This
โœ‚๏ธ

Intermediate Level

Ideal for those with basic knitting experience, featuring slightly more advanced stitches and techniques to expand your skills.

โฑ๏ธ

All-Day Adventure

Requires 8-10 hours, ideal for a full day of immersive knitting.

๐Ÿงธ

Cute Companion

An adorable friend to cherish, handcrafted with love to bring comfort and joy for years to come.

About This Eira Owl Amigurumi Pattern

The Eira Owl pattern features intricate details including specially designed eye patches with yellow centers, a functional beak that can hold mail, and carefully positioned wings and feet that allow the owl to stand freely. The pattern includes multiple accessories like a colorful striped scarf, a miniature envelope with wax seal, and detailed embroidered features that bring this magical creature to life.

Eira Owl Amigurumi Pattern crochet pattern - detailed view of completed project

This comprehensive pattern includes step-by-step assembly instructions with helpful photos and tips for achieving the perfect positioning of all components. The owl stands approximately 6 inches tall and makes a wonderful decorative piece or gift.

Why You'll Love This Eira Owl Amigurumi Pattern

I absolutely love how this pattern combines functionality with whimsy - the owl actually stands on its own thanks to the clever tail design that acts as a kickstand! The attention to detail is incredible, from the layered eye patches that create depth to the tiny envelope she carries. What makes this pattern special is how each component serves both an aesthetic and functional purpose, creating a truly interactive amigurumi that tells a story.

Eira Owl Amigurumi Pattern step 1 - construction progress Eira Owl Amigurumi Pattern step 2 - assembly progress Eira Owl Amigurumi Pattern step 3 - details and accessories Eira Owl Amigurumi Pattern step 4 - final assembly and finishing

Switch Things Up

I love how versatile this Eira Owl pattern can be with just a few creative modifications! Try making her in different seasonal colors - imagine a autumn owl in warm oranges and browns, or a winter version in icy blues and silvers. You could easily customize her accessories too - swap the envelope for a tiny book, add a small graduation cap for a wise professor owl, or create different scarf patterns like cables or fair isle designs.

The eye patches offer another fun customization opportunity - try different color combinations or even add small embroidered details like eyelashes or eyebrows for more personality. For a more rustic look, consider using natural fiber yarns in earthy tones, or go bold with bright rainbow colors for a whimsical fairy tale version.

Size variations are another exciting possibility - scale up the pattern with thicker yarn and larger hooks for a cuddly companion, or work it in finer thread for an elegant miniature display piece.

Common Mistakes & How to Fix Them

โœ— Not marking your rounds properly can lead to uneven shaping and misaligned features during assembly โœ— Stuffing too firmly in the head area makes it difficult to close the final rounds smoothly โœ— Positioning the safety eyes incorrectly affects the entire facial expression and proportions of the owl โœ— Forgetting to attach feet before the tail prevents the owl from standing properly as intended

Eira Owl Amigurumi Pattern

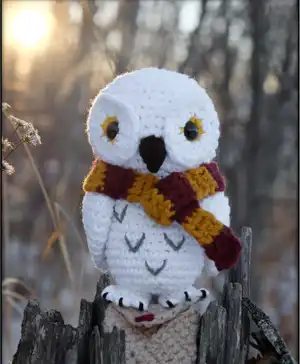
Create your own magical Eira Owl with this charming amigurumi pattern! This adorable white owl comes complete with expressive yellow-rimmed eyes, a cozy striped scarf, and even carries her own tiny envelope sealed with a red wax seal. Perfect for Harry Potter fans or anyone who loves whimsical woodland creatures, this detailed pattern will guide you through creating a freestanding owl that's ready to deliver magical messages.

Intermediate 8-10 Hours

Materials Needed for Eira Owl Amigurumi Pattern

โ€” Main Fabric

  • 01
    Approximately 92 metres of white worsted weight yarn (#4)
  • 02
    Small amounts of yellow, black, grey, beige, and red worsted weight yarn
  • 03
    12 metres of worsted yarn in choice of colors for striped scarf

โ€” Tools Required

  • 01
    3.5mm crochet hook
  • 02
    5mm crochet hook for scarf
  • 03
    2 safety eyes (12mm)
  • 04
    Black embroidery thread
  • 05
    Poly-fil stuffing
  • 06
    Stitch markers
  • 07
    Darning needle
  • 08
    Sewing needle
  • 09
    Scissors

Progress Tracker

0% Complete

โ€” Eyes (make 2) - must be made first :

Round 1 :

Using YELLOW - In MR, SC 3, HDC, DC, HDC, SC 2. Close the MR loosely, leaving enough room to insert the safety eye post through the middle. Join with a SlSt (8sts)

Round 2 :

Using WHITE - Ch 2 (counts as a st). HDC in same st as the ch. HDC INC in each stitch around. Join with a SlSt (16sts)

Round 3 :

Ch 1. SC in the same stitch. {SC, INC} 7x, SC in last stitch (24sts). Fasten off with a tail for sewing. Insert the safety eye into the centre of the MR and pull the tail to tighten.

โ€” Body :

Round 1 :

In MR, SC 6. Pull yarn tail to close ring (6sts)

Round 2 :

INC once in each stitch (12sts)

Round 3 :

{SC, INC} 6x (18sts)

Round 4 :

SC, INC, {SC 2, INC} 5x, SC (24sts)

Round 5 :

{SC 3, INC} 6x (30sts)

Round 6-15 :

SC once in each stitch (30sts)

Round 16 :

{SC 3, DEC} 6x (24sts)

Round 17 :

{SC 3, INC} 6x (30sts)

Round 18 :

SC 2, INC, {SC 4, INC} 5x, SC 2 (36sts)

Round 19 :

{SC 5, INC} 6x (42sts)

Round 20-24 :

SC once in each stitch (42sts)

Round 25 :

{SC 5, DEC} 6x (36sts)

Round 26 :

SC once in each stitch (36sts)

Round 27 :

SC 2, DEC, {SC 4, DEC} 5x, SC 2 (30sts)

Round 28 :

{SC 3, DEC} 6x (24sts)

Info :

Stop & attach the eyes. Counting down 7 rows from the current one, insert the eye post between the 21st & 22nd row, with 3 stitches visible between the eye patches. Stuff the lower body, and as much of the head as you comfortably can.

Round 29 :

SC, DEC, {SC 2, DEC} 5x, SC (18sts)

Round 30 :

{SC, DEC} 6x (12sts)

Round 31 :

DEC all (6sts). Fasten off, and weave in the end.

โ€” Feet (make 2) :

Round 1 :

Ch 4. SC in the 2nd Ch from the hook, mark this stitch as the start. SC. In last Ch, SC 3. Rotate the piece so you're now working the other side of the chain, INC once in each of the 2 open Ch spaces (9sts)

Round 2 :

In FLO, {SlSt, Ch 2, SC in 2nd Ch from hook, SlSt in the same stitch as first SlSt} once in each of the next 3 sts. Working in both loops again, SC 2, mark the first SC. In FLO, SlSt, Ch 3, SC in 2nd Ch from hook, SC, SlSt in the FLO of the following stitch. Working in both loops again, SC 2 (4 toes, 4 SC sts)

Round 3 :

Flip the toes down towards the sole, and work 3 SC into the back loops left open from rnd 3 (one near the middle of each toe). Skip the marked stitch. Working in both loops again, SC in the next stitch, and then SC into the SlSt. Flip the back toe down, and SC in the BLO of the next 2 sts. Working in both loops again, SC 2 (9sts). Fasten off with a tail for sewing.

โ€” Wings (make 2) :

Round 1 :

In MR, SC 6. Pull yarn tail to close ring (6sts)

Round 2 :

INC once in each stitch (12sts)

Round 3 :

{SC, INC} 6x (18sts)

Round 4 :

{SC 5, INC} 3x (21sts)

Round 5-6 :

SC once in each stitch (21sts)

Round 7 :

{SC 5, DEC} 3x (18sts)

Round 8 :

SC once in each stitch (18sts)

Round 9 :

{SC, DEC} 6x (12sts)

Round 10 :

SC once in each stitch (12sts)

Round 11 :

DEC all (6sts)

Round 12 :

SC once in each stitch (6sts). Fasten off, and weave in ends.

โ€” Beak :

Construction :

Using BLACK - Leaving a long tail for sewing, Ch 4. SlSt in 2nd Ch from hook. HDC. In last Ch, DC, SC, DC. Turn. Working on the other side of the chain, HDC, SlSt to last Ch. (7sts). Fasten off with a tail for sewing. Pinch the tip of the beak closed and sew back and forth a couple times to secure the point in place.

โ€” Tail :

Round 1 :

Ch 6. SC in 2nd Ch from hook. SC 3. In last Ch, SC 3. Turn (7sts)

Round 2 :

Working on the other side of the chain, SC 3. In last Ch, SC 2 (5sts)

Round 3-4 :

Working in rounds from this point on, SC once in each stitch (12sts)

Round 4 :

{DEC, SC 4} 2x (10sts)

Round 5 :

SC once in each stitch (10sts)

Round 6 :

{DEC, SC 3} 2x (8sts). Fasten off with a tail for sewing.

โ€” Wax Seal :

Construction :

Using RED - In MR, SC 4 (4sts). Pull ring closed tightly, and fasten off with a small tail for sewing.

โ€” Envelope :

Row 1 :

Using BEIGE, and a 5mm hook โ€“ Leaving a 6" tail, Ch 15. SC in 2nd Ch from hook, and once in each stitch across (14sts)

Row 3-14 :

SC once in each stitch (14sts). Goal is to make a 3x3" square. Fasten off with another tail for sewing.

โ€” Scarf :

Row 1 :

Ch 4. SC in 2nd Ch from hook, SC 2 (3sts)

Row 2-4 :

Ch 1. SC once in each stitch (3sts)

Info :

Change yarn colour and repeat color change rows every 3 rows until your scarf is around 13" long, or long enough to wrap around the owls neck at least 1.5x. Weave in all the ends.

Assembly Instructions

  • Position eye patches so the DC side of yellow faces towards outside edge of head, sew 2/3 around leaving top edge able to fold down slightly
  • Attach beak level with bottom of safety eyes, sewing only 1/3 of beak to face leaving tip free for carrying mail
  • Embroider small V shapes onto front of body using grey yarn for feather details
  • Position wings so they abut bottom edge of head, are centered when viewed from side, and slightly tilted back
  • Attach feet one row over from starting magic ring, centered when viewed from side, before attaching tail
  • Position tail in center of owl's back, 7-8 rows up from starting MR with low side facing down to create kickstand
  • Fold envelope into proper shape and attach wax seal to closure flap

Important Notes

  • ๐Ÿ’กUse stitch markers to mark beginning of each round as pattern is worked in continuous rounds
  • ๐Ÿ’กWork tight enough that there are no visible holes or stuffing will show through
  • ๐Ÿ’กRecommend using invisible decrease (using FLO) any time a decrease is called for
  • ๐Ÿ’กEyes must be made first and safety eyes inserted before continuing with assembly
  • ๐Ÿ’กAttach feet before tail to ensure owl stands properly as intended
  • ๐Ÿ’กMake sure to stuff lower body and head before closing final rounds

This enchanting Eira Owl pattern brings magical charm to life with incredible attention to detail. From her expressive layered eyes to her functional mail-carrying beak, every element tells a story. The clever kickstand tail design allows your owl to stand proudly while her cozy striped scarf adds the perfect whimsical touch. Complete with a tiny sealed envelope, this amigurumi captures the wonder of magical messengers in adorable miniature form.

You ask,

we answer.

FAQs

Can I use different yarn weights for this pattern?

Yes, any weight yarn may be substituted, but you'll need to adjust your safety eye size, hook size, and yarn amounts accordingly. The finished size will also change.

Why must the eyes be made first?

The eyes require safety eye posts to be inserted through the center of the magic ring before the eye patches are completed, so they must be prepared before body assembly.

How do I make sure my owl stands properly?

The key is positioning the tail correctly as a kickstand - make sure the low side from working in rounds faces down and the tail is positioned to support the owl's weight.

Can I make the scarf in different colors?

Absolutely! The pattern suggests changing colors every 3 rows, but you can customize the color changes however you like or even make it solid colored.