🧢 Beautiful ✨ Detailed πŸ’ Adorable

Erebus the Angler Fish Amigurumi Pattern

Erebus the Angler Fish Amigurumi Pattern
4.2β˜… Rating
8-10 Hours Time Needed
2.1K Made This
βœ‚οΈ

Intermediate Level

Ideal for those with basic knitting experience, featuring slightly more advanced stitches and techniques to expand your skills.

⏱️

All-Day Adventure

Requires 8-10 hours, ideal for a full day of immersive knitting.

🐠

Charming Critter

Delightful animal designs with sweet details that capture the essence of your favorite woodland and farmyard friends.

About This Erebus the Angler Fish Amigurumi Pattern

This enchanting angler fish pattern brings the mysterious depths of the ocean to life in adorable amigurumi form. With its distinctive glowing lure, intricate fin details, and charming personality, Erebus makes for a unique addition to any collection. The pattern includes special techniques for creating sunken eyes and detailed assembly instructions to ensure your finished fish has that perfect deep-sea character.

Erebus the Angler Fish Amigurumi Pattern crochet pattern - detailed view of completed project

Working from front to back, you'll create a seamless body with carefully placed features. The pattern offers two different top fin variations and includes helpful tips for achieving that authentic angler fish appearance.

Why You'll Love This Erebus the Angler Fish Amigurumi Pattern

I absolutely love how this pattern captures the mystique of deep-sea creatures while maintaining that irresistible amigurumi charm. The combination of textures and colors creates such visual interest, and watching the personality emerge as you add each detail is incredibly satisfying. The special eye technique gives Erebus that authentic sunken-eye look that makes him truly special, and the posable light feature adds an interactive element that's both fun and functional.

Erebus the Angler Fish Amigurumi Pattern step 1 - construction progress Erebus the Angler Fish Amigurumi Pattern step 2 - assembly progress Erebus the Angler Fish Amigurumi Pattern step 3 - details and accessories Erebus the Angler Fish Amigurumi Pattern step 4 - final assembly and finishing

Switch Things Up

I love experimenting with different color combinations for this angler fish pattern! Instead of the traditional deep purple, try creating a bioluminescent version using glow-in-the-dark yarn or add metallic threads for that otherworldly shimmer. You could make a whole school of angler fish in various sizes by adjusting your hook size - imagine tiny baby angler fish alongside their larger parents!

For a more realistic approach, research actual angler fish species and recreate their unique colorations. Some have striking patterns or unusual fin shapes that would translate beautifully into crochet. I've also seen crafters add LED lights inside the lure section for a truly glowing effect, though this requires careful planning for battery placement.

Consider making seasonal versions too - a Valentine's angler fish in pinks and reds, or a Halloween version in oranges and blacks. The pattern's structure is so versatile that it welcomes creative interpretation while maintaining that distinctive angler fish silhouette.

Common Mistakes & How to Fix Them

βœ— Placing safety eyes too early before achieving the sunken eye effect during assembly process βœ— Not stuffing the head firmly enough which affects the final shape and eye placement positioning βœ— Skipping stitch markers which leads to miscounting rounds and uneven shaping throughout the project βœ— Rushing the eye threading technique without following the detailed video tutorial for proper execution

Erebus the Angler Fish Amigurumi Pattern

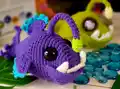
Create your own adorable deep-sea companion with this charming angler fish crochet pattern! This unique amigurumi features realistic details including a glowing lure, textured fins, and intimidating teeth that give this mysterious creature personality. Perfect for ocean lovers and those who appreciate the beauty of unusual sea creatures, this pattern combines intermediate techniques with clear instructions to help you craft a stunning 6-inch finished piece.

Intermediate 8-10 Hours

Materials Needed for Erebus the Angler Fish Amigurumi Pattern

β€” Main Fabric

  • 01
    Worsted Weight #4 yarn, approximately 75g of main purple color
  • 02
    Less than 25g each of green, white, and blue accent colors for details

β€” Tools Required

  • 01
    D hook or 3.25mm crochet hook
  • 02
    27mm safety eyes
  • 03
    Scissors
  • 04
    Sewing needle
  • 05
    Stitch marker
  • 06
    Fiberfill stuffing
  • 07
    Pipe cleaner for posable light (optional)

Progress Tracker

0% Complete

β€” Fish Head and Body :

Round 1 :

Make 6 sc into a magic ring (6)

Round 2 :

Increase in each st around (12)

Round 3 :

(sc, inc) x 6 (18)

Round 4 :

(2 sc, inc) x 6 (24)

Round 5 :

(3 sc, inc) x 6 (30)

Round 6 :

sc in each st around

Round 7 :

(inc, sc) x 3, 24 sc (33)

Round 8 :

sc in each st around

Round 9 :

(inc, 2 sc) x 3, 24 sc (36)

Round 10 :

sc in each st around

Round 11 :

(inc, 3 sc) x 3, 24 sc (39)

Info :

Place eyes between rounds 10 and 11, leaving 10 holes between them

Round 12 :

sc in each st around

Round 13 :

(inc, 4 sc) x 3, 24 sc (42)

Round 14-18 :

sc in each st around

Round 19 :

(dec, 12 sc) x 3 (39)

Round 20 :

(dec, 11 sc) x 3 (36)

Round 21 :

sc in each st around

Round 22 :

(dec, 10 sc) x 3 (33)

Round 23 :

(dec, 9 sc) x 3 (30)

Round 24-26 :

sc in each st around

Round 27 :

(3 sc, dec) x 6 (24)

Round 28-30 :

sc in each st around

Round 31 :

(2 sc, dec) x 6 (18)

Round 32-33 :

sc in each st around

Round 34 :

(sc, dec) x 6 (12)

Round 35 :

sc in each st around

β€” Tail Section :

Step 1 :

Fold the opening half, sc the opening closed

Row 1 :

Ch 1, turn, sc across

Row 2 :

Ch 1, turn, inc, 4 sc, inc (8)

Row 3 :

Ch 1, turn, inc, 6 sc, inc (10)

Row 4 :

Ch 1, turn, sc across

Row 5 :

Ch 1, turn, inc, 8 sc, inc (12)

Row 6 :

Ch 1, turn, inc, 10 sc, inc (14)

Row 7 :

Ch 1, turn, inc, 12 sc, inc (16)

Row 8 :

Create decorative tail edge with chains and various stitches

β€” Teeth :

Round 1 :

Make 3 sc into a magic ring (3)

Round 2 :

Inc, 2 sc (4)

Round 3 :

sc in each st around

Round 4 :

(inc, sc) x 2 (6)

Round 5-6 :

sc in each st around

β€” Front Teeth :

Foundation :

Ch 8

Row 1 :

Sc in 2nd ch from hook and across (7)

Row 2 :

Create decorative tooth edge with chain loops

β€” Mouth :

Foundation :

Ch 11

Row 1 :

sc in 2nd ch from hook and across (10)

Row 2 :

Ch 1, turn, Inc, 8 sc, inc (12)

Row 3-9 :

Continue increasing each row to create mouth shape

Row 10 :

BLO sc in each st across, sc around edges

β€” Side Fins :

Foundation :

Ch 5

Row 1 :

sc in 2nd ch from hook and across (4)

Row 2-5 :

Work increases and create fin shape

Edging :

Add decorative blue edging with chain loops

β€” Top Fin :

Foundation :

Ch 9

Row 1-4 :

Create fin shape with increases

Edging :

Add decorative blue edging

β€” Light :

Round 1 :

Make 4 sc into a magic ring (4)

Round 2 :

Increase in each st around (8)

Round 3 :

sc in each st around

Round 4 :

(2 sc, dec) x 2 (6)

Round 5 :

(sc, dec) x 2 (4)

Round 6-21 :

Change to purple, sc in each st around

Assembly Instructions

  • Pin and sew the top fin onto the top of the body for proper positioning
  • Pin the mouth onto the front of the face stopping at rounds 2 and 3, then sew except the top edge
  • Attach all teeth pieces to the face before securing the mouth completely
  • Pin and sew the side fins onto both sides of the body at appropriate positions
  • Insert pipe cleaner into the light piece if desired for posability, then attach above the eyes
  • Create sunken eye effect by threading yarn between eye holes and pulling gently as shown in tutorial

Important Notes

  • πŸ’‘Use stitch markers to keep track of rounds, especially during color changes and complex shaping
  • πŸ’‘Stuff the head firmly for proper shape before creating the sunken eye effect
  • πŸ’‘Watch the provided YouTube tutorial for the specialized eye threading technique
  • πŸ’‘Eye placement may need adjustment depending on yarn weight and hook size used
  • πŸ’‘Different eye sizes can be used but may require repositioning for best results
  • πŸ’‘Polyfil stuffing is recommended for best results and proper shaping

This captivating Erebus the Angler Fish pattern brings the mysterious beauty of deep-sea creatures into your home with adorable amigurumi charm. Featuring unique details like sunken eyes, a posable glowing lure, and intricate fin work, this intermediate pattern offers both challenge and reward. The finished 6-inch fish makes a perfect conversation piece for ocean enthusiasts and adds whimsical character to any space. 🌊 Happy crocheting! 🧢✨

You ask,

we answer.

FAQs

What size will my finished angler fish be?

The finished angler fish measures approximately 6 inches long from the back fin to the front of the head when using weight 4 yarn and a 3.25mm hook.

Can I use different colored yarns than specified?

Absolutely! While the pattern uses purple, green, white, and blue, you can customize your angler fish with any colors you prefer to create your own unique deep-sea creature.

Is the sunken eye technique difficult?

The sunken eye technique requires patience but isn't overly difficult. The pattern includes detailed instructions and references a YouTube tutorial to guide you through the process step by step.

Do I need to use a pipe cleaner for the light?

The pipe cleaner is optional but recommended as it makes the angler fish's lure posable and more interactive. You can stuff with regular fiberfill if you prefer a non-posable version.

Can I make this pattern larger or smaller?

Yes! You can use different hook sizes and yarn weights to adjust the size. Just keep in mind that you may need to adjust eye placement and sizing accordingly.