๐Ÿงถ Beautiful โœจ Detailed ๐Ÿ’ Adorable

Feather Locklear the Chick Amigurumi Pattern

Feather Locklear the Chick Amigurumi Pattern
4.2โ˜… Rating
4-5 Hours Time Needed
1.3K Made This
โœ‚๏ธ

Intermediate Level

Ideal for those with basic knitting experience, featuring slightly more advanced stitches and techniques to expand your skills.

โฑ๏ธ

Weekend Treat

Takes 5-7 hours, making it an enjoyable project to finish over a couple of days.

๐Ÿฅ

Charming Critter

Delightful animal designs with sweet details that capture the essence of your favorite woodland and farmyard friends.

About This Feather Locklear the Chick Amigurumi Pattern

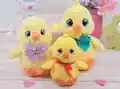
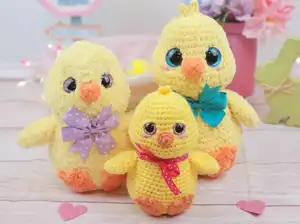
This enchanting Feather Locklear the Chick pattern brings springtime joy to life with its fluffy yellow body and adorable features. Standing at 6 inches tall when made with worsted weight yarn, this sweet chick showcases a unique sunken eye technique that gives it incredible personality and depth. The pattern includes detailed step-by-step instructions for creating the head, body, wings, feet, beak, and optional hair tuft, along with comprehensive photo tutorials to guide you through the special eye embellishment process that makes this design truly stand out.

Feather Locklear the Chick Amigurumi Pattern crochet pattern - detailed view of completed project

Perfect for both beginners ready to advance their skills and experienced crocheters looking for a quick, satisfying project, this pattern offers flexibility with different yarn weights and hook sizes for varied results. The finished chick makes a wonderful handmade gift, Easter decoration, or adorable addition to any amigurumi collection.

Why You'll Love This Feather Locklear the Chick Amigurumi Pattern

I absolutely love this pattern because it teaches you a stunning eye technique that transforms a simple amigurumi into a character bursting with life and emotion. The sunken eye detail creates such depth and personality that every chick you make will have its own unique expression. What really excites me is how quickly this project works up - in just a few hours, you'll have an adorable springtime friend that looks incredibly professional. The pattern strikes that perfect balance between being accessible for intermediate crocheters while still offering techniques that feel special and rewarding. Plus, there's something deeply satisfying about seeing those sweet little wings and feet come together to create such a charming, huggable companion. The optional variations with different yarn types mean you can customize your chick to be fluffy, chenille-soft, or classically smooth, making each creation uniquely yours.

Feather Locklear the Chick Amigurumi Pattern step 1 - construction progress Feather Locklear the Chick Amigurumi Pattern step 2 - assembly progress Feather Locklear the Chick Amigurumi Pattern step 3 - details and accessories Feather Locklear the Chick Amigurumi Pattern step 4 - final assembly and finishing

Switch Things Up

I love experimenting with different yarn textures to give each Feather Locklear chick its own unique personality and feel. Sometimes I'll use the fluffy chenille version for an extra-cuddly companion that feels like a cloud, while other times I stick with smooth worsted weight for that classic, polished amigurumi look.

Color variations are where I really let my creativity shine - instead of traditional yellow and orange, I've made chicks in soft pastels for baby showers, bright rainbow colors for playful gifts, and even white with gray accents to create little doves. The pattern works beautifully with variegated yarns too, creating stunning ombre effects across the body.

I sometimes add embellishments like tiny ribbon bows around the neck, small fabric flowers near the hair tuft, or even miniature crocheted accessories like a tiny scarf or hat for seasonal variations. For holiday versions, I've created Christmas chicks with red and green accents, and Halloween chicks with orange and black color schemes.

Playing with eye sizes dramatically changes the expression - larger eyes create a more kawaii, cartoon-like appearance that's perfect for children's toys, while smaller eyes give a more realistic, sophisticated look for adult collectors. I've also experimented with safety eyes that have different colored irises, like blue or green, which transforms the entire character.

The optional eyelid technique is something I almost always include because it adds so much depth and emotion. By adjusting how much of the eye I cover with the eyelid, I can make some chicks look sleepy and sweet, while others appear wide-awake and excited. Sometimes I'll even make asymmetrical eyelids for a quirky, charming wink effect.

For the feet, I occasionally use a slightly larger hook to make them more prominent and cartoon-like, or I'll add extra rounds to create longer, more exaggerated toes. The tail can also be modified - adding more rounds creates a fluffier, more prominent tail that's perfect for peacock-inspired variations.

I love making themed collections by creating multiple chicks with coordinating colors and accessories, like a whole rainbow family or a set of seasonal chicks. They look absolutely adorable displayed together on a shelf or nestled in a handmade basket.

Texture mixing is another favorite technique - combining smooth yarn for the body with fuzzy yarn for the tail and wing tips creates beautiful contrast and visual interest. I've even incorporated metallic threads into the yellow yarn for special occasion chicks that sparkle and shine.

The beauty of this pattern is its versatility - whether you're making a traditional Easter chick, a whimsical art piece, or a personalized gift, there are endless ways to make each Feather Locklear uniquely your own while following the same beloved base pattern.

Common Mistakes & How to Fix Them
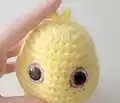
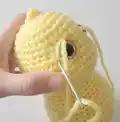
โœ— Not marking stitch placement for eyes on round 9 which leads to uneven or misaligned eye positioning โœ— Placing safety eye backs too early before completing the sunken eye technique resulting in inability to create depth โœ— Overstuffing the head and body causing distorted shape and making it difficult to close final rounds properly โœ— Forgetting to stuff the body as you work during rounds 21-37 which makes it nearly impossible to stuff evenly later
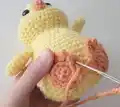
 โœ— Not leaving long enough tails on wings, feet, beak and tail pieces making assembly and secure attachment very difficult โœ— Skipping the pinning step before sewing pieces onto body resulting in crooked or asymmetrical placement of features

Feather Locklear the Chick Amigurumi Pattern

Create your very own adorable Feather Locklear the Chick with this delightful amigurumi pattern! This charming 6-inch chick features expressive safety eyes with a unique sunken eye technique, fluffy yellow body, sweet orange beak and feet, and optional hair details. Perfect for spring decorations, Easter gifts, or as a cuddly companion for children and collectors alike. The pattern includes detailed photo tutorials for the special eye technique and complete assembly instructions.

Intermediate 4-5 Hours

Materials Needed for Feather Locklear the Chick Amigurumi Pattern

โ€” Main Fabric

  • 01
    Worsted Weight #4 yarn, approximately 50g of yellow (main color) and 20g of orange (accent color)
  • 02
    Red Heart With Love Daffodil (yellow) recommended
  • 03
    I Love This Yarn Carrot (orange) recommended
  • 04
    Alternative: Little Bunny Yellow and Parfait Mango for fluffy version
  • 05
    Alternative: Parfait Yellow, Parfait Mango, and Flecks Yarn Loops & Thread Sunshine for chenille version

โ€” Tools Required

  • 01
    Crochet hook size D/3.25mm (or F/3.75mm for fluffy/chenille versions)
  • 02
    18mm safety eyes (23mm for fluffy version, 28mm for chenille version)
  • 03
    Scissors
  • 04
    Sewing needle (yarn needle)
  • 05
    Stitch markers
  • 06
    Fiberfill stuffing (Polyfil recommended)
  • 07
    White yarn for eye highlights
  • 08
    Pink yarn or embroidery thread for cheeks (optional)
  • 09
    Yellow yarn for eyelids (optional)

Progress Tracker

0% Complete

โ€” Head and Body:

Info:

Crocheted from top of head to bottom with Color A (Yellow)

Round 1:

Make 12 sc into a magic ring (12)

Round 2:

Increase in each st around (24)

Round 3:

(3 sc, inc) x 6 (30)

Round 4:

sc in each st around (30)

Round 5:

(4 sc, inc) x 6 (36)

Round 6-8:

sc in each st around (36)

Info:

Mark the 6th and 7th inc with a st marker on round 9 for placement of eyes

Round 9:

inc x 6, 6 sc, inc x 6, 18 sc (48)

Round 10-12:

sc in each st around (48)

Round 13:

dec x 6, 6 sc, dec x 6, 18 sc (36)

Round 14:

sc in each st around (36)

Round 15:

(dec, 4 sc) x 6 (30)

Info:

Place eyes between rounds 8 and 9, leaving 9 holes between them. With the eyes facing you, the left eye will be placed before the stitch marker between rounds 8 and 9. The right eye will be placed after the stitch marker. If you want the sunken eye look, do not place the backs of the eyes on until round 29

Round 16:

(dec, 3 sc) x 6 (24)

Round 17:

sc in each st around (24)

Info:

Now for the eyes. Stuff the head well. Cut a long piece of yarn and remove the eyes. Place the needle in the hole where the first eye was and insert the needle into a hole next to the eye hole. Go back and forth between each eye hole repeating the process from the first eye. Pull slightly on the yarn after going through each hole. Do this about 3 times on each side until you reach the look you want

Info:

To place the backs of the eyes you will need to remove most of the stuffing to place the washers on the eyes, then re-stuff it

Round 18:

(inc, 3 sc) x 6 (30)

Round 19:

(inc, 4 sc) x 6 (36)

Round 20:

sc in each st around (36)

Info:

Stuff the body as you work

Round 21:

(inc, 11 sc) x 3 (39)

Round 22:

sc in each st around (39)

Round 23:

(inc, 12 sc) x 3 (42)

Round 24:

sc in each st around (42)

Round 25:

(6 sc, inc) x 6 (48)

Round 26:

(7 sc, inc) x 6 (54)

Round 27-29:

sc in each st around (54)

Round 30:

(7 sc, dec) x 6 (48)

Round 31:

(6 sc, dec) x 6 (42)

Round 32:

(5 sc, dec) x 6 (36)

Round 33:

(4 sc, dec) x 6 (30)

Round 34:

(3 sc, dec) x 6 (24)

Round 35:

(2 sc, dec) x 6 (18)

Round 36:

(sc, dec) x 6 (12)

Round 37:

dec x 6 (6)

Info:

F/O and sew the hole closed

โ€” Beak:

Info:

With Color B (Orange)

Round 1:

Make 6 sc into a magic ring (6)

Round 2:

(sc, inc) x 3 (9)

Info:

F/O and leave a long tail for sewing

โ€” Wings (Make 2):

Info:

With Color A (Yellow)

Round 1:

Make 6 sc into a magic ring (6)

Round 2:

(sc, inc) x 3 (9)

Round 3:

(2 sc, inc) x 3 (12)

Round 4:

sc in each st around (12)

Info:

Do not stuff the wings

Round 5:

(sc, inc) x 6 (18)

Round 6:

sc in each st around (18)

Round 7:

(sc, dec) x 6 (12)

Round 8:

(2 sc, dec) x 3 (9)

Round 9:

(sc, dec) x 3 (6)

Info:

Fold the wings in half and sc the opening closed. F/O and leave a long tail for sewing

โ€” Tail:

Info:

With Color A (Yellow)

Round 1:

Make 6 sc into a magic ring (6)

Round 2:

(sc, inc) x 3 (9)

Round 3:

Inc x 3, 6 sc (12)

Info:

F/O and leave a long tail for sewing

โ€” Feet (Make 2):

Info:

With Color B (Orange)

Round 1:

Make 6 sc into a magic ring (6)

Round 2:

Increase in each st around (12)

Round 3:

(sc, inc) x 6 (18)

Round 4:

(ch 3, sl st in 2nd ch from hook, sl st in next ch, sl st in next 2 sts on circle) x 3

Info:

F/O and leave a long tail for sewing

โ€” Hair on Head (optional):

Info:

With Color A (Yellow), attach yarn in the magic ring with a sl st

Step:

(Ch 4, sl st in 2nd ch from hook and across) x 2

Info:

F/O and weave in the tail end

Assembly Instructions

  • Take a long strand of white yarn and create eye highlights by inserting needle between the eyes, bringing it to the lower corner of the eye, wrapping around the outside, and inserting into a hole on top of the eye. Pull slightly to create a highlight. Repeat for second eye.
  • Optional: Create eyelids using yellow yarn by wrapping the needle in front of the eye to make an eyelid effect. Repeat on second eye.
  • Optional: Embroider two pink cheeks using pink yarn or embroidery thread.
  • Pin the orange beak onto the front of the face between the eyes (do not stuff the beak), then sew securely in place.
  • Pin the wings onto the sides of the body approximately between rounds 18 and 19, then sew securely onto the body.
  • Pin the feet with three-toed design onto the front of the body at the bottom, then sew securely in place.
  • Pin the tail onto the back of the body, then sew securely onto the body to complete your adorable chick.

Important Notes

  • ๐Ÿ’กDo not join rounds unless stated - work in a continuous spiral throughout the pattern
  • ๐Ÿ’กUse a stitch marker to mark the beginning of each round to avoid losing your place
  • ๐Ÿ’กAll stitches are worked in both loops unless the pattern specifically states BLO or FLO
  • ๐Ÿ’กMark the 6th and 7th increase with stitch markers on round 9 for accurate eye placement
  • ๐Ÿ’กDo not place safety eye backs until round 29 if you want the signature sunken eye look
  • ๐Ÿ’กStuff the body as you work during rounds 21-37 for even, professional results
  • ๐Ÿ’กLeave long tails on all separate pieces (wings, feet, beak, tail) for easier assembly
  • ๐Ÿ’กPin all pieces in place before sewing to ensure symmetrical and correct positioning

This enchanting Feather Locklear the Chick pattern was lovingly designed by Sweet Oddity Art to bring springtime magic into your hands! With its signature sunken eye technique that creates incredible depth and personality, this 6-inch cutie is perfect for Easter baskets, nursery decorations, or as a cherished handmade gift. The detailed photo tutorials guide you through each special technique, making even the advanced eye embellishment accessible and rewarding. Whether you choose classic worsted weight, fluffy chenille, or soft Parfait yarn, your little chick will radiate charm and handmade love. Happy crocheting, and may your Feather Locklear bring endless smiles! ๐Ÿฅ๐Ÿ’›โœจ

You ask,

we answer.

FAQs

What size will my finished chick be?

The finished chick will measure approximately 6 inches from bottom to top of head when made with worsted weight #4 yarn and a 3.25mm hook. Using different yarn weights or hook sizes will change the final size.

Do I have to use the sunken eye technique?

No, the sunken eye technique is optional but highly recommended as it gives the chick incredible personality and depth. If you prefer, you can simply place the safety eyes with backs in the standard way between rounds 8 and 9.

Can I use different colored yarn?

Absolutely! While the pattern uses yellow and orange for a classic chick look, feel free to experiment with any colors you love. Pastels would be beautiful for spring, or try white and gray for a different bird species.

What type of stuffing works best for this pattern?

Polyfil fiberfill stuffing is recommended by the designer. How you stuff matters greatly - stuff firmly but not too tightly for the best shape, and remember to stuff the body as you work rather than waiting until the end.

Can I make the chick fluffy or use chenille yarn?

Yes! The pattern includes variations for both fluffy and chenille versions. For fluffy, use Little Bunny Yellow and Parfait Mango with an F hook and 23mm eyes. For chenille, double strand Parfait Yellow with Loops & Thread Sunshine, use an F hook and 28mm eyes.

Why do I need to remove the eyes after placing them?

The unique sunken eye technique requires you to temporarily remove the eyes so you can thread yarn through the eye holes to create depth and dimension. This is what gives Feather Locklear that adorable, expressive look. You'll secure the backs after completing this technique.

Do I stuff the wings, beak, and tail?

No, the wings should not be stuffed and are folded flat before closing. The beak also should not be stuffed according to the designer. The tail is left unstuffed as well for the best shape and proportion.

Is this pattern suitable for beginners?

This is an intermediate pattern that's suitable for novice crocheters who have basic crochet skills and are ready to learn new techniques. It requires patience and precision during assembly, especially for the special eye technique, but the detailed photo tutorials make it very achievable.