🧢 Beautiful ✨ Detailed πŸ’ Adorable

Fox Hat Crochet Pattern

Fox Hat Crochet Pattern
4.5β˜… Rating
3-4 Hours Time Needed
2.2K Made This
βœ‚οΈ

Beginner Friendly Level

Perfect for those just starting their sewing journey, with clear instructions and simple techniques

⏱️

Bite-Sized Project

Complete in under 2 hoursβ€”quick, fun, and perfect for a little creative escape.

🧸

Cute Companion

An adorable friend to cherish, handcrafted with love to bring comfort and joy for years to come.

About This Fox Hat Crochet Pattern

This delightful fox hat pattern brings woodland charm to your little one's wardrobe. Featuring distinctive pointed ears with contrasting inner ears and sweet facial details, this hat captures the playful spirit of a friendly fox. The pattern includes four different sizes to accommodate growing children from infants to school age. With its combination of basic stitches and creative finishing touches, this project offers the perfect balance of simplicity and character for both beginner and experienced crocheters.

Fox Hat Crochet Pattern crochet pattern - detailed view of completed project

The hat construction begins with a simple crown worked in rounds, then continues with straight sides for a comfortable fit. The charming fox features are created separately and sewn on, allowing for personalization and creative expression in the finishing details.

Why You'll Love This Fox Hat Crochet Pattern

I absolutely love how this pattern transforms basic crochet techniques into something truly magical. The joy on a child's face when they wear their handmade fox hat makes every stitch worthwhile. It's one of those projects that looks complex but comes together surprisingly quickly, giving you that satisfying sense of accomplishment. Plus, the multiple size options mean you can create matching hats for siblings or adapt the pattern as your little one grows.

Fox Hat Crochet Pattern step 1 - construction progress Fox Hat Crochet Pattern step 2 - assembly progress Fox Hat Crochet Pattern step 3 - details and accessories Fox Hat Crochet Pattern step 4 - final assembly and finishing

Switch Things Up

I love how versatile this fox pattern can be with just a few creative tweaks. You could easily transform this into other woodland creatures by changing the ear shape and facial features - imagine a bear with rounded ears or a cat with pointed triangular ones. I've experimented with adding stripes to the main body or using variegated yarn for a more textured look. For older kids, I sometimes add ear flaps with braided ties for extra warmth and style. The white contrast section could be replaced with cream or light gray for a more realistic fox coloring, or you could go bold with bright colors for a fantasy fox. I've also tried making the ears detachable with buttons so kids can mix and match different animal ears on the same hat base.

Common Mistakes & How to Fix Them

βœ— Forgetting to maintain consistent tension can result in uneven crown shaping and sizing issues βœ— Not counting stitches carefully during increase rounds leads to lopsided or incorrectly sized hat crowns βœ— Sewing facial features too tightly can pucker the hat fabric and distort the overall shape βœ— Placing ears incorrectly can throw off the entire fox appearance and symmetry of the design

Fox Hat Crochet Pattern

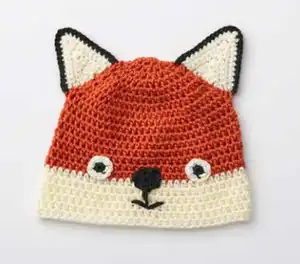
Create an adorable fox hat that's perfect for little ones! This charming pattern features pointed ears, sweet embroidered eyes, and a tiny nose that brings this woodland creature to life. Available in four sizes from 6 months to 8 years, this cozy hat combines warmth with whimsical style. The simple construction uses basic crochet stitches, making it accessible for crafters looking to add some animal magic to their projects.

Beginner Friendly 3-4 Hours

Materials Needed for Fox Hat Crochet Pattern

β€” Main Fabric

  • 01
    Caron Simply Soft yarn in Pumpkin (main color), Off White (contrast A), and Black (contrast B)
  • 02
    Medium weight yarn (4) in orange, white, and black colors for authentic fox coloring

β€” Tools Required

  • 01
    U.S. G/6 (4 mm) crochet hook
  • 02
    U.S. H/8 (5 mm) crochet hook
  • 03
    Tapestry needle for sewing
  • 04
    Scissors
  • 05
    Stitch markers

Progress Tracker

0% Complete

β€” Main Hat :

Starting Ring :

With larger hook and MC, ch 4. Join with sl st to first ch to form a ring

Round 1 :

Ch 2. 8 hdc in ring. Join with sl st to first hdc

Round 2 :

Ch 2. 2 hdc in first hdc. *2 hdc in next hdc. Rep from * around. Join with sl st to first hdc. 16 hdc

Round 3 :

Ch 2. 2 hdc in first hdc. *1 hdc in next hdc. 2 hdc in next hdc. Rep from * to last hdc. 1 hdc in last hdc. Join with sl st to first hdc. 24 hdc

Round 4 :

Ch 2. 2 hdc in first hdc. *1 hdc in each of next 2 hdc. 2 hdc in next hdc. Rep from * to last 2 hdc. 1 hdc in each of last 2 hdc. Join with sl st to first hdc. 32 hdc

Round 5 :

Ch 2. 2 hdc in first hdc. *1 hdc in each of next 3 hdc. 2 hdc in next hdc. Rep from * to last 3 hdc. 1 hdc in each of last 3 hdc. Join with sl st to first hdc. 40 hdc

Round 6 :

Ch 2. 2 hdc in first hdc. *1 hdc in each of next 4 hdc. 2 hdc in next hdc. Rep from * to last 4 hdc. 1 hdc in each of last 4 hdc. Join with sl st to first hdc. 48 hdc

Size 6/12 mos Round 7 :

Ch 2. 2 hdc in first hdc. *1 hdc in each of next 11 hdc. 2 hdc in next hdc. Rep from * to last 11 hdc. 1 hdc in each of last 11 hdc. Join with sl st to first hdc. 52 hdc

Sizes 18/24 mos, 4 yrs, 6/8 yrs Round 7 :

Ch 2. 2 hdc in first hdc. *1 hdc in each of next 5 hdc. 2 hdc in next hdc. Rep from * to last 5 hdc. 1 hdc in each of last 5 hdc. Join with sl st to first hdc. 56 hdc

Sizes 4 yrs and 6/8 yrs Round 8 :

Ch 2. 2 hdc in first hdc. [1 hdc in each of next 27 (13) hdc. 2 hdc in next hdc] 1 (3) time(s). 1 hdc in each hdc to end of rnd. Join with sl st to first hdc. 58 (60) hdc

All Sizes Straight Rounds :

Ch 2. 1 hdc in each hdc around. Join with sl st to first hdc. Rep last rnd until Hat from beg measures 5 (5Β½-5Β½-6)" [12.5 (14-14-15) cm], joining A at end of last rnd. Break MC

White Band :

With A, rep last rnd until Hat from beg measures 7 (7Β½-8-8Β½)" [18 (19-20.5-21.5) cm]. Fasten off

β€” Inner Ear (Make 2) :

Row 1 :

With smaller hook and A, ch 2. 5 sc in 2nd ch from hook. Turn

Row 2 :

Ch 1. 1 sc in each of first 2 sc. 3 sc in next sc. 1 sc in each of next 2 sc. Turn. 7 sc

Row 3 :

Ch 1. 1 sc in each of first 3 sc. (1 sc. 1 hdc. 1 dc. 1 hdc. 1 sc) in next sc. 1 sc in each of next 3 sc. Turn

Row 4 :

Ch 1. 1 sc in each of next 5 sts. (1 sc. 1 hdc. 1 dc. 1 hdc. 1 sc) in next sc. 1 sc in each of next 5 sc. Turn

Row 5 :

Ch 1. 1 sc in each of next 7 sts. (1 sc. 1 hdc. 1 dc. 1 hdc. 1 sc) in next sc. 1 sc in each of next 7 sc. Turn

Row 6 :

Ch 1. 1 sc in each of next 9 sts. (1 sc. 1 hdc. 1 dc. 1 hdc. 1 sc) in next sc. 1 sc in each of next 9 sc. Fasten off

β€” Outer Ear (Make 2) :

Construction :

With smaller hook and MC, make as given for Inner Ear

β€” Join Ears :

Assembly :

With WS of Inner Ear and Outer Ear facing each other, and RS of Inner Ear facing, using smaller hook join B with sl st to first sc

Edging Round :

Ch 1. Working through both thicknesses, 2 sc in first sc. 1 sc in each of next 10 sts. 3 sc in next sc. 1 sc in each of next 10 sts. 2 sc in last sc

β€” Nose :

Round 1 :

With smaller hook and B, ch 2. (3 sc. 1 hdc. 1 dc. 1 tr. 1 dc. 3 hdc. 1 dc. 1 tr. 1 dc. 1 hdc) all in 2nd ch from hook. Join with sl st to first sc. Fasten off

β€” Eyes (Make 2) :

Round 1 :

With smaller hook and B, ch 2. 6 sc in 2nd ch from hook. Join A with sl st to first sc. Break B

Round 2 :

With A, ch 1. 2 sc in each sc around. Join with sl st to first sc. Fasten off

Assembly Instructions

  • Position and sew ears to the top sides of the hat, ensuring they are symmetrically placed
  • Attach eyes to the front of the hat between the white and orange sections, spacing them evenly
  • Sew the nose between the eyes, centered on the white section
  • Embroider the mouth below the nose using 2 strands of black yarn with straight stitches
  • Weave in all loose ends securely to prevent unraveling

Important Notes

  • πŸ’‘Ch 2 at beginning of rounds does not count as hdc throughout the pattern
  • πŸ’‘Maintain consistent tension to ensure proper fit and shape of the hat
  • πŸ’‘Use stitch markers to keep track of round beginnings, especially during increases
  • πŸ’‘When changing colors, join new color at end of last round for clean color transitions
  • πŸ’‘Pin all facial features in place before sewing to ensure proper positioning
  • πŸ’‘Stuff ears lightly before joining if you want them to stand up more prominently

This charming fox hat pattern combines the warmth of a practical winter accessory with the whimsical appeal of woodland creatures. Perfect for little adventurers who love to play outdoors, this hat will keep them cozy while sparking their imagination. The simple construction makes it an ideal project for building confidence with basic crochet techniques while creating something truly special. Whether you're crafting for your own little fox or creating a thoughtful gift, this pattern delivers both comfort and character in every stitch.

You ask,

we answer.

FAQs

Can I adjust the size if it doesn't fit perfectly?

Yes! You can easily add or subtract rounds in the straight section of the hat to adjust length. For width adjustments, work additional increase rounds before starting the straight sides.

What if I want to make the ears more structured?

You can add a small amount of interfacing or batting between the inner and outer ear pieces before joining them to help the ears stand up better.

Can I substitute different yarn weights?

While the pattern is designed for worsted weight yarn, you can use different weights by adjusting your hook size and checking your gauge. Remember that changing yarn weight will affect the final size.

How do I ensure the facial features are positioned correctly?

Pin all pieces in place first and try the hat on the intended wearer if possible. The eyes should sit just above the white band, with the nose centered between them.