🧢 Beautiful ✨ Detailed πŸ’ Adorable

Halloween Pumpkin Amigurumi Pattern

Halloween Pumpkin Amigurumi Pattern
3.9β˜… Rating
4-5 Hours Time Needed
3.0K Made This
βœ‚οΈ

Intermediate Level

Ideal for those with basic knitting experience, featuring slightly more advanced stitches and techniques to expand your skills.

⏱️

Weekend Treat

Takes 5-7 hours, making it an enjoyable project to finish over a couple of days.

πŸŽƒ

Holiday Cheer

Festive fun for the season, bringing handmade magic to celebrations and creating new family traditions.

About This Halloween Pumpkin Amigurumi Pattern

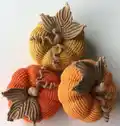
This delightful pumpkin pattern combines simple crochet techniques with special sculpting methods to create a realistic autumn decoration. The pattern features detailed instructions for creating the signature pumpkin ridges using strategic sculpting techniques. You'll learn how to make charming curly moustaches using a PVA glue solution and create beautiful leaf details that complete the seasonal look.

Halloween Pumpkin Amigurumi Pattern crochet pattern - detailed view of completed project

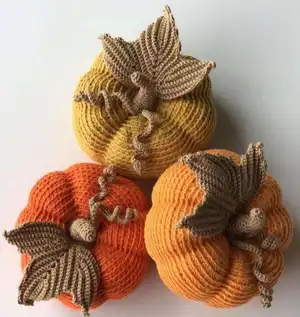
The finished pumpkin measures 12cm when using the recommended yarns and makes a perfect Halloween decoration or autumn gift. The pattern includes clear photo tutorials for the more complex sculpting steps.

Why You'll Love This Halloween Pumpkin Amigurumi Pattern

I absolutely love how this pattern transforms a simple crocheted ball into such a realistic pumpkin through the sculpting technique! The curly moustaches add such character and whimsy, while the leaf details make it look like it just came from the pumpkin patch. What makes this pattern special is how it teaches you valuable sculpting skills that you can use in other amigurumi projects. The end result is so satisfying and makes the most adorable seasonal decoration that you'll want to display year after year.

Halloween Pumpkin Amigurumi Pattern step 1 - construction progress Halloween Pumpkin Amigurumi Pattern step 2 - assembly progress Halloween Pumpkin Amigurumi Pattern step 3 - details and accessories Halloween Pumpkin Amigurumi Pattern step 4 - final assembly and finishing

Switch Things Up

I love experimenting with different color combinations for this pumpkin pattern! While orange is classic, I've made gorgeous versions in deep burgundy, sage green, and even cream colors for a more vintage farmhouse look. The sculpting technique works beautifully with any color choice and creates such realistic texture. Sometimes I make a whole patch of different sized pumpkins using various yarn weights - they look amazing clustered together on a mantel or as a centerpiece. You could even add embroidered faces or appliquΓ© details to make each pumpkin unique. I've also tried making the moustaches in different colors like gold or copper for extra visual interest. The leaf can be made in multiple shades of brown and green to mimic real autumn leaves. Don't be afraid to make this pattern your own - it's so versatile and forgiving!

Common Mistakes & How to Fix Them

βœ— Over-stuffing the pumpkin making sculpting difficult - stuff firmly but not too tight βœ— Skipping the sculpting steps which creates just a plain orange ball instead of pumpkin βœ— Not moistening moustaches properly with PVA solution causing them to lose their curl βœ— Making sculpting lines too symmetrical instead of natural looking pumpkin ridges

Halloween Pumpkin Amigurumi Pattern

Create the perfect autumn decoration with this adorable Halloween pumpkin amigurumi! This charming 12cm pumpkin features realistic sculpting techniques that give it authentic ridges and curves, plus delightful curly moustaches and a decorative leaf. The pattern uses beautiful orange yarn for the pumpkin body and brown accents for the leaves and curly details. Perfect for seasonal decorating, Halloween gifts, or adding a cozy fall touch to your home. This intermediate-friendly pattern includes detailed sculpting instructions and photo tutorials.

Intermediate 4-5 Hours

Materials Needed for Halloween Pumpkin Amigurumi Pattern

β€” Main Fabric

  • 01
    Yarn GAZZAL BABY COTTON 50g/165m in orange color for pumpkin body
  • 02
    Yarn ALIZE FOREVER 50g/300m in brown color for leaves and moustaches

β€” Tools Required

  • 01
    Crochet hook matching your yarn size
  • 02
    Yarn needle for sculpting and sewing
  • 03
    Scissors
  • 04
    Stuffing/filler of your choice
  • 05
    PVA glue for moustache treatment
  • 06
    Brown sewing thread
  • 07
    Pencil for shaping moustaches

Progress Tracker

0% Complete

β€” Pumpkin Body :

Round 1 :

8 sc in a magic ring

Round 2 :

inc*8 (16)

Round 3 :

(1 sc, inc)*8 (24)

Round 4 :

(2 sc, inc)*8 (32)

Round 5 :

(3 sc, inc)*8 (40)

Round 6 :

(4 sc, inc)*8 (48)

Round 7 :

(5 sc, inc)*8 (56)

Round 8 :

(6 sc, inc)*8 (64)

Round 9 :

(7 sc, inc)*8 (72)

Round 10 :

72 sc

Round 11 :

(8 sc, inc)*8 (80)

Round 12-13 :

80 sc

Round 14 :

(9 sc, inc)*8 (88)

Round 15-25 :

88 sc (11 rounds)

Round 26 :

(dec, 9 sc)*8 (80)

Round 27-28 :

80 sc

Round 29 :

(dec, 8 sc)*8 (72)

Round 30 :

72 sc

Round 31 :

(dec, 7 sc)*8 (64)

Round 32 :

(dec, 6 sc)*8 (56)

Round 33 :

(dec, 5 sc)*8 (48)

Round 34 :

(dec, 4 sc)*8 (40)

Round 35 :

(dec, 3 sc)*8 (32)

Info :

Stuff the part well, but not firmly

Round 36 :

(dec, 2 sc)*8 (24)

Round 37 :

(dec, 1 sc)*8 (16)

Round 38 :

dec*8 (8)

Info :

FO, cut the yarn, leave a long tail

β€” Moustache (Make 2) :

Step 1 :

Make a chain of 7 cm length (resize fitting to your pumpkin)

Step 2 :

Crochet sc-row along the chain

Info :

Moisten with PVA glue solution (1:1 ratio), wrap on pencil and let dry

β€” Tail :

Round 1 :

8 sc in magic ring

Round 2-5 :

8 sc (4 rounds)

Round 6 :

3 sl st, 5 sc

Round 7 :

8 sc

Round 8 :

3 sl st, 5 sc

Round 9 :

8 sc

Round 10 :

3 sl st, 5 sc

Round 11 :

8 sc

Round 12 :

(3 sc, inc)*2 (10)

Round 13-14 :

10 sc

Round 15 :

(4 sc, inc)*2 (12)

Round 16 :

12 sc

Round 17 :

(2 sc, inc)*4 (16)

Round 18 :

(1 sc, inc)*8 (24)

Round 19 :

24 sc

β€” Leaf :

Row 1 :

Make 16 ch

Row 2 :

Starting in 3rd st from hook: 14 sc, 4 ch, in back direction 14 sc, 1 ch

Row 3 :

Skip 1 st, 13 sc; in arch: 2 sc+ 4 ch+ 2 sc; 11 sc, 1 ch

Row 4 :

Skip 1 st, 12 sc; in arch: 2 sc+ 4 ch+ 2 sc; 12 sc, 1 ch

Row 5 :

Skip 1 st, 13 sc; in arch: 2 sc+ 4 ch+ 2 sc; 11 sc, 1 ch

Row 6 :

Skip 1 st, 12 sc; in arch: 2 sc+ 4 ch+ 2 sc; 12 sc, 1 ch

Row 7-9 :

Skip 1 st, 13 sc; in arch: 2 sc+ 4 ch+ 2 sc; 12 sc, 1 ch

Row 10 :

Skip 1 st, 13 sc; in arch: 5 sc; 12 sc

Row 11-28 :

Continue leaf shaping with detailed chain and single crochet combinations as shown in pattern

Assembly Instructions

  • Complete the sculpting process by creating 8 ridges around the pumpkin ball using yarn needle and finishing tail
  • Make central sculpting from magic ring to finishing hole to create pumpkin dimple
  • Prepare curly moustaches by moistening with PVA glue solution and wrapping around pencil to dry
  • Sew the dried curly moustaches at the center of the pumpkin
  • Stuff the lower part of the tail lightly and attach to pumpkin above the moustache attachment point
  • Sew the completed leaf to the top of the pumpkin for finishing touch

Important Notes

  • πŸ’‘Work pumpkin body in back loops only and in spiral rounds for proper texture
  • πŸ’‘Don't over-stuff the pumpkin as it makes sculpting difficult
  • πŸ’‘Make sculpting lines naturally uneven for realistic pumpkin appearance
  • πŸ’‘Use thinner brown yarn for leaves compared to pumpkin body yarn
  • πŸ’‘Allow moustaches to dry completely on pencil before removing for best curl

This charming Halloween pumpkin pattern brings all the cozy autumn vibes right to your home! The sculpting technique creates amazingly realistic pumpkin ridges, while the playful curly moustaches add personality and whimsy. The finished piece makes a perfect seasonal decoration that captures the spirit of fall and Halloween. Whether you're decorating your home or creating handmade gifts, this pumpkin will bring smiles and warmth to any space. Happy crocheting and have a spook-tacular Halloween! πŸŽƒ

You ask,

we answer.

FAQs

Can I make the pumpkin larger or smaller?

Yes! Simply adjust your hook size and yarn weight. For a larger pumpkin, use bulkier yarn and larger hook. For smaller, use thinner yarn and smaller hook. Remember to adjust moustache length accordingly.

What if I don't have PVA glue for the moustaches?

You can use fabric stiffener or even diluted white school glue. The key is creating a solution that will help hold the curl when dried on the pencil.

Is the sculpting technique difficult for beginners?

The sculpting requires some patience but isn't too complex. Take your time and follow the photo tutorials. Practice on a test piece if you're nervous about it.

Can I skip the leaf and just make the pumpkin?

Absolutely! The pumpkin looks great on its own. You could also substitute with a simple crocheted stem if you prefer a different look.