🧢 Beautiful ✨ Detailed πŸ’ Adorable

Little Floweret Amigurumi Pattern

Little Floweret Amigurumi Pattern
4.3β˜… Rating
6-8 Hours Time Needed
2.8K Made This
βœ‚οΈ

Intermediate Level

Ideal for those with basic knitting experience, featuring slightly more advanced stitches and techniques to expand your skills.

⏱️

All-Day Adventure

Requires 8-10 hours, ideal for a full day of immersive knitting.

🧸

Cute Companion

An adorable friend to cherish, handcrafted with love to bring comfort and joy for years to come.

About This Little Floweret Amigurumi Pattern

This Little Floweret pattern creates an enchanting 18cm tall amigurumi character with a sweet yellow face, colorful petals, and a matching flower pot. The pattern includes detailed step-by-step instructions for creating six individual petals that are attached during the head construction process. The finished toy features safety eyes, embroidered details, and a removable collar for extra charm.

Little Floweret Amigurumi Pattern crochet pattern - detailed view of completed project

The pattern combines multiple techniques including magic rings, color changes, and specialized attachment methods for the petals. It's designed to create a stable, well-proportioned toy that stands beautifully in its decorative pot.

Why You'll Love This Little Floweret Amigurumi Pattern

I absolutely love how this pattern brings together so many delightful elements - the cheerful flower face, the dimensional petals, and that adorable little pot that makes it a complete decorative piece. The way the petals attach during construction is ingenious and creates such a professional-looking finish. What really captures my heart is how this little character seems to have its own personality with those sweet safety eyes and embroidered smile.

Little Floweret Amigurumi Pattern step 1 - construction progress Little Floweret Amigurumi Pattern step 2 - assembly progress Little Floweret Amigurumi Pattern step 3 - details and accessories Little Floweret Amigurumi Pattern step 4 - final assembly and finishing

Switch Things Up

I love experimenting with this Little Floweret pattern by changing up the color schemes to match different seasons and occasions. For spring, I use pastel blues and purples with a white center, creating a dreamy garden feel. During autumn, I switch to warm oranges and deep reds that capture the essence of fall blooms.

Sometimes I create a whole bouquet by making multiple flowers in different sizes - scaling down the pattern by using a smaller hook creates adorable mini versions perfect for gift toppers or desk decorations. I've also tried adding small bells inside the petals for a gentle chiming sound that delights children.

The pot offers endless customization opportunities too. I've made versions with textured stitches, added decorative bands with contrasting colors, and even embroidered small designs on the sides. One of my favorites was a version where I added small crocheted drainage holes for authenticity.

Common Mistakes & How to Fix Them

βœ— Forgetting to stuff petals only halfway before folding can make them too bulky and difficult to attach properly βœ— Not marking the beginning of rounds clearly can lead to misaligned petals and uneven head shaping βœ— Skipping the cardboard reinforcement in the flower pot bottom will result in a wobbly, unstable finished piece βœ— Rushing the petal attachment process without checking alignment can create an asymmetrical flower head appearance

Little Floweret Amigurumi Pattern

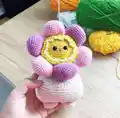
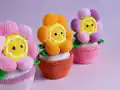
Create this adorable Little Floweret character with its charming yellow center face and pink petals sitting in a decorative flower pot. This delightful amigurumi toy combines beautiful textures and colors to bring a smile to anyone's face. Perfect for gifting or adding a touch of handmade charm to your home decor collection.

Intermediate 6-8 Hours

Materials Needed for Little Floweret Amigurumi Pattern

β€” Main Fabric

  • 01
    Cotton blend yarn (330m/100g) in pink shades - Alize Cotton Gold 518 and 98
  • 02
    Green yarn - Alize Cotton Gold 126
  • 03
    Nude yarn - Alize Cotton Gold 382 or 401
  • 04
    Yellow yarns - dark yellow Yarn Art Jeans 35, yellow Alize Cotton Gold 110, pastel yellow Alize Cotton Gold 187
  • 05
    Dark pink yarn - Alize Cotton Gold 33

β€” Tools Required

  • 01
    Crochet hook 2mm
  • 02
    Safety eyes 8mm diameter (2 pieces)
  • 03
    Polyester fiberfill stuffing
  • 04
    Tapestry needle with large eye
  • 05
    Black thread or embroidery floss
  • 06
    Dry pastel chalk for toning
  • 07
    Soft cloth for applying chalk
  • 08
    Tailor pins
  • 09
    Cardboard for pot reinforcement

Progress Tracker

0% Complete

β€” LEGS :

Round 1 :

6 sc into an AMR (6)

Round 2 :

6 inc (12)

Round 3 :

(1 sc, 1 inc) 6 times (18)

Round 4 :

(2 sc, 1 inc) 6 times (24)

Round 5 :

1 sc each in every stitch (24)

Round 6 :

5 sc, 7 dec, 5 sc (17)

Round 7 :

1 sc each in every stitch (17)

Info :

On first leg, break yarn and secure. On second leg, work 4 sc more to inside of leg and continue to body

β€” BODY :

Round 1 :

5 inc, 7 sc, 10 inc, 7 sc, 5 inc (54)

Round 2 :

1 sc each in every stitch (54)

Round 3 :

4 sc, 1 inc, (8 sc, 1 inc) 5 times, 4 sc (60)

Round 4 :

(9 sc, 1 inc) 6 times (66)

Round 5 :

5 sc, 1 inc, (10 sc, 1 inc) 5 times, 5 sc (72)

Rounds 6–15 :

10 rounds total – 1 sc each in every stitch (72)

Round 16 :

24 sc, 12 dec, 24 sc (60)

Round 17 :

(8 sc, 1 dec) 6 times (54)

Round 18 :

1 sc each in every stitch (54)

Round 19 :

(7 sc, 1 dec) 6 times (48)

Round 20 :

1 sc each in every stitch (48)

Round 21 :

(6 sc, 1 dec) 6 times (42)

Round 22 :

1 sc each in every stitch (42)

Round 23 :

(5 sc, 1 dec) 6 times (36)

Round 24 :

1 sc each in every stitch (36)

Round 25 :

(4 sc, 1 dec) 6 times (30)

β€” PETALS (make 6) :

Round 1 :

6 sc into an AMR (6)

Round 2 :

6 inc (12)

Round 3 :

(1 sc, 1 inc) 6 times (18)

Round 4 :

(2 sc, 1 inc) 6 times (24)

Round 5 :

(3 sc, 1 inc) 6 times (30)

Rounds 6–8 :

3 rounds total – 1 sc each in every stitch (30)

Round 9 :

(8 sc, 1 dec) 3 times (27)

Round 10 :

1 sc each in every stitch (27)

Round 11 :

(7 sc, 1 dec) 3 times (24)

Round 12 :

1 sc each in every stitch (24)

Round 13 :

(2 sc, 1 dec) 6 times (18)

Info :

Stuff piece halfway, fold in half, and crochet edges together with 8 sc

β€” HEAD :

Round 1 :

4 sc, 3 sc into last chain. Continue into unused loops: 3 sc, 1 inc into first chain (12)

Round 2 :

1 inc, 3 sc, 3 inc, 3 sc, 2 inc (18)

Round 3 :

1 sc, 1 inc, 3 sc, (1 sc, 1 inc) 3 times, 3 sc, (1 sc, 1 inc) 2 times (24)

Round 4 :

2 sc, 1 inc, 3 sc, (2 sc, 1 inc) 3 times, 3 sc, (2 sc, 1 inc) 2 times (30)

Round 5 :

3 sc, 1 inc, 3 sc, (3 sc, 1 inc) 3 times, 3 sc, (3 sc, 1 inc) 2 times (36)

Round 6 :

4 sc, 1 inc, 3 sc, (4 sc, 1 inc) 3 times, 3 sc, (4 sc, 1 inc) 2 times (42)

Round 7 :

blo – 1 sc each in every stitch (42)

Round 8 :

joining the petals - detailed attachment process following pattern steps

Round 9 :

in Green – (6 sc, 1 inc) 6 times (48)

Rounds 10–17 :

8 rounds total – 1 sc each into every st (48)

Round 18 :

3 sc, dec, (6 sc, 1 dec) 5 times, 3 sc (42)

Round 19 :

(5 sc, 1 dec) 6 times (36)

Round 20 :

2 sc, dec, (4 sc, 1 dec) 5 times, 2 sc (30)

Round 21 :

(3 sc, 1 dec) 6 times (24)

Round 22 :

1 sc, dec, (2 sc, 1 dec) 5 times, 1 sc (18)

Round 23 :

(1 sc, 1 dec) 6 times (12)

Round 24 :

6 dec

β€” LEAF (make 2) :

Step 1 :

Crochet chain of ch11 + ch1 for height adjustment

Step 2 :

Work 11 sl-st along chain, ch1

Step 3 :

Without turning, work into unused loops: 2 sc into same st, 1 hdc, 6 dc, 1 hdc, 2 sc, ch2

Step 4 :

Repeat stitch sequence mirror-inverted on other side

Step 5 :

1 sl-st each into every st around

β€” COLLAR :

Row 1 :

1 sc each in every stitch, ch3, turn work

Row 2 :

alternate (dc, dc-inc) to end, then ch3, sl-st into same st

Info :

Create chains and sl-st for ties

β€” FLOWER POT :

Round 1 :

4 sc, 3 sc into last chain. Continue into unused loops: 3 sc, 1 inc into first chain (12)

Round 2 :

1 inc, 3 sc, 3 inc, 3 sc, 2 inc (18)

Round 3 :

1 sc, 1 inc, 3 sc, (1 sc, 1 inc) 3 times, 3 sc, (1 sc, 1 inc) 2 times (24)

Round 4 :

2 sc, 1 inc, 3 sc, (2 sc, 1 inc) 3 times, 3 sc, (2 sc, 1 inc) 2 times (30)

Round 5 :

3 sc, 1 inc, 3 sc, (3 sc, 1 inc) 3 times, 3 sc, (3 sc, 1 inc) 2 times (36)

Round 6 :

4 sc, 1 inc, 3 sc, (4 sc, 1 inc) 3 times, 3 sc, (4 sc, 1 inc) 2 times (42)

Round 7 :

5 sc, 1 inc, 3 sc, (5 sc, 1 inc) 3 times, 3 sc, (5 sc, 1 inc) 2 times (48)

Round 8 :

6 sc, 1 inc, 3 sc, (6 sc, 1 inc) 3 times, 3 sc, (6 sc, 1 inc) 2 times (54)

Round 9 :

7 sc, 1 inc, 3 sc, (7 sc, 1 inc) 3 times, 3 sc, (7 sc, 1 inc) 2 times (60)

Round 10 :

blo – 1 sc each in every stitch (60)

Rounds 11-24 :

Continue following pattern for pot construction with increases and decreases

Assembly Instructions

  • Sew the head to the body using a double-pointed needle for easier alignment and pinning in place
  • Attach the leaves to the sides of the body, positioning them 4 rounds below the head seam to serve as arms
  • Place the removable collar around the neck area and tie it securely in the back
  • Insert the cardboard circle into the bottom of the flower pot for stability and structure
  • Apply dry pastel chalk to the cheeks using a soft cloth for a natural blushing effect
  • Secure all yarn ends properly and ensure all seams are reinforced for durability

Important Notes

  • πŸ’‘Use stitch markers consistently to track round beginnings, especially during petal attachment sequences
  • πŸ’‘Stuff all pieces firmly but not overly tight to maintain proper shaping and proportions
  • πŸ’‘Insert safety eyes before completing the head and ensure washers are properly secured from inside
  • πŸ’‘Keep petals stuffed only halfway before folding to prevent bulk during attachment process
  • πŸ’‘Cut cardboard reinforcement slightly smaller than pot bottom to ensure proper fit
  • πŸ’‘Apply pastel chalk sparingly and build up color gradually for best results

This charming Little Floweret pattern brings together the sweetness of amigurumi with the beauty of floral design. The combination of the adorable face, dimensional petals, and decorative pot creates a truly special piece that works wonderfully as both a toy and home décor item. The thoughtful construction techniques ensure a professional finish that will be treasured for years to come. 🌸 Happy crocheting! 🧢✨

You ask,

we answer.

FAQs

Can I use different colors for the petals?

Absolutely! The pattern works beautifully with any color combination. You can make all petals the same color or create a rainbow effect with multiple shades.

Is the collar removable?

Yes, the collar is designed to be removable with chain ties, making it easy to take on and off or replace with different styles.

What if I can't find the exact yarn specified?

Any cotton blend yarn of similar weight will work. The key is maintaining consistent tension and using colors that complement each other.

How do I ensure the petals attach evenly?

Use stitch markers to mark your placement and take time to align each petal before securing. The pattern includes detailed step-by-step attachment instructions.

Can I make this without the flower pot?

Yes, the flower character can stand alone, though the pot adds stability and completes the decorative look.