๐Ÿงถ Beautiful โœจ Detailed ๐Ÿ’ Adorable

Little Teddy Bear Amigurumi Pattern

Little Teddy Bear Amigurumi Pattern
4.8โ˜… Rating
8-10 Hours Time Needed
3.2K Made This
โœ‚๏ธ

Intermediate Level

Ideal for those with basic knitting experience, featuring slightly more advanced stitches and techniques to expand your skills.

โฑ๏ธ

All-Day Adventure

Requires 8-10 hours, ideal for a full day of immersive knitting.

๐Ÿงธ

Cute Companion

An adorable friend to cherish, handcrafted with love to bring comfort and joy for years to come.

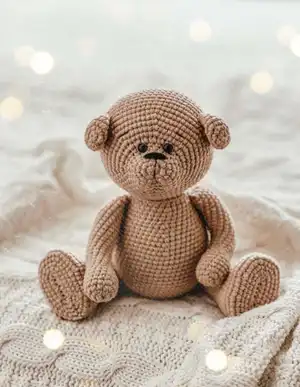
About This Little Teddy Bear Amigurumi Pattern

This little teddy bear pattern combines traditional amigurumi techniques with advanced jointing methods to create a truly special handmade toy. Featuring cotter pin joints for the head and sewn-on limbs, this bear has a classic teddy bear feel with moveable parts. The pattern includes detailed needle sculpting instructions for creating expressive facial features and proper shaping techniques for that perfect teddy bear silhouette.

Little Teddy Bear Amigurumi Pattern crochet pattern - detailed view of completed project

Working with sport-weight yarn and a 2mm hook creates tight, secure stitches perfect for a stuffed toy. The pattern includes helpful photos and detailed explanations for each advanced technique used.

Why You'll Love This Little Teddy Bear Amigurumi Pattern

I absolutely love this pattern because it teaches you so many valuable amigurumi skills in one project! The jointed construction means your finished bear will have that authentic teddy bear movement and posability. I'm particularly fond of how the needle sculpting brings the face to life - there's something magical about watching those simple stitches transform into an expressive little personality. The detailed instructions make even the most complex steps achievable, and the end result is a truly professional-looking toy that could easily be mistaken for a store-bought treasure.

Little Teddy Bear Amigurumi Pattern step 1 - construction progress Little Teddy Bear Amigurumi Pattern step 2 - assembly progress Little Teddy Bear Amigurumi Pattern step 3 - details and accessories Little Teddy Bear Amigurumi Pattern step 4 - final assembly and finishing

Switch Things Up

I love experimenting with different yarn colors and textures when making this teddy bear pattern! Sometimes I use a fluffy mohair blend for an ultra-soft vintage feel, or try variegated yarns for a unique striped effect. I've also made seasonal versions - a sparkly gold yarn for holidays, or soft pastels for spring. The beauty of this pattern is how adaptable it is to your creative vision.

I often modify the facial features too, trying different eye placements or adding rosy cheeks with a bit of pink yarn. Some of my favorite variations include making the ears slightly larger for a more puppy-like appearance, or adding a little embroidered heart on the chest area. I've even experimented with making tiny accessories like miniature scarves or bow ties to give each bear its own personality.

The joint system opens up so many possibilities - I sometimes make bears in different poses by adjusting how I position the limbs during assembly. Each bear truly becomes one-of-a-kind with these small personal touches that make the crafting process even more enjoyable and meaningful.

Common Mistakes & How to Fix Them

โœ— Not stuffing the head firmly enough before needle sculpting can result in uneven facial features โœ— Forgetting to wrap wire ends in medical tape can cause the wire to poke through the fabric โœ— Skipping the plastic insoles in the feet will make the bear unable to stand properly โœ— Not securing the cotter pin tightly enough can cause the head to become loose over time

Little Teddy Bear Amigurumi Pattern

Create your own adorable little teddy bear with this comprehensive amigurumi pattern! This charming design features detailed instructions for crafting a cuddly companion with jointed limbs, embroidered facial features, and perfect proportions. The pattern includes step-by-step guidance for advanced techniques like needle sculpting and cotter pin joints, making it an excellent project for expanding your crochet skills while creating a treasured keepsake.

Intermediate 8-10 Hours

Materials Needed for Little Teddy Bear Amigurumi Pattern

โ€” Main Fabric

  • 01
    Sport-weight yarn in beige (YarnArt Jeans no.48 or no.87, 50g/160mt - 1 skein)
  • 02
    Brown or black embroidery thread for nose and facial features
  • 03
    White thread for creating live eyes highlights

โ€” Tools Required

  • 01
    Crochet hook no.2/2mm (Clover Amour recommended)
  • 02
    Tapestry needle for sewing pieces
  • 03
    Plastic safety eyes D=6mm (2 pieces)
  • 04
    Attachment disc D=25-20mm (2 pieces)
  • 05
    Cotter pin 25/2mm (1 piece)
  • 06
    Wire for arms (10cm/4 inches long)
  • 07
    Medical plaster for wrapping wire ends
  • 08
    Stuffing material (fiberfill)
  • 09
    Plastic for insoles (from container lids)
  • 10
    Strong nylon or cotton thread for sewing
  • 11
    Pliers for cotter pin assembly

Progress Tracker

0% Complete

โ€” Head :

MR :

6 sc = 6

Round 1 :

inc *6 = 12

Round 2 :

(sc, inc)*6 = 18

Round 3 :

sc into every st = 18

Round 4 :

(2 sc, inc)*6 = 24

Round 5 :

sc into every st = 24

Round 6 :

(3 sc, inc)*6 = 30

Round 7 :

inc *15, 5 sc, dec *3, 4 sc = 42

Round 8 :

(6 sc, inc)*6 = 48

Round 9 :

(7 sc, inc)*6 = 54

Round 10 :

(8 sc, inc)*6 = 60

Round 11 :

(9 sc, inc)*6 = 66

Rounds 12-22 :

sc into every st = 66 (11 rounds)

Info :

If you use plastic safety eyes, insert them between rounds 6 and 7, skipping 4 or 5 sts apart

Round 23 :

(9 sc, dec)*6 = 60

Round 24 :

(8 sc, dec)*6 = 54

Round 25 :

(7 sc, dec)*6 = 48

Round 26 :

(6 sc, dec)*6 = 42

Round 27 :

(5 sc, dec)*6 = 36

Round 28 :

(4 sc, dec)*6 = 30

Info :

Put the head aside for now

โ€” Arms (Make 2) :

MR :

6 sc

Round 1 :

inc *6 = 12

Round 2 :

(2 sc, inc)*4 = 16

Rounds 3-7 :

sc into every st = 16 (5 rounds)

Round 8 :

(2 sc, dec)*4 = 12

Rounds 9-27 :

sc into every st = 12 (19 rounds)

Info :

Insert wire into arm, wrap ends with medical plaster. Stuff tightly, leaving upper 3 rounds unstuffed for attachment. Fold arm in half and work dec*3 into both folded edges together

โ€” Ears (Make 2) :

MR :

6 sc

Round 1 :

inc *6 = 12

Round 2 :

(sc, inc)*6 = 18

Round 3 :

sc into every st = 18

Round 4 :

(2 sc, inc)*6 = 24

Round 5 :

(2 sc, dec)*6 = 18

Round 6 :

sc into every st = 18

Info :

Cut yarn leaving long tail for sewing

โ€” Body :

MR :

6 sc

Round 1 :

inc *6 = 12

Round 2 :

(sc, inc)*6 = 18

Round 3 :

(2 sc, inc)*6 = 24

Round 4 :

(3 sc, inc)*6 = 30

Round 5 :

BLO sc into every st = 30

Round 6 :

sc into every st = 30

Round 7 :

(4 sc, inc)*6 = 36

Round 8 :

15 sc, 3 sc together with first arm, 15 sc, 3 sc together with second arm = 36

Round 9 :

(5 sc, inc)*6 = 42

Round 10 :

sc into every st = 42

Round 11 :

(6 sc, inc)*6 = 48

Round 12 :

sc into every st = 48

Round 13 :

(7 sc, inc)*6 = 54

Round 14 :

sc into every st = 54

Round 15 :

(8 sc, inc)*6 = 60

Round 16 :

sc into every st = 60

Rounds 17-30 :

sc into every st = 60 (14 rounds)

Round 31 :

(8 sc, dec)*6 = 54

Round 32 :

(7 sc, dec)*6 = 48

Round 33 :

(6 sc, dec)*6 = 42

Round 34 :

(5 sc, dec)*6 = 36

Round 35 :

(4 sc, dec)*6 = 30

Round 36 :

(3 sc, dec)*6 = 24

Round 37 :

(2 sc, dec)*6 = 18

Info :

Stuff body tightly

Round 38 :

(sc, dec)*6 = 12

Round 39 :

dec *6 or more to close hole

โ€” Legs (Make 2) :

Foundation :

Chain 8, work into 2nd st from hook around chain foundation

Round 1 :

inc, 5 sc, [5 sc into one st], to other side 5 sc, inc = 18

Round 2 :

inc, 6 sc, inc*4, 6 sc, inc = 24

Round 3 :

inc, 9 sc, inc, 2 sc, inc, 9 sc, inc = 28

Round 4 :

(3 sc, inc)*7 = 35

Round 5 :

sc into every st = 35

Round 6 :

(4 sc, inc)*7 = 42

Info :

Circle sole on plastic and cut insole. Cut 2 pieces

Rounds 7-9 :

sc into every st = 42 (3 rounds)

Round 10 :

(4 sc, dec)*7 = 35

Round 11 :

sc into every st = 35

Round 12 :

(3 sc, dec)*7 = 28

Info :

Insert insole into foot

Round 13 :

10 sc, dec *4, 10 sc = 24

Round 14 :

9 sc, dec *3, 9 sc = 21

Round 15 :

8 sc, dec *2, 9 sc = 19

Rounds 16-26 :

sc into every st = 19 (11 rounds)

Info :

Stuff leg very tightly

Round 27 :

Work decreases to close hole

Assembly Instructions

  • Insert attachment disc into head between rounds 15-16 and secure with T-shaped cotter pin
  • Attach head to body by connecting cotter pin through second disc in body, bend pin ends securely
  • Perform needle sculpting for eyes between rounds 6-7, pulling tight to create eye sockets
  • Embroider nose and mouth using black thread through the head opening
  • Sew ears to head along rounds 14-15, folding ears in half and securing with long tails
  • Attach legs to body using strong thread, ensuring they are firmly pressed against body sides
  • Add white highlights to eyes and optional eyebrows for final facial details

Important Notes

  • ๐Ÿ’กWork with X-shaped stitches very tightly for proper bear proportions and structure
  • ๐Ÿ’กAlways wrap wire ends with medical plaster to prevent fabric damage
  • ๐Ÿ’กUse plastic insoles in feet to help the bear stand upright independently
  • ๐Ÿ’กStuff all pieces firmly but leave attachment areas unstuffed for proper joining
  • ๐Ÿ’กGet assistance when tightening cotter pins and leg attachments for secure assembly
  • ๐Ÿ’กKeep safety eyes away from young children and consider embroidered eyes for baby toys

This delightful Little Teddy Bear pattern brings together traditional craftsmanship with modern amigurumi techniques to create a truly special handmade treasure. With jointed construction and detailed facial features, your finished bear will have authentic teddy bear charm and personality. The comprehensive instructions guide you through advanced techniques while ensuring success at every step. Perfect for gifting or keeping as a cherished companion! ๐Ÿงถ Happy crocheting! ๐Ÿงตโœจ

You ask,

we answer.

FAQs

Can I use different yarn weights for this pattern?

While the pattern is designed for sport-weight yarn, you can use different weights but your finished bear will be a different size. Adjust your hook size accordingly and test your gauge.

Is this pattern suitable for beginners?

This is an intermediate pattern that requires knowledge of basic amigurumi techniques. Beginners should master basic stitches and simple amigurumi projects first.

Can I make this bear without the jointed head?

Yes, you can sew the head directly to the body instead of using cotter pins, though it won't be moveable.

What size will the finished bear be?

Using the recommended yarn and hook, the bear will be approximately 6-8 inches tall when seated.

Are the wire-filled arms safe for children?

The wire is optional and should be omitted for toys intended for young children. The medical plaster wrapping helps, but for safety, make non-wired arms for little ones.