๐Ÿงถ Beautiful โœจ Detailed ๐Ÿ’ Adorable

Monster Frankenstein Amigurumi Pattern

Monster Frankenstein Amigurumi Pattern
4.1โ˜… Rating
4-5 Hours Time Needed
1.5K Made This
โœ‚๏ธ

Intermediate Level

Ideal for those with basic knitting experience, featuring slightly more advanced stitches and techniques to expand your skills.

โฑ๏ธ

Weekend Treat

Takes 5-7 hours, making it an enjoyable project to finish over a couple of days.

๐Ÿงธ

Cute Companion

An adorable friend to cherish, handcrafted with love to bring comfort and joy for years to come.

About This Monster Frankenstein Amigurumi Pattern

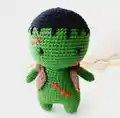
This Monster Frankenstein amigurumi pattern creates an absolutely charming character that transforms the classic scary monster into an adorable companion. The pattern features beautiful color work with vibrant green yarn for the body and contrasting black for the signature hair. The cute facial features and tiny brown sweater add personality and charm to this delightful creation.

Monster Frankenstein Amigurumi Pattern crochet pattern - detailed view of completed project

Working from head to toe, this pattern guides you through creating each component with clear, easy-to-follow instructions. The finished amigurumi stands perfectly on its own and makes a wonderful decoration or gift.

Why You'll Love This Monster Frankenstein Amigurumi Pattern

I absolutely love how this pattern transforms something traditionally scary into something completely endearing! The color combinations are stunning, and I find the process of bringing this little character to life incredibly satisfying. The way the facial features come together creates such personality, and I love how the brown sweater adds that perfect finishing touch.

Monster Frankenstein Amigurumi Pattern step 1 - construction progress Monster Frankenstein Amigurumi Pattern step 2 - assembly progress Monster Frankenstein Amigurumi Pattern step 3 - details and accessories Monster Frankenstein Amigurumi Pattern step 4 - final assembly and finishing

Switch Things Up

I absolutely love how versatile this Frankenstein pattern can be when you start experimenting with different approaches! You can easily change up the color scheme - imagine him in purple and silver for a more mystical look, or even in pastels for a completely different vibe.

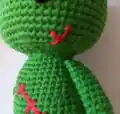
I've discovered that adding small details like tiny embroidered scars or changing the sweater to a vest creates completely new personalities. Some makers I know have even added small accessories like a tiny hat or bowtie.

The beauty of this pattern is how you can adjust the facial expression just by changing the placement of the safety eyes or adding different embroidered features. I've seen versions where crafters added rosy cheeks or even a small smile that transforms the whole character.

You could also experiment with different textures by using fuzzy yarn for the hair section or adding metallic thread accents to the sweater. The possibilities are truly endless, and each variation tells its own unique story!

Common Mistakes & How to Fix Them

โœ— Forgetting to change yarn colors at the specified rounds can affect the character's appearance significantly
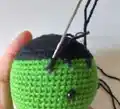
 โœ— Not stuffing the head firmly enough will cause it to lose its round shape over time โœ— Skipping the back loop only instruction in round 12 will change the texture transition between colors โœ— Placing safety eyes incorrectly can alter the character's facial expression and overall charm

Monster Frankenstein Amigurumi Pattern

Create your own adorable Monster Frankenstein with this delightful amigurumi pattern! This cute green character features his signature black hair, charming facial details, and tiny brown sweater. Perfect for Halloween decorations, gifts for monster lovers, or adding a spooky-cute touch to any collection. The pattern includes detailed step-by-step instructions to guide you through creating this lovable Frankenstein monster that's more friend than fright.

Intermediate 4-5 Hours

Materials Needed for Monster Frankenstein Amigurumi Pattern

โ€” Main Fabric

  • 01
    Alize Cotton Gold yarn in three colors: 126 (black), 493 (green), 60 (brown)
  • 02
    Any cotton or acrylic yarn in black, green, and brown colors can be substituted

โ€” Tools Required

  • 01
    2.00mm crochet hook or size to match your yarn
  • 02
    6mm safety eyes
  • 03
    Polyester fiberfill stuffing
  • 04
    Yarn needle
  • 05
    Scissors
  • 06
    Stitch markers

Progress Tracker

0% Complete

โ€” Head :

Round 1 :

6 sc in magic ring (6)

Round 2 :

(inc) x6 (12)

Round 3 :

(sc, inc) (18)

Round 4 :

(inc, 2 sc) x6 (24)

Round 5 :

(3 sc, inc) x6 (30)

Round 6 :

2 sc, inc, (4 sc, inc) x5, 2 sc (36)

Round 7 :

(5 sc, inc) (42)

Round 8 :

3 sc, inc, (6 sc, inc) x5, 3 sc (48)

Round 9 :

(7 sc, inc) x6 (54)

Round 10 :

4 sc, inc, (8 sc, inc) x5, 4 sc (60)

Round 11 :

sc around (60) *change to green yarn

Round 12 :

BLO Sc around (60)

Round 13-23 :

Sc around (60) (11 rnds)

Round 24 :

(3 sc, dec) x12 (48)

Round 25 :

(2 sc, dec) x12 (36)

Round 26 :

2 sc, dec, (4 sc, dec) x5, 2 sc (30)

Round 27 :

(3 sc, dec) x6 (24)

Round 28 :

sc around (24)

โ€” Leg :

Round 1 :

7 sc in magic ring (7)

Round 2 :

(inc) x7 (14)

Round 3-5 :

sc around (14) *make 2 pieces

Info :

After making the first leg, cut the thread. When making the second leg, do not cut the thread and continue to the body.

โ€” Body :

Round 6 :

ch4, join the first leg with the sc. Crochet on the first leg: 2 sc, (inc, 5 sc) x2, working on the chain: inc, 2 sc, inc, crochet on the second leg: (5 sc, inc) x2, 2 sc, working on the chain: 4 sc (42)

Round 7 :

(13 sc, inc) x3 (45)

Round 8-12 :

sc around (45) (5 rnds)

Round 13 :

(13 sc, dec) x3 (42)

Round 14-16 :

sc around (42) (3 rnds)

Round 17 :

(5 sc, dec) x6 (36)

Round 18-20 :

sc around (36) (3 rnds)

Round 21 :

(4 sc, dec) x6 (30)

Round 22-24 :

sc around (30)

Round 25 :

(3 sc, dec) x6, slst (24)

Info :

Fasten off and leaving a long tail for sewing. Stuff the body. Sew the Head with the Body.

โ€” Arm :

Round 1 :

6 sc in magic ring (6)

Round 2 :

(sc, inc) x3 (9)

Round 3-11 :

sc around (9) (9 rnds)

Info :

I don't fill arms.

โ€” Sweater :

Round 1 :

Ch 25, (sc, inc) x12 (36) ch1, turn

Round 2 :

(2 sc, inc) x12 (48) ch1, turn

Round 3 :

Sc around (48) ch1, turn

Round 4 :

7 sc, ch3, skip 10 sc, 14 sc, ch3, skip 10 sc, 7 sc, ch1, turn

Round 5-7 :

Sc around (34) (3 rnds) ch1, turn. Cut the yarn and hide.

Assembly Instructions

  • Stuff the head firmly and attach safety eyes between rounds where the color changes from black to green
  • Sew the head to the body using the long tail left from the body assembly
  • Attach arms to the sides of the body at shoulder level, ensuring they are evenly positioned
  • Place the brown sweater over the body and secure in place
  • Embroider facial features like the mouth and any additional details with contrasting thread
  • Add decorative stitching details to enhance the Frankenstein appearance

Important Notes

  • ๐Ÿ’กUse stitch markers to keep track of rounds, especially during color changes from black to green
  • ๐Ÿ’กStuff the head and body firmly but not too tightly to maintain proper shape
  • ๐Ÿ’กTake care when changing colors to create clean transitions between the black hair and green face
  • ๐Ÿ’กPosition safety eyes carefully before securing to achieve the desired facial expression
  • ๐Ÿ’กThe sweater should fit snugly but not too tight over the completed body

This adorable Monster Frankenstein pattern brings a beloved classic character to life in the sweetest way possible! The combination of vibrant green, dramatic black hair, and the tiny brown sweater creates a character that's more huggable than frightening. Perfect for Halloween enthusiasts or anyone who loves unique amigurumi characters with personality. This little monster is sure to become a treasured companion that brings smiles wherever he goes. Happy crocheting!

You ask,

we answer.

FAQs

Can I use different yarn weights for this pattern?

Yes, but you'll need to adjust your hook size accordingly. The finished size will vary depending on your yarn choice.

How do I achieve clean color changes between the black and green sections?

Complete the last stitch of the previous color by pulling through with the new color, and carry the yarn neatly on the inside.

Is this pattern suitable for beginners?

This is an intermediate pattern due to the color changes and multiple components. Basic amigurumi skills are recommended.

Can I make the sweater removable?

Yes, you can modify the pattern to make the sweater as a separate piece that slips on and off.

What size will the finished Frankenstein be?

Using the recommended yarn and hook size, the finished amigurumi will be approximately 6-7 inches tall.