๐Ÿงถ Beautiful โœจ Detailed ๐Ÿ’ Adorable

Plush Dumpling and Steamer Basket Amigurumi Pattern

Plush Dumpling and Steamer Basket Amigurumi Pattern
4.1โ˜… Rating
5-7 Hours Time Needed
1.8K Made This
โœ‚๏ธ

Intermediate Level

Ideal for those with basic knitting experience, featuring slightly more advanced stitches and techniques to expand your skills.

โฑ๏ธ

Weekend Treat

Takes 5-7 hours, making it an enjoyable project to finish over a couple of days.

๐Ÿงธ

Cute Companion

An adorable friend to cherish, handcrafted with love to bring comfort and joy for years to come.

About This Plush Dumpling and Steamer Basket Amigurumi Pattern

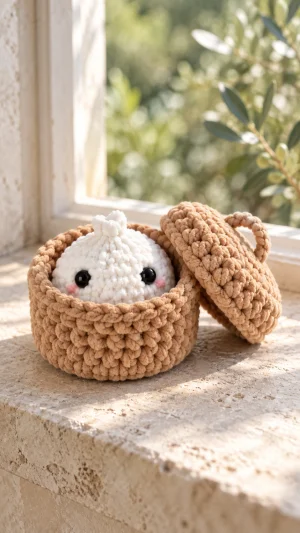
This Hook Vibes pattern creates three main components: a rounded dumpling, an open basket, and a removable lid with a sewn handle. The dumpling begins at its underside and narrows toward the top, where a separate ruffled crown suggests gathered dough without complicated pleating. Single crochet gives the chenille yarn a dense, softly pebbled surface, while back-loop rounds establish the basket base and lid edges. You will practice working in continuous rounds, counting increases and decreases, placing facial details, and checking the fit between separate pieces before finishing their edges.

Plush Dumpling and Steamer Basket Amigurumi Pattern crochet pattern - detailed view of completed project

The basket has more stitches around its sides than the dumpling, providing room for the stuffed character while keeping the pairing visually snug. Because chenille thickness and tension vary considerably, I recommend checking the actual pieces together rather than relying on a promised finished size or an identical yarn-weight label.

Why You'll Love This Plush Dumpling and Steamer Basket Amigurumi Pattern

I love how this project gives a small character its own setting: the caramel basket frames the white dumpling, and the removable lid makes the finished pair feel complete. I can divide the work into manageable stages, starting with the basket, moving to the dumpling, and saving the face and crown for a focused finishing session. The stitch pattern stays approachable, but the fit checks give me useful opportunities to adjust tension before committing to the last details. I also appreciate that the basket remains usable on its own for lightweight keepsakes. For a gift, I would nestle the dumpling inside with the lid resting beside it, allowing the embroidered cheeks and gathered top to remain visible.

Plush Dumpling and Steamer Basket Amigurumi Pattern step 1 - construction progress Plush Dumpling and Steamer Basket Amigurumi Pattern step 2 - assembly progress Plush Dumpling and Steamer Basket Amigurumi Pattern step 3 - details and accessories Plush Dumpling and Steamer Basket Amigurumi Pattern step 4 - final assembly and finishing

Switch Things Up

I would start with color when personalizing this set, keeping the dumpling creamy white while choosing honey, cinnamon, or pale oatmeal for the basket and matching lid. I would keep the basket and lid in the same yarn range, because two similarly named bulky yarns can have different thicknesses and produce pieces that no longer fit together. For a steamed-bun variation, I would choose an ivory body and use the same shaping and separate crown, allowing the color to change the character without changing any stitch counts. If I wanted a playful dessert version, I would use pale pink for the dumpling and add a few short embroidered sprinkles before stuffing, securing each thread inside.

I like the option of embroidered eyes when I want a softer face, placing them at the same marked positions and checking their spacing while the body is lightly stuffed. I would make the cheeks with two small horizontal stitches on each side, or omit them for a simpler expression that leaves the chenille texture as the main detail. To create a coordinated pair, I would make a second complete dumpling in another color and give each its own basket, rather than crowding two characters into this basket. If I wanted a larger set, I would change yarn and hook size for every component together, then repeat the basket, dumpling, and lid fit checks because their fabric thickness still affects clearance.

For a cleaner steamer silhouette, I would leave off the handle and weave in the lid ends neatly, keeping its round count and side depth unchanged. When presenting the set as a gift, I would add a removable paper name tag around the basket rather than sewing extra decorations across the opening, so the dumpling can still lift out easily.

Common Mistakes & How to Fix Them

โœ— A basket base that ripples usually has extra stitches or loose increases. Count each round against its stated total, undo the first incorrect round, and check that the corrected base rests reasonably flat before making the walls.โœ— A dumpling that will not settle into the basket may be overstuffed or worked at a looser tension. Remove some filling first, then compare the fabrics; the body should lift out without pulling the basket rim upward.โœ— Visible stuffing between the white stitches means the fabric is too open or stretched. Reduce the filling and inspect again; if gaps remain, remake the body with a smaller hook before attaching the crown.โœ— A lid that perches above the rim instead of slipping over it needs more clearance. Check its 48-stitch count and try a slightly larger hook for the lid; confirm the fit before working its slip-stitch edge.โœ— Eyes that appear uneven often result from following the sloping spiral rather than checking the face straight on. Mark both positions, lightly stuff the body, and compare their height before securing washers or embroidering.โœ— A stiff, star-shaped crown comes from spreading its base too widely or pulling its outer edge tight. Gather only the foundation edge, sew it around the closed top, and check that the outer ruffle remains loose.โœ— A basket rim that draws inward can be caused by tight finishing slip stitches. Undo that edging and remake it loosely, using a larger hook if necessary; the opening should retain its previous width.โœ— A handle that twists or pulls the lid into a fold usually has uneven attachment points. Pin both ends at equal distances from the center, reposition them until the lid lies flat, and then sew securely.

Plush Dumpling and Steamer Basket Amigurumi Pattern

Crochet a smiling white dumpling tucked inside a caramel basket, complete with a removable lid and soft loop handle. You will make the stuffed dumpling, shape its gathered crown, and crochet a matching basket using simple rounds and plush yarn. This original photo-inspired project brings together a cuddly character and a little storage basket for a charming handmade display.

Intermediate 5-7 Hours

Materials Needed for Plush Dumpling and Steamer Basket Amigurumi Pattern

โ€” Main Fabric

  • 01
    Super bulky chenille yarn, category 6, in white or ivory for the dumpling and crown; allow approximately 40-60 g, depending on yarn and tension.
  • 02
    Matching super bulky chenille yarn in caramel or tan for the basket, lid, and handle; allow approximately 80-120 g, depending on yarn and tension.
  • 03
    Small amount of pink smooth yarn or embroidery floss for the cheeks.
  • 04
    Small amount of black smooth yarn or embroidery floss if embroidering the eyes.
  • 05
    Strong matching sewing yarn for attaching the crown and handle if the chenille strand sheds or breaks when pulled.

โ€” Tools Required

  • 01
    5 mm crochet hook as a starting size; adjust to produce dense fabric with your chosen chenille.
  • 02
    An adjacent hook size for adjusting basket or lid fit if needed.
  • 03
    Locking stitch markers.
  • 04
    Blunt yarn needle with an eye large enough for the chosen yarn.
  • 05
    Embroidery needle suitable for the facial-detail yarn.
  • 06
    Scissors.
  • 07
    Polyester toy stuffing.
  • 08
    Optional pair of approximately 12 mm safety eyes with matching washers; choose an appropriate size for your actual fabric.
  • 09
    Sewing pins for positioning the crown and handle.

Progress Tracker

0% Complete

โ€” Before You Begin :

Info :

This is an original pattern inspired by the pictured plush dumpling, caramel basket, and removable handled lid. The reference image contains a project title and photographs, but no readable stitch instructions.

Working Method :

Use US crochet terms. Work in continuous rounds unless a join is specifically stated. Place a marker in the first stitch of each round and move it as you work. Work through both loops unless BLO is specified. Starting chains do not count as stitches.

Tension :

Begin with a 5 mm hook and super bulky chenille. The dumpling fabric must hide the stuffing, and the basket fabric should hold a soft upright shape. Adjust your hook to suit your yarn; no fixed finished measurement is specified.

Making a Secure Center :

For each magic ring, leave a tail long enough to secure with a needle. Close the ring gradually rather than yanking the chenille. If your yarn breaks when cinched, ch 2 and work the first round into the second chain from the hook instead.

โ€” Basket :

Info :

Use caramel yarn. Make the basket first so you can check the dumpling and lid against the actual opening.

Round 1 :

6 sc in MR. (6)

Round 2 :

Inc in each st around. (12)

Round 3 :

(1 sc, inc) ร— 6. (18)

Round 4 :

(2 sc, inc) ร— 6. (24)

Round 5 :

(3 sc, inc) ร— 6. (30)

Round 6 :

(4 sc, inc) ร— 6. (36)

Round 7 :

(5 sc, inc) ร— 6. (42)

Base Check :

Place the base on a flat surface. Gently smooth it with your fingers. If it strongly cups or ripples despite the correct count, adjust your hook or tension before continuing.

Round 8 :

Working BLO, sc in each st around. (42)

Round 9 :

Sc in each st around through both loops. (42)

Round 10 :

Sc in each st around. (42)

Round 11 :

Sc in each st around. (42)

Round 12 :

Sc in each st around. (42)

Round 13 :

Sc in each st around. (42)

Round 14 :

Loosely sl st in each st around. Keep the loops relaxed so the opening does not tighten. (42 sl sts)

Fasten Off :

Cut the yarn and pull the tail through the final loop.

Secure the Center :

Thread the starting tail through several stitches on the inside of the base, changing direction to secure it.

Finish the Rim :

Weave the ending tail into the inside wall without drawing the rim inward.

โ€” Dumpling Body :

Info :

Use white yarn. Begin at the underside and work upward. Keep the round marker at the back when choosing the face position.

Round 1 :

6 sc in MR. (6)

Round 2 :

Inc in each st around. (12)

Round 3 :

(1 sc, inc) ร— 6. (18)

Round 4 :

(2 sc, inc) ร— 6. (24)

Round 5 :

(3 sc, inc) ร— 6. (30)

Round 6 :

(4 sc, inc) ร— 6. (36)

Round 7 :

Sc in each st around. (36)

Round 8 :

Sc in each st around. (36)

Round 9 :

Sc in each st around. (36)

Round 10 :

Sc in each st around. (36)

First Fit Check :

Add a little temporary stuffing and place the body into the basket. It should settle inside with gentle contact at the sides. Remove the body and temporary stuffing before continuing. If it is too tight, remake the dumpling with a slightly smaller hook while retaining all stitch counts.

Round 11 :

(4 sc, dec) ร— 6. (30)

Round 12 :

(3 sc, dec) ร— 6. (24)

Mark the Face :

Lightly stuff the body to reveal its shape. Mark two eye positions between Rounds 8 and 9 on the front, leaving approximately 7 stitches between the insertion points. Check their height and spacing while the dumpling is sitting in the basket.

Attach Safety Eyes :

If using safety eyes, remove enough temporary stuffing to reach inside. Insert the posts at the marked positions and attach the matching washers securely. Use embroidered eyes instead for a young child's toy.

Embroidered Eye Alternative :

If omitting safety eyes, use black yarn to make several short vertical stitches at each marked position, forming two small ovals. Secure the ends inside without pulling the face inward.

Cheeks :

Using pink yarn, make two short horizontal stitches just below and slightly outside each eye. Secure the thread ends inside the body.

Round 13 :

(2 sc, dec) ร— 6. (18)

Stuff the Body :

Add small tufts of stuffing, spreading them evenly around the sides and underside. Keep the bottom softly flattened and the upper body rounded. Check the basket fit again before adding more filling.

Round 14 :

(1 sc, dec) ร— 6. (12)

Final Stuffing :

Add a final small amount of stuffing beneath the narrowing top. Leave the fabric supple enough to compress gently without showing filling between stitches.

Round 15 :

Dec ร— 6. (6)

Fasten Off :

Cut the yarn, leaving a sewing tail, and pull the tail through the final loop.

Close the Body :

Thread the tail through the front loops of the remaining 6 stitches. Draw the opening closed gently.

Secure the Closure :

Pass the tail through nearby stitches and bury it inside the body. Do not pull tightly enough to create a deep dent.

โ€” Gathered Crown :

Foundation :

With white yarn, ch 12, leaving a long starting tail for gathering and sewing. Sl st into the first ch to form a ring without twisting it. The joining sl st does not count as a stitch.

Round 1 :

Ch 1, then sc in each foundation ch around. Do not join; continue in a spiral. (12)

Round 2 :

(1 sc, inc) ร— 6. (18)

Fasten Off :

Cut the working yarn and pull it through the final loop.

Finish the Outer Edge :

Weave the working tail through the underside of the crown without tightening its 18-stitch outer edge.

Gather the Base :

Thread the starting tail through the foundation chain ring. Draw it in until the base forms a small gathered opening that sits over the body's closed top. Leave the wider outer edge loose.

Attach the Crown :

Position the gathered foundation edge around the body closure. Sew it to the top of the dumpling with small stitches distributed around the base, leaving the ruffled edge free.

Secure the Crown Tail :

Weave the sewing tail through nearby stitches, change direction, and bury the end inside the body.

Shape the Crown :

Pinch the free edge into three or four soft folds with your fingers. Keep a small opening at the center to suggest the gathered top shown in the photograph.

โ€” Basket Lid :

Info :

Use caramel yarn. The lid has a wider top than the basket and a shallow side wall that fits over its rim.

Round 1 :

6 sc in MR. (6)

Round 2 :

Inc in each st around. (12)

Round 3 :

(1 sc, inc) ร— 6. (18)

Round 4 :

(2 sc, inc) ร— 6. (24)

Round 5 :

(3 sc, inc) ร— 6. (30)

Round 6 :

(4 sc, inc) ร— 6. (36)

Round 7 :

(5 sc, inc) ร— 6. (42)

Round 8 :

(6 sc, inc) ร— 6. (48)

Top Fit Check :

Place the lid top over the empty basket. It should extend slightly beyond the outside of the rim. If it is too small, remake the lid with a slightly larger hook while retaining the stated counts.

Round 9 :

Working BLO, sc in each st around. (48)

Round 10 :

Sc in each st around through both loops. (48)

Side Fit Check :

Try the lid over the empty basket rim. Its side wall should overlap the rim without forcing the basket inward. Resolve a tight fit before adding the edging.

Round 11 :

Loosely sl st in each st around. (48 sl sts)

Fasten Off :

Cut the yarn and pull the tail through the final loop.

Secure the Lid Center :

Weave the starting tail through stitches on the underside, changing direction to secure it.

Finish the Lid Edge :

Weave the ending tail into the inside of the side wall without tightening the edging.

โ€” Lid Handle :

Foundation :

With caramel yarn, ch 13, leaving a long starting tail for attachment.

Row 1 :

Sc in the second ch from the hook and in each remaining ch. (12)

Fasten Off :

Cut the yarn, leaving a long sewing tail, and pull it through the final loop.

Position the Handle :

Lay the lid top facing upward. Pin one handle end near Round 3 on one side of the center and the other end near Round 3 directly opposite it. Let the strip arch above the lid without twisting.

Attach the First End :

Use the starting tail to sew the first end across several lid stitches. Keep the stitches snug without denting the lid.

Attach the Second End :

Use the ending tail to sew the second end in place. Check that the arch is centered and the lid still lies evenly.

Secure the Handle Tails :

Weave both sewing tails into the underside of the lid, changing direction before trimming.

โ€” Final Finishing :

Check Attachments :

Remove all pins and markers. Check that the crown, handle, eyes, and embroidery are secure and that no loose yarn ends remain.

Shape the Basket :

Gently press the base flat and smooth the walls upright with your fingers.

Nest the Dumpling :

Place the dumpling inside with its face toward the front. Redistribute its stuffing through the fabric if necessary so it sits steadily and lifts out easily.

Arrange the Lid :

Rest the lid beside the basket to display the crown. For covered storage, gently compress the soft crown and check that the lid seats without force; display it separately if the stuffed dumpling stands too tall.

Assembly Instructions

  • Place and secure the chosen eyes before closing the dumpling body, using the face positions between Rounds 8 and 9.
  • Embroider the pink cheeks and secure their ends inside the body before completing the stuffing.
  • Stuff the dumpling evenly, close its final 6-stitch opening, and bury the closure tail.
  • Gather the crown's foundation edge, sew it around the closed body top, and arrange its loose outer edge into soft folds.
  • Pin the handle ends on opposite sides of the lid center, sew each end securely, and weave the tails into the underside.
  • Secure all remaining ends, remove pins and markers, and shape the basket base and walls by hand.
  • Set the dumpling inside the basket and arrange the removable lid beside it, checking that the character lifts out without stretching the rim.

Important Notes

  • ๐Ÿ’กThe supplied reference contains photographs and a title rather than readable pattern directions; the instructions here are an original photo-inspired construction.
  • ๐Ÿ’กThe 5-7 hour duration is a planning estimate and varies with crochet speed and finishing choices.
  • ๐Ÿ’กYarn quantities are purchasing allowances, not measured consumption; chenille brands differ substantially in weight per length.
  • ๐Ÿ’กUse the same yarn range for the basket and lid, and comparable thickness for the dumpling, to make the stated proportions a useful starting point.
  • ๐Ÿ’กThe dumpling reaches 36 stitches around, the basket reaches 42, and the lid reaches 48; actual clearance still depends on fabric thickness and tension.
  • ๐Ÿ’กCount the finishing slip stitches carefully and work them loosely so they do not reduce the basket or lid opening.
  • ๐Ÿ’กUse embroidered eyes for children under three; plastic safety eyes can become a choking hazard if detached.
  • ๐Ÿ’กDo not overstuff the dumpling: a supple body fits the basket more comfortably and keeps filling from showing.
  • ๐Ÿ’กThe crown is intentionally taller than the basket rim. The lid is removable and can be displayed beside the basket rather than pressed onto the character.
  • ๐Ÿ’กUse the lid handle to lift the lid only, rather than carrying the filled basket.
  • ๐Ÿ’กFollow the care instructions on every yarn label, and avoid hot blocking or direct ironing of chenille.

Your dumpling and basket are ready for their final fit check: lift the character out, settle it back inside, and make sure the rim keeps its shape. Adjust the crown folds with your fingers and smooth the lid edge before arranging the handle. I like displaying the lid beside the basket so the little face stays visible. Keep your yarn labels with the project notes so you can follow the correct care instructions when the set needs freshening up.
You ask,

we answer.

FAQs

How do I make sure the dumpling fits inside the basket?

Make the basket first, then try the dumpling inside after its tenth round with a little temporary stuffing. The sides should touch gently without stretching the rim. If the fit is tight, reduce the temporary filling first. If the fabric itself is too wide, remake the dumpling with a slightly smaller hook and keep its stitch counts unchanged.

Can I use cotton or acrylic yarn instead of chenille?

Yes, but the texture and scale will change. Choose a hook that makes dense fabric, and use yarns of comparable thickness for all three main components. Smooth cotton usually gives clearer stitches and a firmer basket, while acrylic may feel springier. Repeat every fit check because different fabric thicknesses affect the basket's usable interior and the lid's clearance.

Why does my lid feel too tight even though the stitch count is correct?

The lid needs to fit around the outside of the basket, so thick fabric or tighter tension can use up the extra space provided by its larger stitch count. Check the fit before adding the slip-stitch edge. If necessary, remake the lid with a slightly larger hook, then work its final edging loosely and check again.

Does the lid close over the dumpling's gathered top?

The basket and lid are designed to fit each other, while the dumpling's crown projects above the rim for display. A softly stuffed body and flexible crown may allow the lid to sit over the character, but clearance depends on your yarn and stuffing. Keep the lid beside the basket if closing it would squash the face or distort the rim.

How can I make the basket hold its shape?

Use a hook that produces firm single crochet and keep your tension even through the walls. The back-loop round helps establish the base edge, but chenille still makes a soft basket. Smooth the base flat by hand and stand the walls upright. If the empty basket collapses heavily, remake it with a smaller hook and check the dumpling fit afterward.

Can I embroider the eyes instead of using plastic eyes?

Yes. Mark the same positions between Rounds 8 and 9, lightly stuff the body, and compare the marks from the front. Remove enough filling to access the inside, then make several short black stitches at each position to form small ovals. Secure the ends internally without tightening them enough to dent the face.

Should I block or wash the finished set?

Start with gentle hand shaping; this project generally needs its curves arranged rather than flattened. Follow the yarn labels for cleaning, especially if different fibers are used for the embroidery. If washing is permitted, reshape the basket and lid while damp and let every component dry fully. Avoid direct ironing, which can damage chenille pile.