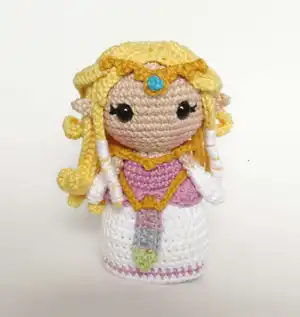
Create your own adorable Princess Zelda from The Legend of Zelda with this detailed amigurumi pattern! This enchanting 14cm royal character features her iconic pink dress, beautiful blonde hair with delicate braids, and sparkling tiara. Perfect for Nintendo fans and collectors, this pattern includes step-by-step instructions with helpful photos to guide you through every stitch. Bring the beloved Hyrulian princess to life with your crochet hook and display her proudly or gift her to any Zelda enthusiast in your life.
Progress Tracker
0% Complete
— Arms :
Round 1 :
6 sc in the magic ring
Round 2 :
(1 sc, inc) around [9]
Round 5 :
(1 sc, dec) around [6]
Round 9 :
Fold and close the opening with 2 sc
— Legs :
Round 1 :
6 sc in the magic ring
Round 3 :
(3 sc, inc) around [15]
Round 5-10 :
Sc around [15]
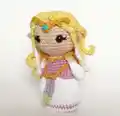
— Body :
Info :
Using white, join both legs with a slip stitch
Round 11 :
Sc around both legs [30]
Round 12 :
6 sc, dec, 6 sc, dec, 6 sc, dec, 6 sc [27]
Round 14 :
6 sc, dec, 5 sc, dec, 5 sc, dec, 5 sc [24]
Round 15 :
Sc around in back loops only [24]
Round 17 :
5 sc, dec, 4 sc, dec, 4 sc, dec, 5 sc [21]
Round 18-19 :
Sc around [21]
Round 20 :
4 sc, dec, 4 sc, dec, 4 sc, dec, 3 sc [18]
Round 21 :
4 sc, 2 sc joining the arm, 7 sc, 2 sc joining the arm, 3 sc [18]
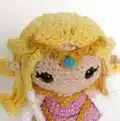
— Head :
Round 1 :
6 sc in the magic ring
Round 3 :
(1 sc, inc) around [18]
Round 4 :
(2 sc, inc) around [24]
Round 5 :
(3 sc, inc) around [30]
Round 6 :
(4 sc, inc) around [36]
Round 7 :
(5 sc, inc) around [42]
Round 8-14 :
Sc around [42]
Info :
Embroider eyelashes and insert safety eyes between rounds 11 and 12, eight stitches apart
Round 15 :
(5 sc, dec) around [36]
Round 16 :
(4 sc, dec) around [30]
Round 17 :
(3 sc, dec) around [24]
Round 18 :
(2 sc, dec) around [18]
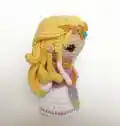
— Hair :
Round 1 :
6 sc in the magic ring
Round 3 :
(1 sc, inc) around [18]
Hair Strands :
Chain 27, skip 1, 26 hdc
Hair Strands :
Chain 23, skip 1, slst 12, 1 sc, 9 hdc
Hair Strands :
Chain 27, skip 1, 26 hdc
Hair Strands :
Chain 10, skip 1, slst 5, 1 sc, 2 hdc, 1 dc
— Tiara :
Picot Section :
Chain 5, slst 1, (ch 3, slst 1) x3
Center :
Chain 3, skip 2 chains, 2 hdc, chain 2, slst 1 in the same stitch
Picot Section :
Chain 2, slst 1, (chain 3, slst 1) x3, chain 2
— Accessories :
Pennant :
Mauve: Chain 8, skip two chains, 2 sc. Light blue: 3 sc. Light green: {2 sc, ch 2, slst 1, 2 sc} in the same chain
Belt :
Chain 15, slst 1 in the right corner of the pennant, chain 3, slst 1, ch 1, slst 1 attaching the belt on the other corner, chain 14
This enchanting Princess Zelda amigurumi pattern brings Nintendo's beloved royal character to life in the most delightful way! Every detail from her flowing golden locks to her elegant tiara has been carefully designed to capture her grace and beauty. Whether you're a longtime Zelda fan or discovering her magic for the first time, this pattern offers a wonderful journey through intermediate crochet techniques while creating a treasured keepsake. 🧶 Happy crocheting! 🧵✨