🧢 Beautiful ✨ Detailed πŸ’ Adorable

Sailor Girl Amigurumi Pattern

Sailor Girl Amigurumi Pattern
4.4β˜… Rating
8-10 Hours Time Needed
3.7K Made This
βœ‚οΈ

Intermediate Level

Ideal for those with basic crochet experience, featuring slightly more advanced stitches and techniques to expand your skills.

⏱️

All-Day Adventure

Requires 8-10 hours, ideal for a full day of immersive crocheting.

🧸

Cute Companion

An adorable friend to cherish, handcrafted with love to bring comfort and joy for years to come.

About This Sailor Girl Amigurumi Pattern

This delightful sailor girl pattern brings nautical charm to life with her vibrant orange curly hair and classic maritime outfit. She features a detailed sailor hat complete with anchor emblem, a layered blue and white skirt, and charming red accessories. Every stitch creates personality in this sweet companion who's ready to set sail on imaginative adventures.

Sailor Girl Amigurumi Pattern crochet pattern - detailed view of completed project

With her rosy cheeks and friendly smile, this sailor girl captures the spirit of seaside adventures. Her carefully crafted details make her a treasured keepsake for any nautical lover.

Why You'll Love This Sailor Girl Amigurumi Pattern

I absolutely love how this pattern combines classic nautical elements with adorable amigurumi charm! The way her curly orange hair bounces and her little sailor outfit comes together piece by piece is pure magic. Every detail from her tiny hat to her miniature bag tells a story, and watching her personality emerge as you crochet is incredibly rewarding. She's not just a pattern - she's a friend waiting to be brought to life through your loving stitches.

Sailor Girl Amigurumi Pattern step 1 - construction progress Sailor Girl Amigurumi Pattern step 2 - assembly progress Sailor Girl Amigurumi Pattern step 3 - details and accessories Sailor Girl Amigurumi Pattern step 4 - final assembly and finishing

Switch Things Up

I love experimenting with different approaches to make each sailor girl unique! You could try using variegated yarn for her hair to create a more dynamic color effect, or add metallic thread to her outfit details for extra sparkle. Consider making her hat removable by adding small snaps, or create a whole wardrobe of different nautical outfits she can wear.

For a more vintage look, I sometimes use muted, dusty colors instead of bright ones, which gives her an antique doll appearance. You could also scale up the pattern using bulky yarn and a larger hook for a cuddly oversized version, or go smaller with thread and a tiny hook for a miniature collectible.

I've found that changing the hair color completely transforms her personality - try blonde for a classic look, brunette for sophistication, or even fun colors like pink or purple for a modern twist. Adding small embroidered details like flowers on her hat or tiny buttons on her outfit makes each one special and personalized.

Common Mistakes & How to Fix Them

βœ— Forgetting to stuff firmly as you go - this causes floppy limbs and poor shape retention βœ— Not maintaining consistent tension throughout - leads to uneven stitches and distorted proportions in the final piece βœ— Skipping stitch markers when working in rounds - makes it easy to lose count and create lopsided sections βœ— Placing safety eyes too early before stuffing - prevents proper positioning and secure attachment to the head

Sailor Girl Amigurumi Pattern

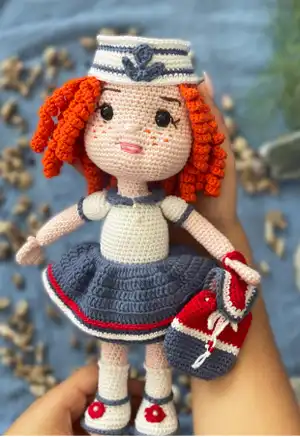
Create this adorable sailor girl amigurumi with beautiful curly orange hair and a classic nautical outfit complete with hat and bag. This charming doll features intricate details including a sailor cap with anchor motif, layered skirt, and tiny accessories that make her absolutely precious. Perfect for nautical enthusiasts and doll collectors alike, she measures about 20 cm in circumference and 10 cm in length when completed.

Intermediate 8-10 Hours

Materials Needed for Sailor Girl Amigurumi Pattern

β€” Main Fabric

  • 01
    Light Pink yarn for skin tone (Main Color)
  • 02
    White yarn for sailor top and hat base (A Color)
  • 03
    Sailor Blue yarn for skirt and hat details (B Color)
  • 04
    Orange yarn for curly hair (C Color)
  • 05
    Red yarn for small accessories (D Color)

β€” Tools Required

  • 01
    2.5mm crochet hook or size that fits your yarn
  • 02
    Safety eyes (suitable size for your yarn weight)
  • 03
    Scissors for cutting yarn
  • 04
    Stuffing for filling
  • 05
    Tapestry needle for sewing
  • 06
    Stitch marker for tracking rounds
  • 07
    Pins for positioning pieces

Progress Tracker

0% Complete

β€” HEAD :

Main Color

Rnd 1:

6 sc in a magic ring

Rnd 2:

6 sc inc(12 sc)

Rnd 3:

1 sc into sc next inc(18 sc)

Rnd 4:

2 sc into sc next inc(24 sc)

Rnd 5:

3 sc into sc next inc(30 sc)

Rnd 6:

4 sc into sc next inc(36 sc)

Rnd 7:

5 scinto sc next inc(42 sc)

Rnd 8:

6 sc into sc next inc(48 sc)

Rnd 9:

7 sc into sc next inc(54 sc)

Rnd 10-20:

(11 ring)sc into sc(54 sc)

Rnd 21:

18 sc into sc(6 sc inc)6 sc into sc(6 sc inc)18 sc into sc(66 sc)

A Color

Rnd 22-27:

(6 ring)sc into sc(66 sc)

Rnd 28:

(6 times)9 sc into sc next dec(60 sc)

Rnd 29:

(6 times)8 sc into sc next dec(54 sc)

Rnd 30:

(6 times)7 sc into sc next dec(48 sc)

Info:

Attach the safety eyes to rnd 18-19. There should be 8 sc between them.

Rnd 31:

(6 times)6 sc into sc next dec(42 sc)

Rnd 32:

(6 times)5 sc into sc next dec(36 sc)

Rnd 33:

(6 times)4 sc into sc next dec(30 sc)

Rnd 34:

(6 times)3 sc into sc next dec(24 sc)

Rnd 35:

(6 times)2 sc into sc next dec(18 sc)

Rnd 36-39:

(4 ring)sc into sc(18 sc)fo. Leave a long thread for sewing.

β€” HAIRS :

C Color

Rnd 1:

8 sc in a magic ring

Rnd 2:

8 sc inc(18 sc)

Rnd 3:

45 ch,turn 35 ch into 2 sc(70 sc)10 sc into sc 11 strand.

Rnd 4:

Top Layer =50 ch 40 ch into 2 sc(80 sc)10 ch into sc 11 strand.(22 strand)

β€” LEGS and BODY :

A Color

Rnd 1:

6 ch

Rnd 2:

6 ch inc (12 sc)

Rnd 3:

3 sc into sc (6 sc inc)3 sc into sc(18 sc)

Rnd 4:

6 sc into sc(6 sc inc)6 sc into sc (24 sc)

Rnd 5:

8 sc into sc(8 sc inc)8 sc into sc(32 sc)

Rnd 6:

Only in flo sc into sc(32 sc)

Rnd 7-8:

(2 ring)sc into sc(32 sc)

Rnd 9:

8 sc into sc(8 sc dec)8 sc into sc(24 sc)

Rnd 10:

8 sc into sc(6 sc dec)8 sc into sc(18 sc)

Rnd 11-12:

(2 ring)sc into sc(18 sc)

Rnd 13:

Only in flo sc into sc(18 sc)

Rnd 14:

(2 times)8 sc into sc next dec(16 sc)

Rnd 15-20:

(6 ring)sc into sc(16 sc)

Main Color

Rnd 21:

Only in flo sc into sc(16 sc)

Info:

Stuff the legs tightly. Keep filling as you go.

Rnd 22-34:

(13 ring)sc into sc(16 sc)

Rnd 35:

(2 times)8 sc into sc next inc(18 sc)

Rnd 36:

(2 times)9 sc into sc next inc(20 sc)

Rnd 37:

sc into sc(20 sc)

Rnd 38:

Join the legs. 20 sc into sc 4 ch 20 sc into sc 20 sc into sc ch's unworked rnd sc(48 sc)

Rnd 39:

20 sc into sc 4 ch into sc 20 sc into sc ch's unworked rnd sc(48 sc)

Rnd 40-49:

(10 ring)sc into sc(48 sc)

Rnd 50:

(6 times)6 sc into sc next dec(42 sc)

A Color

Rnd 51:

Only in flo sc into sc (42 sc)

Rnd 52-58:

(7 ring)sc into sc(42 sc)

Rnd 59:

(6 times)5 sc into sc next dec(36 sc)

Rnd 60:

sc into sc(36 sc)

Rnd 61:

(6 times)4 sc into sc next dec(30 sc)

Rnd 62:

(6 times)3 sc into sc next dec(24 sc)

Rnd 63:

Only in flo sc into sc(24 sc)

Main Color

Rnd 64:

sc into sc (24 sc)

Rnd 65:

(6 times)2 sc into sc next dec(18 sc)

Rnd 66:

(6 times)1 sc into sc next dec(12 sc)

Rnd 67-68:

(2 ring)sc into sc(12 sc)fo.

β€” SKIRT :

B Color

Rnd 1:

(rnd-51 in blo sc into sc (42 sc)

Rnd 2:

1 sc into 2 cr(84 cr)

Rnd 3-4:

(2 times)cr into cr(84 cr)

Rnd 5:

(15 times)5 cr into cr next inc(99 cr)

Rnd 6:

Only in flo cr into cr(99 cr)

Rnd 7:

Only in flo cr into cr(99 cr)

Rnd 8:

Only in flo cr into hdc(99 hdc)

Rnd 9:

Only in blo hdc into sc(99 sc)fo.

SKIRT DETAIL - D Color

Rnd 6:

in blo sc into sc(99 sc)

A Color

Rnd 7:

in blo sc into sc(99 sc)fo.

β€” ARMS :

Main Color - Make 2

Rnd 1:

6 sc in a magic ring

Rnd 2:

6 sc inc(12 sc)

Rnd 3-7:

(5 ring)sc into sc(12 sc)

Rnd 8:

6 sc into sc (3 ch)6 sc into sc(12 sc)

Rnd 9:

6 sc into sc(3 ch out)6 sc into sc(12 sc)

Rnd 10:

6 sc dec(6 sc)

Rnd 11:

6 sc into sc

Rnd 12:

6 sc inc (12 sc)

Rnd 13-25:

(13 ring)sc into sc(12 sc)

Rnd 26:

A color - only in flo sc into(12 sc)

Info:

Fill the sleeves a little

Rnd 27:

(6 times)1 sc into sc next inc(18 sc)

Rnd 28-31:

(4 ring)sc into sc(18 sc)

Rnd 32:

(6 times)1 sc into sc next dec(12 sc)

Rnd 33:

Straighten it.

Info:

Dip the awl into both layers. 6 sc fo.

β€” HAT :

A Color

Rnd 1:

6 sc in a magic ring

Rnd 2:

6 sc inc(12 sc)

Rnd 3:

(6 times)1 sc into sc next inc(18 sc)

Rnd 4:

(6 times)2 sc into sc next inc(24 sc)

Rnd 5:

(6 times)3 sc into sc next inc(30 sc)

Rnd 6:

(6 times)4 sc into sc next inc(36 sc)

Rnd 7:

(6 times)5 sc into sc next inc(42 sc)

Rnd 8:

(6 times)6 sc into sc next inc(48 sc)

Rnd 9:

(6 times)7 sc into sc next inc(54 sc)

Rnd 10:

Only in flo sc into sc(54 sc)

Rnd 11-12:

(2 ring)sc into sc(54 sc)

Rnd 13:

B color - sc into sc(54 sc)

Rnd 14:

A Color - sc into sc(54 sc)

Rnd 15:

sc into sc(54 sc)fo.

Rnd 10 (Detail):

only in blo B color -sc into sc(54 sc)

Rnd 2 (Detail):

A color - (2 ring)sc into sc(54 sc)fo.

β€” BAG :

B Color

Rnd 1:

10 ch.

Rnd 2:

10 ch into 20 sc

Rnd 3:

10 sc into sc next inc(22 sc)

Rnd 4:

(2 times)11 sc into sc next inc(24 sc)

Rnd 5:

only in flo sc into sc(24 sc)

Rnd 6:

(12 times)1 sc into sc next inc(36 sc)

Rnd 7-11:

(5 ring)sc into sc)36 sc)

Rnd 12-13:

(2 ring)A color-sc into sc(36 sc)

Rnd 14-18:

D color (5 ring)sc into sc(36 sc)

Rnd 19:

sc into hdc(36 hdc)fo.

Cover of the Bag - D Color

Rnd 1:

12 ch.

Rnd 2:

12 ch into 24 sc

Rnd 3:

1 sc into sc next inc(36 sc)

Rnd 4:

sc into sc(36 sc)

Rnd 5:

A color - sc into sc (36 sc)

Rnd 6:

2 sc into sc next inc(48 sc)

Rnd 7:

B color - sc into sc(48 sc)fo.

Assembly Instructions

  • Attach the head to the body by aligning the 18 stitches from the final round of each piece and whipstitching closed
  • Sew the curly hair pieces to the head, starting with the base ring and arranging the curls naturally around the face
  • Position and attach the arms to the body between the appropriate rounds, stuffing lightly before closing
  • Attach the sailor hat to the top of the head, ensuring it sits at a jaunty angle
  • Sew the bag accessory to one side of the body or arm as desired
  • Add facial details like cheeks and mouth using embroidery thread in appropriate colors
  • Secure all loose threads and ensure all pieces are firmly attached before final inspection

Important Notes

  • πŸ’‘Use safety eyes appropriate for the yarn weight and secure them before stuffing the head completely
  • πŸ’‘Maintain consistent tension throughout all pieces to ensure even proportions and professional appearance
  • πŸ’‘Stuff all pieces firmly but not overly tight to maintain shape while allowing for natural positioning
  • πŸ’‘Use stitch markers consistently when working in rounds to prevent counting errors and maintain pattern accuracy
  • πŸ’‘Position the curly hair pieces while still flexible to achieve the most natural and appealing arrangement

This enchanting sailor girl pattern captures the essence of maritime adventure with her vibrant curly locks and authentic nautical details. From her perfectly positioned sailor cap to her layered skirt and tiny accessories, every element combines to create a truly special amigurumi companion. Whether displayed on a shelf or loved by a child, she brings joy and whimsy wherever she goes. Set sail on this delightful crochet journey! πŸ§Άβš“βœ¨

You ask,

we answer.

FAQs

What yarn weight works best for this sailor girl pattern?

The pattern works beautifully with light worsted weight yarn (DK/Light Worsted). You can also use worsted weight, just adjust your hook size accordingly and expect a slightly larger finished doll.

How do I achieve the curly hair texture shown in the pattern?

The curly hair is created using chain loops that naturally curl. Work the chains loosely and gently brush or tease the finished strands to enhance the curl pattern. The key is in the chain tension and arrangement.

Can I make the sailor outfit in different colors?

Absolutely! While the classic navy and white combination is traditional, you can use any colors that appeal to you. Consider red and white for a different nautical look, or completely custom colors to match your preferences.

What size safety eyes should I use?

The pattern recommends eyes that are suitable for your yarn weight. For DK weight yarn, 8-10mm eyes work well. For worsted weight, you might prefer 10-12mm eyes. Always test fit before securing.

Is this pattern suitable for beginners?

This is an intermediate pattern that requires knowledge of basic crochet stitches, working in rounds, increases/decreases, and color changes. Beginners should master basic amigurumi techniques first before attempting this detailed pattern.