🧢 Beautiful ✨ Detailed πŸ’ Adorable

Spring Kitty Hello Kitty Amigurumi Pattern

Spring Kitty Hello Kitty Amigurumi Pattern
4.8β˜… Rating
4-5 Hours Time Needed
3.6K Made This
βœ‚οΈ

Beginner Friendly Level

Perfect for those just starting their sewing journey, with clear instructions and simple techniques

⏱️

Weekend Treat

Takes 5-7 hours, making it an enjoyable project to finish over a couple of days.

🧸

Cute Companion

An adorable friend to cherish, handcrafted with love to bring comfort and joy for years to come.

About This Spring Kitty Hello Kitty Amigurumi Pattern

This delightful Spring Kitty pattern brings Hello Kitty to life in three enchanting spring-themed variations. Each kitty features the classic white body with colorful striped outfits and themed accessories - butterfly wings with flowers, bee wings with stripes, or ladybug wings with spots. The pattern uses basic crochet stitches worked in spiral rounds, making it perfect for beginners while creating professional-looking results.

Spring Kitty Hello Kitty Amigurumi Pattern crochet pattern - detailed view of completed project

Standing at 12cm tall, these sweet kitties make wonderful gifts for children or charming decorative pieces for any room. The pattern includes detailed assembly instructions with helpful photos to ensure your kitty comes together perfectly.

Why You'll Love This Spring Kitty Hello Kitty Amigurumi Pattern

I absolutely love how this pattern combines the timeless appeal of Hello Kitty with the fresh, vibrant energy of spring! The three different costume variations mean you can create a whole collection, and I find the repetitive nature of the stitches incredibly relaxing and meditative. What makes this pattern special is how each kitty develops its own personality through the costume details and face embroidery.

Spring Kitty Hello Kitty Amigurumi Pattern step 1 - construction progress Spring Kitty Hello Kitty Amigurumi Pattern step 2 - assembly progress Spring Kitty Hello Kitty Amigurumi Pattern step 3 - details and accessories Spring Kitty Hello Kitty Amigurumi Pattern step 4 - final assembly and finishing

Switch Things Up

I love how versatile this Spring Kitty pattern is! You can easily customize each kitty to reflect different seasons or occasions beyond just spring themes. Try creating a winter version with a cozy scarf and mittens, or a summer kitty with sunglasses and a sun hat.

The color possibilities are endless - imagine a pastel rainbow kitty with gradient stripes, or a Halloween version in orange and black with a tiny witch hat. You could even create themed collections for holidays like Christmas with red and green colors, or Valentine's Day with pink and white hearts.

For advanced crocheters, consider adding texture by incorporating different stitch patterns into the body stripes, or create miniature accessories like tiny bags, books, or flowers. The basic structure is so solid that it can support countless creative variations while maintaining that adorable Hello Kitty charm we all love!

Common Mistakes & How to Fix Them

βœ— Forgetting to stuff pieces firmly enough before closing, which can result in floppy or misshapen body parts βœ— Not maintaining consistent tension throughout rounds, leading to uneven stitches and irregular shaping of the pieces βœ— Miscounting stitches during increase and decrease rounds, causing the head or body to become lopsided or incorrectly sized βœ— Skipping stitch markers when working in spiral rounds, making it difficult to track round beginnings and maintain proper stitch counts

Spring Kitty Hello Kitty Amigurumi Pattern

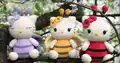
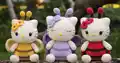
Create your own adorable Spring Kitty with this delightful amigurumi pattern! This charming Hello Kitty-inspired design features three enchanting variations - butterfly, bee, and ladybug costumes that capture the essence of spring. Each kitty stands approximately 12cm tall and makes the perfect companion for children or a sweet decorative piece for your home. The pattern includes detailed step-by-step instructions with clear photos to guide you through every stitch.

Beginner Friendly 4-5 Hours

Materials Needed for Spring Kitty Hello Kitty Amigurumi Pattern

β€” Main Fabric

  • 01
    YarnArt Jeans yarn No. 03 (milk) for main kitty body
  • 02
    Additional colors for costumes: light purple and lilac for butterfly, red and black for ladybug, yellow, chocolate, and light yellow for bee
  • 03
    Contrast colors for wings and accessories as specified in pattern variations

β€” Tools Required

  • 01
    Crochet hook No. 2
  • 02
    Floss thread color black for face embroidery
  • 03
    Strong cotton thread for arm fastening
  • 04
    Crochet markers
  • 05
    Fiberfill for toys (hollow fiber)
  • 06
    Thick needle for assembly and sewing needle
  • 07
    Oval half-beads in black color for eyes (8x10 mm) and yellow for nose (6x8 mm)
  • 08
    Scissors
  • 09
    Sewing pins
  • 10
    Small piece of wire to strengthen the antennae

Progress Tracker

0% Complete

β€” Arms (x2) :

Round 1 :

6 sc in MR (6)

Round 2 :

6 inc (12)

Round 3 :

12 sc (12)

Round 4 :

6 sc, 1 ps, 5 sc (12)

Round 5-10 :

12 sc (12)

Info :

Stuff the arms, less firmly at the end.

Round 11 :

6 dec (6)

Info :

Pull and cut the thread leaving a small tail. With a needle close the hole through the front loops only, fasten off and hide the tail into the detail.

β€” Legs (x2) :

Round 1 :

8 sc in MR (8)

Round 2 :

8 inc (16)

Round 3 :

(1 sc, inc) * 8 (24)

Round 4-6 :

24 sc (24)

Round 7 :

8 sc, 4 dec, 8 sc (20)

Round 8 :

8 sc, 2 dec, 8 sc (18)

Round 9 :

18 sc (18)

Info :

Pull and cut the thread leaving a long tail for sewing. Stuff the detail.

β€” Ears (x2) :

Round 1 :

6 sc in MR (6)

Round 2 :

(1 sc, inc) * 3 (9)

Round 3 :

(2 sc, inc) * 3 (12)

Round 4 :

(3 sc, inc) * 3 (15)

Round 5 :

(4 sc, inc) * 3 (18)

Round 6 :

(5 sc, inc) * 3 (21)

Round 7 :

3 sc, inc, (6 sc, inc) * 2, 3 sc (24)

Info :

Pull and cut the thread leaving a long tail for sewing. Stuff the ears.

β€” Tail :

Round 1 :

6 sc in MR (6)

Round 2 :

6 inc (12)

Round 3-5 :

12 sc (12)

Info :

Pull and cut the thread leaving a tail for sewing.

β€” Flowers (x2) :

Round 1 :

5 sc in MR (5)

Info :

Change color to contrast and cut the previous thread.

Round 2 :

(sl st, hdc, 3 dc, hd) * 5 (30)

Info :

Pull and cut the thread leaving a tail for sewing.

β€” Ears (x2) :

Round 1 :

6 sc in MR (6)

Round 2 :

6 inc (12)

Round 3-5 :

12 sc (12)

Round 6 :

6 dec (6)

Info :

Stuff the detail. Change color to contrast.

Round 7-10 :

6 sc (6)

Info :

Pull and cut the thread leaving a long tail for sewing. Insert a small piece of wire into antennae to make it steady.

β€” Head :

Info :

Make ch of 14, begin crocheting from the 2nd loops of the hook:

Round 1 :

inc, 11 sc, 2 inc in the last loop, then crochet along other side of the chain: 11 sc, inc (30)

Round 2 :

2 inc, 11 sc, 3 inc, 13 sc, inc (36)

Round 3 :

inc, 1 sc, inc, 13 sc, inc, 1 sc, inc, 1 sc, inc, 13 sc, inc, 1 sc (42)

Round 4 :

42 sc (42)

Round 5 :

1 sc, inc, 2 sc, inc, 14 sc, inc, 2 sc, inc, 2 sc, inc, 14 sc, inc, 1 sc (48)

Round 6 :

48 sc (48)

Round 7 :

(7 sc, inc) * 6 (54)

Round 8 :

54 sc (54)

Round 9 :

(8 sc, inc) * 6 (60)

Round 10 :

60 sc (60)

Round 11 :

(9 sc, inc) * 6 (66)

Round 12-20 :

66 sc (66)

Round 21 :

(9 sc, dec) * 6 (60)

Round 22 :

1 sc, dec, (8 sc, dec) * 5, 7 sc (54)

Round 23 :

(7sc, dec) * 6 (48)

Round 24 :

1 sc, dec, (6 sc, dec) * 5, 5 sc (42)

Round 25 :

(5 sc, dec) * 6 (36)

Round 26 :

1 sc, dec, (4 sc, dec) * 5, 3 sc (30)

Round 27 :

(3 sc, dec) * 6 (24)

Info :

Start to stuff the detail. Mark the beginning of 27th round!

Round 28 :

1 sc, dec, (2 sc, dec) * 5, 1 sc (18)

Round 29 :

(1 sc, dec) * 6 (12)

Round 30 :

6 dec (6)

Info :

Add stuffing, space it evenly inside the detail. Pull and cut the thread leaving a long tail for sewing. Close the hole with a needle. Pull the thread to the beginning of 27th round where we placed a marker.

β€” Body :

Info :

Make ch of 15, begin crocheting from the 2nd loops of the hook:

Round 1 :

inc, 12 sc, 2 inc in the last loop, then crochet along other side of the chain: 12 sc, inc (32)

Round 2 :

2 inc, 12 sc, 4 inc, 12 sc, 2 inc (40)

Round 3 :

(inc, 1 sc) * 2, 12 sc, (inc, 1 sc) * 4, 12 sc, (inc, 1 sc) * 2 (48)

Round 4-6 :

48 sc (48)

Info :

Attach the thread of contrast color and crochet next 2 rounds in it. Do not cut the main thread.

Round 7-8 :

48 sc (48)

Info :

Next 4 rounds in the main color.

Round 9-12 :

48 sc (48)

Info :

Next 2 rounds in contrast color.

Round 13 :

48 sc (48)

Round 14 :

(6 sc, dec) * 6 (42)

Info :

Cut the thread of additional color, now crochet only with main one.

Round 15-16 :

42 sc (42)

Round 17 :

(5 sc, dec) * 6 (36)

Round 18 :

36 sc (36)

Round 19 :

(4 sc, dec) * 6 (30)

Round 20-21 :

30 sc (30)

Info :

Crochet additional 2 sc to make the round finish at the side of the body. Pull and cut the thread, hide a tail inside the detail and stuff the detail firmly.
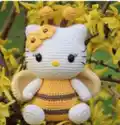
β€” Wings for bee and ladybug (x2) :

Round 1 :

6 sc in MR (6)

Round 2 :

6 inc (12)

Round 3 :

(1 sc, inc) * 6 (18)

Round 4 :

(2 sc, inc) * 6 (24)

Round 5 :

(3 sc, inc) * 6 (30)

Round 6-9 :

30 sc (30)

Round 10 :

(13 sc, dec) * 2 (28)

Round 11 :

(12 sc, dec) * 2 (26)

Round 12 :

(11 sc, dec) * 2 (24)

Round 13 :

(10 sc, dec) * 2 (22)

Round 14 :

(9 sc, dec) * 2 (20)

Round 15 :

(8 sc, dec) * 2 (18)

Round 16 :

(7 sc, dec) * 2 (16)

Round 17 :

(6 sc, dec) * 2 (14)

Info :

Crochet 2 additional sc to even the round, fold the piece edges in half and crochet 7 sc through both sides. Pull and cut the thread leaving a long tail for sewing. Do not stuff the detail.
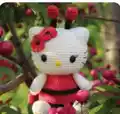
β€” Spots for ladybug (x4) :

Round 1 :

6 sc in MR, sl st (6)

Info :

Pull and cut the thread leaving a long tail for sewing. Place the spots symmetrically on both wings and sew on.

β€” Wings for butterfly (x2) :

Lower wing part (detail No1) :

Round 1 :

6 sc in MR (6)

Round 2 :

6 inc (12)

Round 3 :

(1 sc, inc) * 6 (18)

Round 4-7 :

18 sc (18)

Round 8 :

(7 sc, dec) * 2 (16)

Info :

Pull and cut the thread leaving a small tail.

Upper wing part (detail No2) :

Round 1 :

6 sc in MR (6)

Round 2 :

6 inc (12)

Round 3 :

(1 sc, inc) * 6 (18)

Round 4 :

(2 sc, inc) * 6 (24)

Round 5 :

(3 sc, inc) * 6 (30)

Round 6-9 :

30 sc (30)

Round 10 :

(13 sc, dec) * 2 (28)

Round 11 :

(12 sc, dec) * 2 (26)

Round 12 :

(11 sc, dec) * 2 (24)

Round 13 :

(10 sc, dec) * 2 (22)

Round 14 :

(9 sc, dec) * 2 (20)

Round 15 :

(8 sc, dec) * 2 (18)

Info :

In the next round we will connect both details. Do not cut the working thread.

Round 16 :

holding the detail No2 on the hook, insert it into 1st sc of the last round of the detail No1 and crochet sc. Then crochet along the detail No1: 5 sc, dec, 8 sc, then crochet along the No2: 7 sc, dec, 9 sc (32)

Info :

Thus, we connected the parts of wing and continue crochet in spiral. In case there is a space in the corner between details sew it with a tail we leaved with detail No1.

Round 17 :

5 sc, dec, 14 sc, dec, 9 sc (30)

Round 18 :

4 sc, dec, 13 sc, dec, 9 sc (28)

Info :

Crochet additional 6 sc to make the round finish at the bottom of the wing. Fold the piece edges in half and crochet 14 sc through both sides. Pull and cut the thread leaving a long tail for sewing.

Assembly Instructions

  • Attach the head to the body by matching the last round of the body with the 27th round of the head (which was previously marked), securing with pins before sewing
  • Fix the ears at the level of rounds 2-10 of the head, positioning them symmetrically and sewing them on securely
  • Embroider or glue the nose in the center of the face between rounds 9 and 10 from the bottom, then add eyes and whiskers with black thread
  • Attach the arms to the body using strong cotton thread and needle fastening technique, positioning them between rounds 17-18 of the body
  • Sew the antennae to the top of the head and attach flowers under one ear, leaving petals free for decoration
  • Fix the legs at the level of rounds 3-7 of the body with 9 stitches apart, ensuring proper positioning for stability
  • Attach wings to the back of the toy, positioning them raised or folded as desired, and secure the tail at rounds 5-8 of the body

Important Notes

  • πŸ’‘Use crochet markers or contrast thread for easy round counting when working in spiral
  • πŸ’‘Stuff all pieces firmly but not too tightly to maintain proper shape and allow for sewing
  • πŸ’‘Insert wire into antennae to make them steady and poseable
  • πŸ’‘Pin all parts in place before sewing to ensure correct positioning and symmetry
  • πŸ’‘Work all parts in spiral without slip stitches and chains between rounds for smooth finish

This enchanting Spring Kitty pattern captures the magic of Hello Kitty in three delightful seasonal variations! Each adorable character brings spring vibes with butterfly wings and flowers, cheerful bee stripes, or charming ladybug spots. The pattern combines simple techniques with wonderful details to create companions full of personality and charm. Perfect for beginners who want to create something truly special! 🌸🧢✨

You ask,

we answer.

FAQs

Can I use different yarn weights for this pattern?

Yes, you can use different yarn weights, but remember to adjust your hook size accordingly. The finished size will vary - thicker yarns will create larger kitties, while thinner yarns will make smaller ones. Always maintain consistent tension throughout your work.

How do I make sure my kitty sits properly?

The key is proper leg positioning and stuffing. Attach the legs at rounds 3-7 of the body with 9 stitches apart, and stuff the body firmly but not too tightly. The tail also provides additional support when sewn at rounds 5-8.

Can I make all three variations or do I need separate patterns?

This single pattern includes instructions for all three variations - butterfly, bee, and ladybug! The main body and head are the same for all versions, with different wing and accessory instructions for each theme.

What's the best way to attach the wings securely?

Position the wings on the back of the kitty first, then pin them in place to check the positioning. Use the long tails left from crocheting to sew them on securely. For butterfly wings, make sure both upper and lower parts are properly connected before attaching.

How do I prevent the antennae from being floppy?

Insert a small piece of wire (0.89mm or 1mm) into the antennae after stuffing them lightly. This will make them steady and allow you to pose them as desired. Make sure the wire doesn't poke through the crochet work.