๐Ÿงถ Beautiful โœจ Detailed ๐Ÿ’ Adorable

Standing and Sitting Goofy Amigurumi Pattern

Standing and Sitting Goofy Amigurumi Pattern
4.6โ˜… Rating
8-10 Hours Time Needed
2.9K Made This
โœ‚๏ธ

Intermediate Level

Ideal for those with basic knitting experience, featuring slightly more advanced stitches and techniques to expand your skills.

โฑ๏ธ

All-Day Adventure

Requires 8-10 hours, ideal for a full day of immersive knitting.

๐Ÿงธ

Cute Companion

An adorable friend to cherish, handcrafted with love to bring comfort and joy for years to come.

About This Standing and Sitting Goofy Amigurumi Pattern

This charming Goofy amigurumi pattern brings the beloved Disney character to life in two delightful poses - standing and sitting. Each version features Goofy's iconic black and white face, floppy ears, orange shirt, blue pants, brown shoes, and his signature brown jacket with green hat accessory. The pattern uses colorwork techniques to create the distinctive facial features and costume details that make Goofy instantly recognizable.

Standing and Sitting Goofy Amigurumi Pattern crochet pattern - detailed view of completed project

Working with 4-ply cotton yarn and a 1.8mm hook creates a perfectly sized companion piece. The detailed instructions guide you through creating expressive oval eyes, a crocheted nose option, and all the charming details that bring this classic character's personality to life.

Why You'll Love This Standing and Sitting Goofy Amigurumi Pattern

I absolutely love this pattern because it offers incredible versatility with both standing and sitting versions of Goofy! The colorwork technique creates such authentic character details, from his goofy grin to his signature outfit. What really excites me is how the pattern breaks down complex color changes into manageable steps, making it feel achievable even when working with multiple yarn colors. The option to create poseable ears with wire adds an extra touch of customization. Plus, there's something truly magical about watching this beloved Disney character come to life stitch by stitch - it's a project that brings smiles throughout the entire making process and creates a treasured keepsake that any Disney lover will adore!

Standing and Sitting Goofy Amigurumi Pattern step 1 - construction progress Standing and Sitting Goofy Amigurumi Pattern step 2 - assembly progress Standing and Sitting Goofy Amigurumi Pattern step 3 - details and accessories Standing and Sitting Goofy Amigurumi Pattern step 4 - final assembly and finishing

Switch Things Up

I love how versatile this Goofy pattern is - you can truly make it your own! While the pattern calls for specific colors to match Disney's classic Goofy, don't be afraid to experiment with your favorite color combinations to create a unique version. You could make a pastel Goofy for a nursery, or use sparkly yarn for a magical touch.

Consider adding extra personality by embroidering different facial expressions - maybe a winking eye or a bigger smile. I've found that using different textures of yarn can create interesting effects, like a fuzzy yarn for the ears or a smooth cotton for the face.

If you're making this for a child, you might want to embroider the eyes instead of using plastic safety eyes for added safety. You could also adjust the size of the hat or jacket to give your Goofy a different style.

For an extra special touch, try adding small details like embroidered freckles, different shoe styles, or even tiny accessories like a miniature book or toy. The sitting version makes a perfect shelf companion, while the standing version is great for display or playtime. Don't hesitate to make multiple Goofys in different sizes using various yarn weights - they look adorable as a family group!

Common Mistakes & How to Fix Them

โœ— F โœ— o โœ— r โœ— g โœ— e โœ— t โœ— t โœ— i โœ— n โœ— g โœ— โœ— t โœ— o โœ— โœ— u โœ— s โœ— e โœ— โœ— s โœ— t โœ— i โœ— t โœ— c โœ— h โœ— โœ— m โœ— a โœ— r โœ— k โœ— e โœ— r โœ— s โœ— โœ— d โœ— u โœ— r โœ— i โœ— n โœ— g โœ— โœ— c โœ— o โœ— l โœ— o โœ— r โœ— โœ— c โœ— h โœ— a โœ— n โœ— g โœ— e โœ— s โœ— โœ— c โœ— a โœ— n โœ— โœ— l โœ— e โœ— a โœ— d โœ— โœ— t โœ— o โœ— โœ— m โœ— i โœ— s โœ— a โœ— l โœ— i โœ— g โœ— n โœ— e โœ— d โœ— โœ— p โœ— a โœ— t โœ— t โœ— e โœ— r โœ— n โœ— โœ— d โœ— e โœ— t โœ— a โœ— i โœ— l โœ— s โœ— โœ— a โœ— n โœ— d โœ— โœ— d โœ— i โœ— s โœ— t โœ— o โœ— r โœ— t โœ— e โœ— d โœ— โœ— f โœ— a โœ— c โœ— i โœ— a โœ— l โœ— โœ— f โœ— e โœ— a โœ— t โœ— u โœ— r โœ— e โœ— s โœ— โœ— t โœ— h โœ— a โœ— t โœ— โœ— t โœ— h โœ— r โœ— o โœ— w โœ— โœ— o โœ— f โœ— f โœ— โœ— G โœ— o โœ— o โœ— f โœ— y โœ— ' โœ— s โœ— โœ— i โœ— c โœ— o โœ— n โœ— i โœ— c โœ— โœ— a โœ— p โœ— p โœ— e โœ— a โœ— r โœ— a โœ— n โœ— c โœ— e โœ— . โœ— โœ— S โœ— t โœ— u โœ— f โœ— f โœ— i โœ— n โœ— g โœ— โœ— t โœ— h โœ— e โœ— โœ— b โœ— o โœ— d โœ— y โœ— โœ— a โœ— n โœ— d โœ— โœ— h โœ— e โœ— a โœ— d โœ— โœ— t โœ— o โœ— o โœ— โœ— t โœ— i โœ— g โœ— h โœ— t โœ— l โœ— y โœ— โœ— w โœ— i โœ— l โœ— l โœ— โœ— c โœ— r โœ— e โœ— a โœ— t โœ— e โœ— โœ— a โœ— w โœ— k โœ— w โœ— a โœ— r โœ— d โœ— โœ— b โœ— u โœ— l โœ— g โœ— e โœ— s โœ— โœ— a โœ— n โœ— d โœ— โœ— p โœ— r โœ— e โœ— v โœ— e โœ— n โœ— t โœ— โœ— p โœ— r โœ— o โœ— p โœ— e โœ— r โœ— โœ— s โœ— h โœ— a โœ— p โœ— i โœ— n โœ— g โœ— , โœ— โœ— e โœ— s โœ— p โœ— e โœ— c โœ— i โœ— a โœ— l โœ— l โœ— y โœ— โœ— a โœ— r โœ— o โœ— u โœ— n โœ— d โœ— โœ— t โœ— h โœ— e โœ— โœ— n โœ— e โœ— c โœ— k โœ— โœ— c โœ— o โœ— n โœ— n โœ— e โœ— c โœ— t โœ— i โœ— o โœ— n โœ— โœ— a โœ— r โœ— e โœ— a โœ— . โœ— โœ— N โœ— o โœ— t โœ— โœ— r โœ— e โœ— a โœ— d โœ— i โœ— n โœ— g โœ— โœ— t โœ— h โœ— r โœ— o โœ— u โœ— g โœ— h โœ— โœ— t โœ— h โœ— e โœ— โœ— e โœ— n โœ— t โœ— i โœ— r โœ— e โœ— โœ— p โœ— a โœ— t โœ— t โœ— e โœ— r โœ— n โœ— โœ— b โœ— e โœ— f โœ— o โœ— r โœ— e โœ— โœ— s โœ— t โœ— a โœ— r โœ— t โœ— i โœ— n โœ— g โœ— โœ— c โœ— a โœ— n โœ— โœ— c โœ— a โœ— u โœ— s โœ— e โœ— โœ— c โœ— o โœ— n โœ— f โœ— u โœ— s โœ— i โœ— o โœ— n โœ— โœ— w โœ— i โœ— t โœ— h โœ— โœ— t โœ— h โœ— e โœ— โœ— c โœ— o โœ— l โœ— o โœ— r โœ— - โœ— c โœ— o โœ— d โœ— e โœ— d โœ— โœ— i โœ— n โœ— s โœ— t โœ— r โœ— u โœ— c โœ— t โœ— i โœ— o โœ— n โœ— s โœ— โœ— a โœ— n โœ— d โœ— โœ— r โœ— e โœ— s โœ— u โœ— l โœ— t โœ— โœ— i โœ— n โœ— โœ— u โœ— s โœ— i โœ— n โœ— g โœ— โœ— w โœ— r โœ— o โœ— n โœ— g โœ— โœ— y โœ— a โœ— r โœ— n โœ— โœ— c โœ— o โœ— l โœ— o โœ— r โœ— s โœ— โœ— a โœ— t โœ— โœ— c โœ— r โœ— i โœ— t โœ— i โœ— c โœ— a โœ— l โœ— โœ— s โœ— e โœ— c โœ— t โœ— i โœ— o โœ— n โœ— s โœ— . โœ— โœ— S โœ— k โœ— i โœ— p โœ— p โœ— i โœ— n โœ— g โœ— โœ— t โœ— h โœ— e โœ— โœ— r โœ— e โœ— c โœ— o โœ— m โœ— m โœ— e โœ— n โœ— d โœ— e โœ— d โœ— โœ— p โœ— i โœ— n โœ— โœ— p โœ— l โœ— a โœ— c โœ— e โœ— m โœ— e โœ— n โœ— t โœ— โœ— b โœ— e โœ— f โœ— o โœ— r โœ— e โœ— โœ— s โœ— e โœ— w โœ— i โœ— n โœ— g โœ— โœ— p โœ— a โœ— r โœ— t โœ— s โœ— โœ— t โœ— o โœ— g โœ— e โœ— t โœ— h โœ— e โœ— r โœ— โœ— o โœ— f โœ— t โœ— e โœ— n โœ— โœ— l โœ— e โœ— a โœ— d โœ— s โœ— โœ— t โœ— o โœ— โœ— c โœ— r โœ— o โœ— o โœ— k โœ— e โœ— d โœ— โœ— e โœ— a โœ— r โœ— s โœ— , โœ— โœ— m โœ— i โœ— s โœ— a โœ— l โœ— i โœ— g โœ— n โœ— e โœ— d โœ— โœ— l โœ— i โœ— m โœ— b โœ— s โœ— , โœ— โœ— a โœ— n โœ— d โœ— โœ— a โœ— n โœ— โœ— o โœ— v โœ— e โœ— r โœ— a โœ— l โœ— l โœ— โœ— u โœ— n โœ— b โœ— a โœ— l โœ— a โœ— n โœ— c โœ— e โœ— d โœ— โœ— f โœ— i โœ— n โœ— i โœ— s โœ— h โœ— e โœ— d โœ— โœ— c โœ— h โœ— a โœ— r โœ— a โœ— c โœ— t โœ— e โœ— r โœ— .

Standing and Sitting Goofy Amigurumi Pattern

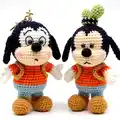
Create your very own adorable Goofy character with this delightful amigurumi pattern! This comprehensive guide includes instructions for both a standing and sitting version of everyone's favorite Disney dog. With his signature floppy ears, charming smile, and iconic outfit complete with brown jacket and green hat, this Goofy amigurumi will bring joy to any Disney fan. Perfect for gifting or keeping as a treasured handmade collectible that captures the lovable personality of this classic character.

Intermediate 8-10 Hours

Materials Needed for Standing and Sitting Goofy Amigurumi Pattern

โ€” Main Fabric

  • 01
    4-ply cotton yarn in black, white, skin color (beige/tan), blue, orange, brown, and green colors

โ€” Tools Required

  • 01
    1.8mm crochet hook
  • 02
    Oval plastic eyes 0.6x0.8cm
  • 03
    Plastic nose 1.4cm (or black yarn to crochet nose)
  • 04
    Stitch markers
  • 05
    Yarn needle
  • 06
    Scissors
  • 07
    Stuffing/fiberfill
  • 08
    Soft wire for ears (optional)
  • 09
    Pins for assembly
  • 10
    Pink blush makeup powder or pink acrylic paint for cheeks

Progress Tracker

0% Complete

โ€” HEAD :

Round 1 :

Magic Ring 6X (6) - BLACK yarn

Round 2 :

6V (12)

Round 3 :

6 (X, V) (18)

Round 4 :

6 (X, V, X) (24)

Round 5 :

6 (3X, V) (30)

Round 6 :

6 (2X, V, 2X) (36)

Round 7 :

6 (5X, V) (42)

Round 8 :

6 (3X, V, 3X) (48)

Round 9 :

48X (48)

Round 10 :

18X, 4X (WHITE), 4X (WHITE), 4X (WHITE), 18X (48)

Round 11 :

17X, 6X (WHITE), 2X (WHITE), 6X (WHITE), 17X (48)

Round 12-15 :

16X, 16X (WHITE), 16X (48)

Round 16 :

17X, 14X (WHITE), 17X (48)

Round 17 :

12X, A, 20X (SKIN COLOR), A, 12X (46)

Round 18 :

12X, FLO X, FLO 3V, FLO 7 (X, V), FLO 3V, FLO X, 12X (59)

Round 19 :

12X, 35X (SKIN COLOR), 12X (59)

Round 20 :

12X, X, 33T (SKIN COLOR), X, 12X (59)

Round 21-22 :

12X, 35X (SKIN COLOR), 12X (59)

Round 23 :

12X, X, 3A, 7 (X, A), 3A, X, 12X (46)

Info :

On Round 24, begin to stuff

Round 24 :

X, 3 (X, A, X), 5 (X, A, X), X, A, X, 2 (X, A, X), X (35)

Round 25 :

X, 3 (X, A), 5 (X, A), X, A, 2 (X, A), X (24)

Round 26 :

6 (X, A, X) (18)

โ€” EAR (MAKE 2) :

Round 1 :

Magic Ring 5X (5) - BLACK yarn

Round 2 :

5V (10)

Round 3-5 :

10X (10)

Round 6 :

A, 3X, A, 3X (8)

Round 7-10 :

8X (8)

Round 11 :

A, 2X, A, 2X (6)

Round 12-14 :

6X (6)

Info :

You don't have to stuff the ears. You may insert soft wire for poseable ears.

โ€” FACE DETAILS :

Info :

Place oval safety eyes between rounds 13-14

โ€” ARMS (MAKE 2) :

Round 1 :

Magic Ring 6X (6) - WHITE yarn

Round 2 :

3 (X, V) (9)

Round 3 :

9X (9) - ORANGE yarn

Round 4 :

4X, In one stitch: 3HDC, 4X (9)

Round 5 :

9X (9)

Round 6 :

A, 7X (8)

Round 7-8 :

8X (8)

Info :

For the arms, you don't have to stuff too full

โ€” LEG + BODY (STANDING) :

Round 1 :

5CH, working on 2nd stitch: 3X, W, 2X, V (10) - BROWN yarn

Round 2 :

V, 2X, 3V, 2X, 2V (16)

Round 3-4 :

16X (16)

Round 5 :

4X, 4A, 4X (12) - BLUE yarn

Round 6 :

A, 2X, 2A, 2X, A (8)

Round 7-8 :

8X (8)

Info :

Fasten off first leg. Repeat Round 1-8 to make second leg. Don't fasten off second leg.

Round 9 :

4CH, connect both legs: On Legs 8X + On CH 4X + On Legs 8X + On CH 4X (24) - ORANGE yarn

Round 10 :

6X, 4 (X, V), 6X, 2 (X, V) (30)

Round 11 :

30X (30)

Round 12 :

6 (2X, V, 2X) (36)

Round 13-14 :

36X (36)

Round 15 :

6 (2X, A, 2X) (30)

Round 16 :

6X, 4 (X, A), 6X, 2(X, A) (24)

Round 17 :

24X (24)

Round 18 :

6 (X, A, X) (18)

Round 19-20 :

18X (18)

โ€” LEG (SITTING) :

Round 1 :

5CH, working on 2nd stitch: 3X, W, 2X, V (10) - BROWN yarn

Round 2 :

V, 2X, 3V, 2X, 2V (16)

Round 3-4 :

16X (16)

Round 5 :

4X, 4A, 4X (12) - BLUE yarn

Round 6 :

A, 2X, 2A, 2X, A (8)

Round 7-8 :

8X (8)

โ€” BODY (SITTING) :

Round 1 :

Magic Ring 8X (8) - BLUE yarn

Round 2 :

8V (16) - ORANGE yarn

Round 3 :

8 (X, V) (24)

Round 4 :

24X (24)

Round 5 :

X, V, 6X, 4 (X, V), 7X, V (30)

Round 6 :

30X (30)

Round 7 :

6 (2X, V, 2X) (36)

Round 8 :

36X (36)

Round 9 :

6 (2X, A, 2X) (30)

Round 10 :

X, A, 6X, 4 (X, A), 7X, A (24)

Round 11 :

24X (24)

Info :

On Round 11, begin to stuff. Once done, leave long tail for sewing.

Round 12 :

6(X, A, X) (18)

Round 13-14 :

18X (18)

โ€” JACKET (WORK IN LINES) :

Row 1 :

25CH, working on 2nd stitch: 24X (24) - BROWN yarn

Row 2 :

1CH Flip over, 6 (3X, V) (30)

Row 3 :

1CH Flip over, 3X, 6CH, Empty 6 stitches, X, 10T, X, 6CH, Empty 6 stitches, 3X (30)

Row 4 :

1CH Flip over, 9X, TV, 10T, TV, 9X (32)

โ€” NOSE (Optional - can use 1.4cm plastic nose) :

Round 1 :

Magic Ring 6X (6) - BLACK yarn

Round 2 :

6V (12)

โ€” HAT :

Round 1 :

Magic Ring 6X (6) - GREEN yarn

Round 2 :

6X (6)

Info :

Fasten off the first piece. Repeat Round 1-2 to make a second piece.

Round 3 :

Insert hook into the first piece to connect both pieces: 6X + 6X (12) - BLACK yarn

Round 4 :

2 (2X, A, 2X) (10)

Round 5 :

10X (10) - GREEN yarn

Round 6 :

10X (10)

Assembly Instructions

  • Position and sew the ears to the top sides of the head as shown in the pattern photo guide.
  • Attach the head to the body, ensuring the neck opening fits securely into the body opening.
  • For standing version: Sew the combined leg-body piece to the head at round 19-20 of the body.
  • For sitting version: Attach the separate body to the head, then sew legs to the bottom of the body with 4-5 stitches distance between them at the center.
  • Sew arms to the sides of the body between the orange shirt section.
  • Attach the brown jacket around the upper body, positioning armholes correctly.
  • Place and secure the green and black hat on top of the head.
  • Attach the nose (plastic or crocheted) to the center of the face between the eyes, and add pink blush to the cheeks for a finishing touch.

Important Notes

  • ๐Ÿ’กRead through the entire pattern completely before beginning to crochet to understand the color changes and construction method
  • ๐Ÿ’กUse stitch markers or a piece of yarn to mark the ending of each round, especially during complex color changes
  • ๐Ÿ’กYou can adjust the size of your Goofy by using finer or bulkier yarn with an appropriate hook size
  • ๐Ÿ’กThe pattern includes color-coded text: BLACK text indicates black yarn, RED text indicates white yarn, BLUE text indicates skin color yarn, etc.
  • ๐Ÿ’กStuff the head and body firmly but not too tightly for the best shape and character definition
  • ๐Ÿ’กFor the sitting version, leave a long tail on the body for easier sewing to the legs
  • ๐Ÿ’กOptional soft wire can be inserted into the ears to make them poseable and add character expression

This delightful Standing and Sitting Goofy pattern captures the lovable personality of Disney's iconic character in adorable handmade form! Whether you choose to create the standing or sitting version, you'll love bringing Goofy to life with his signature floppy ears, charming smile, and classic outfit. The detailed color-coded instructions make it easy to follow along as you create this timeless character. Perfect for Disney fans, collectors, or as a special handmade gift that will bring smiles for years to come! ๐Ÿงถ Happy crocheting! โœจ

You ask,

we answer.

FAQs

Can I use different yarn weights for this pattern?

Yes! The pattern is flexible and can be adapted to different yarn weights. Just remember to use a crochet hook suitable for your chosen yarn. Using finer yarn will create a smaller Goofy, while bulkier yarn will make a larger version.

Do I need to make both the standing and sitting versions?

No, you can choose to make either version. The pattern includes complete instructions for both options, so you can select whichever pose you prefer or make both for variety!

Can I use plastic eyes and nose instead of crocheting them?

Absolutely! The pattern recommends oval plastic eyes (0.6x0.8cm) and a 1.4cm plastic nose, but also provides instructions for crocheting a nose with black yarn if you prefer an all-yarn option.

How do I keep track of the color changes in the head?

The pattern uses color-coded text to indicate which yarn to use. Use stitch markers to mark the beginning of each round, and it's helpful to read a few rounds ahead to prepare your color changes.

What's the purpose of the wire in the ears?

The soft wire is optional and allows you to make the ears poseable, giving your Goofy more character and expression. You can bend them to create different looks, but it's not required if you prefer floppy ears.

How do I connect the legs for the standing version?

After completing both legs, you'll create a chain to bridge them together in Round 9, then continue working in the round to form the body. The pattern provides specific instructions for this joining process.