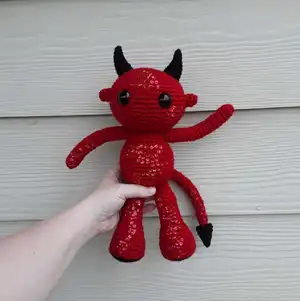
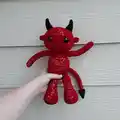
Create your own adorable little devil with this intermediate-level amigurumi pattern! This charming creature features customizable horns, optional wings, and a spiked tail. Perfect for Halloween or year-round mischief, this pattern includes detailed instructions for every component. With options for embellishments like sequins or embroidered details, you can make each devil uniquely yours.
Progress Tracker
0% Complete
— Ears :
Round 1 :
Ch 2. Place 6 sc into the 2nd ch from your hook. Place your stitch marker. (6 sts)
Round 2-3 :
Sc around. Place stitch marker. (6 sts)
Info :
Break yarn with a long tail for sewing. Do not stuff the ears. Place them aside for now!
— Horns Option 1 :
Round 1 :
Ch 2. Place 4 sc into the 2nd ch from your hook. Place your stitch marker. (4 sts)
Round 2 :
{sc, inc} Repeat what's inside the { } for the entire round. Place stitch marker. (6 sts)
Round 3 :
{sc 2, inc} Repeat what's inside the { } for the entire round. Place stitch marker. (8 sts)
Round 4 :
Sc around. Place stitch marker. (8 sts)
Round 5 :
{sc 3, inc} Repeat what's inside the { } for the entire round. Place stitch marker. (10 sts)
Round 6 :
Sc around. Place stitch marker. (10 sts)
Round 7 :
Inc, sc, inc, sc 7. Place stitch marker. (12 sts)
Round 8 :
Sc around. (12 sts)
— Horns Option 2 :
Round 1-8 :
Same as Option 1
Round 9 :
Inc, sc 2, inc, sc 8. Place stitch marker. (14 sts)
Round 10 :
Sc around. Place stitch marker. (14 sts)
Round 11 :
Inc, sc 3, inc, sc 9. Place stitch marker. (16 sts)
Round 12 :
inc, sc 14, inc. Place stitch marker. (18 sts)
Round 13 :
Sc 16. Inc twice. Place stitch marker. (20 sts)
Round 14 :
Sc around. (20 sts)
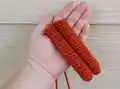
— Legs :
Round 1 :
Ch 2. Place 10 sc into the 2nd ch from your hook. Place your stitch marker. (10 sts)
Round 2 :
{sc, inc} Repeat what's inside the { } for the entire round. Place stitch marker. (15 sts)
Round 3 :
{sc 2, inc} Repeat what's inside the { } for the entire round. Place stitch marker. (20 sts)
Round 4 :
{sc 3, inc} Repeat what's inside the { } for the entire round. Place stitch marker. (25 sts)
Info :
Switch to main body color yarn!
Round 5 :
{sc 4, inc} Repeat what's inside the { } for the entire round. Place stitch marker. (30 sts)
Round 6 :
In the blo! {sc 4, dec} Repeat what's inside the { } for the entire round. Place stitch marker. (25 sts)
Round 7-8 :
Sc around. Place your stitch marker. (25 sts)
Round 9 :
{sc 3, dec} Repeat what's inside the { } for the entire round. Place stitch marker. (20 sts)
Round 10-12 :
Sc around. Place your stitch marker. (20 sts)
Round 13 :
{sc 2, dec} Repeat what's inside the { } for the entire round. Place stitch marker. (15 sts)
Round 14-24 :
Sc around. Place your stitch marker. (15 sts)
Round 25 :
{sc, dec} Repeat what's inside the { } for the entire round. Place stitch marker. (10 sts)
Info :
Do not stuff the last two rounds with poly-fill!
Round 26-27 :
Sc around. Place your stitch marker. (10 sts)
— Tail (Optional) :
Round 1 :
Ch 2. Place 6 sc into the 2nd ch from your hook. Place your stitch marker. (6 sts)
Round 2-28 :
Sc around. Place stitch marker. (6 sts)
— Tail Spike :
Round 1 :
Ch 2. Place 4 sc into the 2nd ch from your hook. Place your stitch marker. (4 sts)
Round 2 :
{sc, inc} Repeat what's inside the { } for the entire round. Place stitch marker. (6 sts)
Round 3 :
{sc 2, inc} Repeat what's inside the { } for the entire round. Place stitch marker. (8 sts)
Round 4 :
Sc around. Place stitch marker. (8 sts)
Round 5 :
{sc 3, inc} Repeat what's inside the { } for the entire round. Place stitch marker. (10 sts)
Round 6 :
Sc around. Place stitch marker. (10 sts)
Round 7 :
Inc, sc, inc, sc 7. (12 sts)
— Body :
Round 1 :
Ch 2. Place 10 sc into the 2nd ch from your hook. Place your stitch marker. (10 sts)
Round 2 :
{sc, inc} Repeat what's inside the { } for the entire round. Place stitch marker. (15 sts)
Round 3 :
{sc 2, inc} Repeat what's inside the { } for the entire round. Place stitch marker. (20 sts)
Round 4 :
{sc 3, inc} Repeat what's inside the { } for the entire round. Place stitch marker. (25 sts)
Round 5 :
{sc 4, inc} Repeat what's inside the { } for the entire round. Place stitch marker. (30 sts)
Round 6 :
{sc 5, inc} Repeat what's inside the { } for the entire round. Place stitch marker. (35 sts)
Round 7 :
{sc 6, inc} Repeat what's inside the { } for the entire round. Place stitch marker. (40 sts)
Round 8 :
{sc 6, dec} Repeat what's inside the { } for the entire round. Place stitch marker. (35 sts)
Round 9-11 :
Sc around. Place stitch marker. (35 sts)
Round 12 :
{sc 5, dec} Repeat what's inside the { } for the entire round. Place stitch marker. (30 sts)
Round 13-14 :
Sc around. Place stitch marker. (30 sts)
Round 15 :
{sc 4, dec} Repeat what's inside the { } for the entire round. Place stitch marker. (25 sts)
Round 16-17 :
Sc around. Place stitch marker. (25 sts)
Round 18 :
{sc 3, dec} Repeat what's inside the { } for the entire round. Place stitch marker. (20 sts)
Round 19-20 :
Sc around. Place stitch marker. (20 sts)
— Arms :
Round 1 :
Ch 2. Place 8 sc into the 2nd ch from your hook. Place your stitch marker. (8 sts)
Round 2-22 :
Sc around. Place stitch marker. (8 sts)
— Wings (Optional) :
Row 1 :
Ch 3. Place 1 sc into the 2nd ch from your hook. Sc across. (2 sts)
Row 2 :
Ch 1 and turn your work. In the blo place 1 sc into the 1st st of the row. In the blo place 3 sc into the last st of the row. (4 sts)
Row 3 :
Ch 1 and turn your work. In the blo sc across. (4 sts)
Row 4 :
Ch 1 and turn your work. In the blo place 1 sc into the 1st three sts of the row. In the blo place 3 sc into the last st of the row. (6 sts)
Info :
Continue pattern increasing every other row until Row 22 with (24 sts)
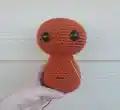
— Head :
Round 1 :
Ch 2. Place 6 sc into the 2nd ch from your hook. Place your stitch marker! (6 sts)
Round 2 :
Inc into each st of the round. Place your stitch marker! (12 sts)
Round 3 :
{sc 1, inc.} Repeat what's inside the { } for the entire round. Place your stitch marker! (18 sts)
Round 4 :
{sc 2, inc.} Repeat what's inside the { } for the entire round. Place your stitch marker! (24 sts)
Round 5 :
{sc 3, inc.} Repeat what's inside the { } for the entire round. Place your stitch marker! (30 sts)
Round 6 :
{sc 4, inc.} Repeat what's inside the { } for the entire round. Place your stitch marker! (36 sts)
Round 7 :
{sc 5, inc.} Repeat what's inside the { } for the entire round. Place your stitch marker! (42 sts)
Round 8 :
{sc 6, inc.} Repeat what's inside the { } for the entire round. Place your stitch marker! (48 sts)
Round 9 :
{sc 7, inc.} Repeat what's inside the { } for the entire round. Place your stitch marker! (54 sts)
Round 10-17 :
Place 1 sc into each st of the round. Place your stitch marker! (54 sts)
Round 18 :
{sc 7, dec.} Repeat what's inside the { } for the entire round. Place your stitch marker! (48 sts)
Round 19 :
{sc 6, dec.} Repeat what's inside the { } for the entire round. Place your stitch marker! (42 sts)
Round 20 :
{sc 5, dec.} Repeat what's inside the { } for the entire round. Place your stitch marker! (36 sts)
Round 21 :
{sc 4, dec.} Repeat what's inside the { } for the entire round. Place your stitch marker! (30 sts)
Round 22 :
{sc 3, dec.} Repeat what's inside the { } for the entire round. Place your stitch marker! (24 sts)
Info :
Place safety eyes between Round 13 & 14. Place safety eyes 8-9 stitches apart. You can use embroidery floss/yarn to stitch on some freckles.
Round 23 :
{sc 2, dec.} Repeat what's inside the { } for the entire round. Place your stitch marker! (18 sts)
Info :
Firmly stuff your head with polyfill.
Round 24 :
{sc, dec.} Repeat what's inside the { } for the entire round. Place your stitch marker! (12 sts)
Round 25 :
dec around. (6 sts)
Info :
Add more poly-fill if needed! Use a running stitch to close the remaining hole. Break yarn and weave in your ends.
This enchanting Little Devil pattern transforms simple stitches into a character brimming with personality and charm. Whether you choose the compact Option 1 horns or the dramatic Option 2 design, add mystical wings, or keep it simple, each devil becomes a unique creation. The detailed instructions guide you through every step, from the tiniest ear to the final assembly. This pattern celebrates the joy of bringing imagination to life, one stitch at a time. 🧶 Happy hooking! 🧵✨