๐Ÿงถ Beautiful โœจ Detailed ๐Ÿ’ Adorable

Tick the Rabbit Amigurumi Pattern

Tick the Rabbit Amigurumi Pattern
4.0โ˜… Rating
8-10 Hours Time Needed
4.1K Made This
โœ‚๏ธ

Intermediate Level

Ideal for those with basic knitting experience, featuring slightly more advanced stitches and techniques to expand your skills.

โฑ๏ธ

All-Day Adventure

Requires 8-10 hours, ideal for a full day of immersive knitting.

๐Ÿงธ

Cute Companion

An adorable friend to cherish, handcrafted with love to bring comfort and joy for years to come.

About This Tick the Rabbit Amigurumi Pattern

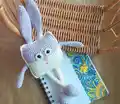
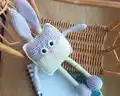
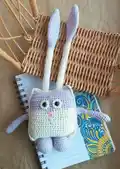
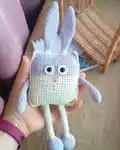
This delightful Tick the Rabbit pattern creates a unique stretchy toy with moveable limbs that children will love to play with. The rabbit features a charming rectangular body design with long ears and legs that have special stretching capabilities. The pattern combines basic amigurumi techniques with innovative construction methods to create an interactive toy that promotes fine motor skill development.

Tick the Rabbit Amigurumi Pattern crochet pattern - detailed view of completed project

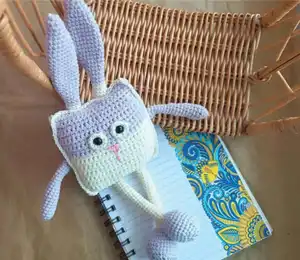
The finished rabbit measures 30cm from ears to feet and uses a beautiful combination of lilac, white, and pink yarns. This pattern requires basic crochet knowledge and includes detailed assembly instructions for perfect results.

Why You'll Love This Tick the Rabbit Amigurumi Pattern

I absolutely love this pattern because it creates such a unique and interactive toy that goes beyond traditional amigurumi! The stretchy limbs make it incredibly fun for children to play with, and I adore how the rectangular body design gives Tick such a distinctive personality. The color combination of soft lilac and white is simply gorgeous, and I love how this pattern combines functionality with cuteness to create a toy that truly engages children's imagination and helps develop their motor skills.

Tick the Rabbit Amigurumi Pattern step 1 - construction progress Tick the Rabbit Amigurumi Pattern step 2 - assembly progress Tick the Rabbit Amigurumi Pattern step 3 - details and accessories Tick the Rabbit Amigurumi Pattern step 4 - final assembly and finishing

Switch Things Up

I love experimenting with this pattern by changing up the color combinations to create different personality rabbits! Sometimes I'll use bright rainbow colors for a more vibrant look, or pastels for a softer aesthetic.

I've also tried adding small embroidered details like freckles or different facial expressions to give each rabbit its own unique character.

For special occasions, I like to create themed versions - using holiday colors for Christmas rabbits or spring colors for Easter gifts.

I've found that using variegated yarn for the white sections creates beautiful color transitions that make each rabbit truly one-of-a-kind.

Sometimes I'll add small accessories like tiny bow ties or flower crowns to make the rabbits extra special for gift-giving.

Common Mistakes & How to Fix Them

โœ— Forgetting to stuff the lilac ear portions before switching to white yarn sections โœ— Not leaving long enough yarn tails when folding arms for proper sewing attachment โœ— Incorrectly placing safety eyes outside the center of the white eye circles โœ— Skipping stitches during body assembly which can create gaps in the finished toy

Tick the Rabbit Amigurumi Pattern

Create an adorable stretchy rabbit toy that sparks imagination and develops fine motor skills! This unique amigurumi features special stretchable limbs that add interactive fun to playtime. Perfect for children aged 2 to 120, this charming bunny combines soft lilac and white colors with playful design elements. The pattern includes detailed instructions for creating a 30cm tall companion that will become a treasured friend for years to come.

Intermediate 8-10 Hours

Materials Needed for Tick the Rabbit Amigurumi Pattern

โ€” Main Fabric

  • 01
    YarnArt Jeans 50gr/160m; 55% cotton, 45% acrylic in shades 19 (lilac) and 03 (white)
  • 02
    YarnArt Iris 20gr/170m; 100% cotton in shade 917 (pink)

โ€” Tools Required

  • 01
    2mm crochet hook
  • 02
    3mm crochet hook
  • 03
    8mm safety eyes
  • 04
    Fiber filling/stuffing
  • 05
    Scissors
  • 06
    Large eye needle
  • 07
    Stitch markers

Progress Tracker

0% Complete

โ€” Ears and legs (make 2) :

Round 1 :

6 MR (6)

Round 2 :

(1 SC, INC)*3 (9)

Round 3-4 :

2 rnds straight: 9 SC

Round 5 :

(2 SC, INC)*3 (12)

Round 6 :

(3 SC, INC)*3 (15)

Round 7-8 :

2 rnds straight: 15 SC

Round 9 :

(4 SC, INC)*3 (18)

Round 10-17 :

8 rnds straight: 18 SC

Round 18 :

(DEC, 4 SC)*3 (15)

Round 19 :

2 rnds straight: 15 SC

Round 20 :

(DEC, 3 SC)*3 (12)

Round 21-22 :

2 rnds straight: 12 SC

Round 23 :

1 rnd straight 10 SC

Info :

Stuff the lilac piece. Switch to white yarn. Go on crocheting. Don't stuff the white piece.

Round 24-75 :

52 rnds straight: 10 SC

Info :

Switch to lilac yarn.

Round 76 :

(INC, 4 SC)*2 (12)

Round 77 :

(1 SC, INC)*6 (18)

Round 78 :

(2 SC, INC)*6 (24)

Round 79 :

(3 SC,INC)*6 (30)

Round 80-83 :

4 rnds straight: 30 SC

Round 84 :

(DEC, 3 SC)*6 (24)

Round 85 :

(DEC, 2 SC)*6 (18)

Round 86 :

(DEC, 1 SC)*6 (12)

Info :

Stuff the piece.

Round 87 :

DEC*6 fasten off.

โ€” Arms (make 2) :

Round 1 :

5 MR (5)

Round 2 :

INC*5 (10)

Round 3-9 :

7 rnds straight: 10 SC

Round 10 :

DEC, 8 SC (9)

Round 11-13 :

3 rnds straight: 9 SC

Info :

Stuff the piece to 13th row.

Round 14 :

DEC, 7 SC (8)

Round 15-20 :

6 rnds straight: 8 SC

Info :

Fold in half and single crochet 4 through both edges. Leave a long yarn tail for sewing.

โ€” Eyes (make 2) :

Round 1 :

6 MR (6)

Round 2 :

INC*6 (12)

Info :

Install safety eyes in the center of the ring.

โ€” Body (make 2) :

First piece :

Chain 25, and starting into the 2nd stitch from hook work 24 SC.

Row 1-19 :

19 rows straight: 24 SC, make 1 turning CH at the end of each row.

Row 20 :

1 SC, DEC, 18 SC, DEC, 1 SC (22)

Round 21 :

1 rnd straight: 22 SC

Round 22 :

1 SC, DEC, 16 SC, DEC, 1 SC (20)

Round 23-25 :

3 rnds straight: 20 SC. Fasten off and cut yarn.

Second piece :

1-16. crochet in white. 17-25. crochet in lilac.

Assembly Instructions

  • Begin joining the body parts together from the right upper corner using 2mm hook, working through both parts' stitches.
  • Insert ear-leg pieces at designated positions during assembly, skipping 3 stitches on back body part as indicated.
  • Work around all edges systematically, stuffing the body firmly during assembly process.
  • Sew eyes between rows 17-20 in the middle of the face area.
  • Embroider nose with pink yarn in center of face below eyes.
  • Attach arms to the back of body between rows 14-17 using long yarn tails.

Important Notes

  • ๐Ÿ’กThis pattern requires basic crochet knowledge and does not contain crocheting lessons.
  • ๐Ÿ’กUse stitch markers to keep track of rounds, especially during long white sections.
  • ๐Ÿ’กDon't stuff the white stretchy sections of the ears and legs - only stuff lilac portions.
  • ๐Ÿ’กLeave long yarn tails when finishing arms for easier sewing attachment.
  • ๐Ÿ’กInstall safety eyes in center of white eye circles before completing the rounds.
  • ๐Ÿ’กStuff body firmly but not too tightly to maintain proper shape and allow for stretching.

This enchanting Tick the Rabbit pattern brings together playful design with interactive features that children absolutely love! The unique stretchy limbs make this more than just a cuddly toy - it's a companion that encourages creative play and fine motor skill development. With its charming rectangular body, long ears, and soft lilac and white color scheme, this rabbit is sure to become a treasured friend. Perfect for crocheters ready to try something delightfully different! Happy crocheting!

You ask,

we answer.

FAQs

Can I use different colors for this pattern?

Yes! While the pattern specifies lilac, white, and pink, you can substitute any colors you prefer. Just maintain the same color placement for the best visual effect.

Why shouldn't I stuff the white sections of the ears and legs?

The white sections are designed to be stretchy and flexible. Stuffing them would prevent the unique stretching feature that makes this rabbit special.

What age is this toy appropriate for?

The pattern states ages 2 to 120! The safety eyes make it suitable for children 2 and up, while the stretchy design appeals to all ages.

How do I achieve the stretchy effect in the limbs?

The stretch comes from the long white sections (52 rounds) that are left unstuffed, creating flexible tubes that can extend and contract.