๐Ÿงถ Beautiful โœจ Detailed ๐Ÿ’ Adorable

Tigger Amigurumi Pattern

Tigger Amigurumi Pattern
4.1โ˜… Rating
8-10 Hours Time Needed
3.8K Made This
โœ‚๏ธ

Intermediate Level

Ideal for those with basic knitting experience, featuring slightly more advanced stitches and techniques to expand your skills.

โฑ๏ธ

All-Day Adventure

Requires 8-10 hours, ideal for a full day of immersive knitting.

๐Ÿงธ

Cute Companion

An adorable friend to cherish, handcrafted with love to bring comfort and joy for years to come.

About This Tigger Amigurumi Pattern

This delightful Tigger pattern captures the essence of everyone's favorite bouncing tiger from the Hundred Acre Wood. With detailed color-changing techniques for his signature stripes and carefully crafted facial features, this amigurumi brings Tigger's joyful spirit to life. The pattern includes options for both thread mounting and joint assembly, allowing you to create either a cuddly companion or a fully poseable figure.

Tigger Amigurumi Pattern crochet pattern - detailed view of completed project

Standing at approximately 19cm tall when made with cotton yarn, this Tigger is the perfect size for display or play. The pattern features advanced techniques like color changes, embroidered details, and optional wire insertion for a poseable tail.

Why You'll Love This Tigger Amigurumi Pattern

I absolutely love how this pattern brings out Tigger's personality through every stitch! The way his orange and black stripes come together creates that instantly recognizable look that makes you smile. I'm particularly fond of the detailed facial features - those eyebrows and pink nose give him such character. The optional wire tail adds that perfect bouncy element that makes this Tigger truly special.

Tigger Amigurumi Pattern step 1 - construction progress Tigger Amigurumi Pattern step 2 - assembly progress Tigger Amigurumi Pattern step 3 - details and accessories Tigger Amigurumi Pattern step 4 - final assembly and finishing

Switch Things Up

I love experimenting with different yarn textures for this Tigger pattern! Sometimes I use a slightly fuzzy orange yarn to give him that soft, huggable tiger fur feeling. You could also try making a mini version using embroidery thread for a tiny desk companion, or go bold with variegated orange yarn for a unique striped effect.

For special occasions, I've added small accessories like a tiny scarf or hat. The beauty of this pattern is in the details - those black stripes can be embroidered in different patterns, and the facial expression can be tweaked by adjusting the eyebrow placement.

I've also seen crafters use glow-in-the-dark thread for the stripes, making a magical nighttime Tigger! The possibilities are endless when you let your creativity bounce as high as Tigger himself!

Common Mistakes & How to Fix Them

โœ— Forgetting to change colors at the right rounds can mess up the stripe pattern completely โœ— Not stuffing the neck area tightly enough will cause the head to wobble and lose shape โœ— Skipping stitch markers during color changes will throw off the entire pattern alignment significantly โœ— Pulling thread too tight during embroidery work can distort the fabric and ruin facial features

Tigger Amigurumi Pattern

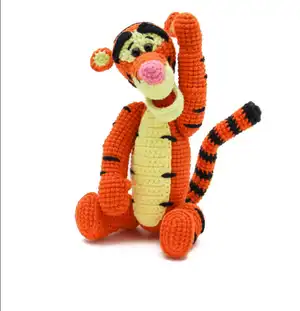
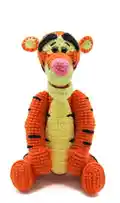
Bring the beloved bouncy tiger from Winnie the Pooh to life with this detailed amigurumi pattern! This charming Tigger features his iconic orange and black stripes, cheerful pink nose, and that unmistakable bouncy personality. Perfect for Disney fans and amigurumi enthusiasts alike, this pattern includes step-by-step instructions for creating Tigger's distinctive features, poseable arms and legs, and optional wire tail for extra bounce.

Intermediate 8-10 Hours

Materials Needed for Tigger Amigurumi Pattern

โ€” Main Fabric

  • 01
    Semi-cotton yarn in orange, light yellow, red, black, and pink colors
  • 02
    Alize Cotton Gold (360 yds/3.5 Oz) or YarnArt Jeans equivalent
  • 03
    Alternative: YarnArt Dolce/Himalaya Dolphin Baby (131 yds/3.5 Oz) for larger version

โ€” Tools Required

  • 01
    Crochet hook size 2mm (or 3.5mm for larger version)
  • 02
    Plastic safety eyes 5-6mm (or 8mm for larger version)
  • 03
    Aluminum/copper wire 2mm diameter (optional for tail)
  • 04
    Band-aid or fabric patch (for wire wrapping)
  • 05
    Synthetic/tooth thread for thread mounting
  • 06
    Sewing needle
  • 07
    Stitch markers
  • 08
    Pins with large heads
  • 09
    Scissors
  • 10
    Fiber filling
  • 11
    Long needles for assembly

Progress Tracker

0% Complete

โ€” Lower Jaw :

Inner part (red yarn) :

Chain 6, work in spiral

Round 1 :

Start in 2nd chain from hook: 4 SC, 3 SC into last chain, on other side: 3 SC, INC (12)

Round 2 :

INC, 3 SC, 3 INC, 3 SC, 2 INC (18)

Round 3 :

SC, INC, 3 SC, (SC, INC)*3, 3 SC, (SC, INC)*2 (24)

Outer part (light yellow yarn) :

Chain 6, work in spiral

Round 1 :

Start in 2nd chain from hook: 4 SC, 3 SC into last chain, on other side: 3 SC, INC (12)

Round 2 :

INC, 3 SC, 3 INC, 3 SC, 2 INC (18)

Round 3 :

SC, INC, 3 SC, (SC, INC)*3, 3 SC, (SC, INC)*2 (24)

Round 4 :

24 SC

Assembly :

Mark 6 SC on top, attach red inner part and work together with 24 SC

โ€” Ears :

Inner part (light yellow) :

Make 2 details

Round 1 :

6 SC in MR

Round 2 :

6 INC (12)

Outer part (orange) :

6 SC in MR, 6 INC (12), attach yellow inner part and work together

โ€” Head :

Round 1 :

6 SC in MR (light yellow)

Round 2 :

(SC, 3 SC in same St)*3 (12)

Round 3 :

2 SC, (3 SC in same St, 3 SC)*2, 3 SC in same St, SC (18)

Round 4 :

3 SC, (3 SC in same St, 5 SC)*2, 3 SC in same St, 2 SC (24)

Rounds 5-10 :

6 rounds 24 SC

Round 11 :

5 SC, 8 SC with stripe, 5 SC, 6 SC with lower jaw (24) - change to orange

Rounds 12-14 :

Color changes with light yellow center section

Rounds 15-20 :

6 rounds 42 SC

Round 21 :

Attach ears: 11 SC, SC with ear, 18 SC, SC with ear, 11 SC (42)

Rounds 22-27 :

Decrease rounds: (5 SC, DEC)*6 to 6 DEC (6)

โ€” Arms :

Make 2 (left and right) :

Chain 5, work oval base

Rounds 1-6 :

Create hand shape with 16 SC

Round 7 :

7 SC, PS (puff stitch), 8 SC

Round 9 :

Left arm: 4 DEC, 2 SC, 4 INC, 2 SC; Right arm: 2 SC, 4 INC, 2 SC, 4 DEC

Rounds 10-29 :

Continue with 16 SC, create elbow bend at rounds 18-19

Rounds 30-31 :

(2 SC, DEC)*4 (12), then (SC, DEC)*4 (8)

โ€” Legs :

Round 1 :

Chain 8, work oval: 6 SC, 3 SC in last chain, 5 SC, INC (16)

Rounds 2-3 :

Increase to 28 SC, work BPSC round

Rounds 7-8 :

Shape foot: 7 SC, 7 DEC, 7 SC (21); 5 SC, 6 DEC, 4 SC (15)

Rounds 9-23 :

Shape leg with increases and decreases, end with 6 DEC (6)

โ€” Body :

Rounds 1-3 :

Start from 6x6 SC area under head, 3 rounds 18 SC

Rounds 4-16 :

Increase and shape body to 36 SC

Rounds 17-29 :

12 rounds 42 SC

Rounds 30-41 :

Decrease from 36 SC to 6 DEC (6)

โ€” Tail :

Round 1 :

6 SC in MR (black)

Round 2 :

6 INC (12)

Rounds 3-42 :

Alternate black and orange stripes every 2-3 rounds
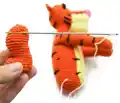
Wire installation :

Cut wire longer than tail, bend and wrap end, insert through body rounds 36-37

Assembly Instructions

  • Attach the completed head to the body by securing the neck area tightly with stuffing
  • Mount arms using thread mounting technique between body rounds 12-13, ensuring thumbs point inward
  • Attach legs using thread mounting between body rounds 35-36 on the sides for proper positioning
  • Sew the yellow tummy piece to the front of the body, embroidering black stripes over it
  • Install the tail with optional wire between body rounds 35-38, securing wire ends with patches
  • Embroider all black stripes on the body, arms, and legs using the reference photos as guide

Important Notes

  • ๐Ÿ’กUse stitch markers consistently during color changes to maintain stripe pattern alignment
  • ๐Ÿ’กStuff the neck area very tightly to prevent the head from wobbling or losing shape
  • ๐Ÿ’กWhen using wire for the tail, wrap all sharp ends with band-aids for safety, especially for children
  • ๐Ÿ’กMark attachment areas carefully before assembly as rounds may shift during crocheting process
  • ๐Ÿ’กCut and tie thread ends at each color change for cleaner stripe transitions
  • ๐Ÿ’กThread mounting requires very strong thread and long needles for best results

This adorable Tigger amigurumi pattern brings the bouncy, lovable character from Winnie the Pooh right into your hands! With his signature orange and black stripes, cheerful pink nose, and that unmistakable joyful expression, this handcrafted tiger is sure to bounce into hearts everywhere. The detailed instructions guide you through advanced techniques like color changes and thread mounting, making this both a challenging and rewarding project. Perfect for Disney lovers and amigurumi enthusiasts who want to create something truly special! ๐Ÿงถ Happy crocheting! ๐Ÿ…โœจ

You ask,

we answer.

FAQs

Can I make this pattern without the wire in the tail?

Yes! The tail can be made without wire by simply stuffing it lightly and sewing it to the body. The wire is optional and just adds the ability to pose the tail.

What's the difference between thread mounting and joint mounting?

Thread mounting creates moveable limbs using strong thread passed through the body, while joint mounting uses plastic or wooden joints for more stable positioning. Both methods are explained in the pattern.

Can I use different yarn weights for this pattern?

Yes, the pattern provides instructions for both cotton yarn (2mm hook) and chunky yarn (3.5mm hook). Just adjust your hook size accordingly and expect size differences in the finished product.

How do I keep track of the color changes for the stripes?

Use stitch markers consistently and mark your pattern as you go. The pattern recommends cutting and tying thread at each color change for the cleanest results.

Is this pattern suitable for beginners?

This is an intermediate pattern due to the color changes, embroidery work, and assembly techniques. Beginners should have experience with basic amigurumi before attempting this project.