🧢 Beautiful ✨ Detailed πŸ’ Adorable

Train Loris Amigurumi Pattern

Train Loris Amigurumi Pattern
4.9β˜… Rating
8-10 Hours Time Needed
3.4K Made This
βœ‚οΈ

Intermediate Level

Ideal for those with basic knitting experience, featuring slightly more advanced stitches and techniques to expand your skills.

⏱️

All-Day Adventure

Requires 8-10 hours, ideal for a full day of immersive knitting.

πŸš‚

Whimsical Buddy

Playful characters full of personality, designed to spark imagination and become cherished playtime favorites.

About This Train Loris Amigurumi Pattern

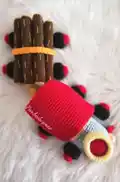
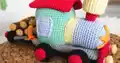
This Train Loris amigurumi pattern creates a delightful locomotive with a detachable log wagon. The train features multiple colorful sections including a green chassis, red roof, yellow chimney details, and blue windows. The pattern includes detailed instructions for creating eight wheels, axles, six individual logs, and a functional rope system for the wagon. Wire reinforcement adds stability to the structure.

Train Loris Amigurumi Pattern crochet pattern - detailed view of completed project

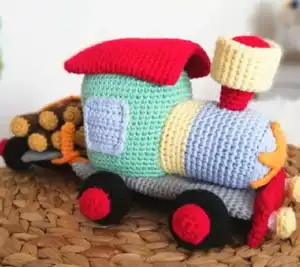
The finished train measures approximately 15cm in length and includes intricate details like front lamps, a decorative star, and a working chimney. All components are designed to fit together perfectly for hours of imaginative play.

Why You'll Love This Train Loris Amigurumi Pattern

I absolutely love how this pattern combines functionality with adorable design! The train not only looks fantastic but actually works - you can load and unload the logs from the wagon, and the wire reinforcement makes it sturdy enough for play. The color-changing techniques create beautiful visual interest, and watching each component come together feels so rewarding. It's like building a real train, stitch by stitch!

Train Loris Amigurumi Pattern step 1 - construction progress Train Loris Amigurumi Pattern step 2 - assembly progress Train Loris Amigurumi Pattern step 3 - details and accessories Train Loris Amigurumi Pattern step 4 - final assembly and finishing

Switch Things Up

I love experimenting with different color combinations for this train pattern! Try creating a vintage steam engine look with deep burgundy and brass colors, or go modern with sleek silver and electric blue. You could even make multiple trains in different color schemes to create an entire fleet.

For added personalization, consider embroidering numbers or letters on the chassis sides, or adding tiny fabric flags to the chimney. Some makers have successfully scaled the pattern up by using a larger hook and thicker yarn for a bigger train, though you'll need to adjust the wire length accordingly.

The log cargo can be customized too - try making different colored logs or even replacing them entirely with other cargo like tiny gift boxes or mailbags to create themed variations. The possibilities are endless when you let your creativity take the conductor's seat!

Common Mistakes & How to Fix Them

βœ— Forgetting to stuff components firmly enough before closing, leading to floppy finished pieces βœ— Not using stitch markers when switching colors, causing uneven color transitions throughout the pattern βœ— Skipping the wire reinforcement step, resulting in a train that doesn't hold its shape properly βœ— Rushing through the wheel attachment without proper alignment, making the train sit unevenly on surfaces

Train Loris Amigurumi Pattern

Create an adorable miniature train complete with logs and wagon using this detailed amigurumi pattern. This charming locomotive features a colorful design with green, red, yellow, and blue sections, plus a functional log wagon that can be loaded and unloaded. Perfect for train enthusiasts and makes a wonderful gift for children who love vehicles and transportation toys.

Intermediate 8-10 Hours

Materials Needed for Train Loris Amigurumi Pattern

β€” Main Fabric

  • 01
    Peria baby soft cotton XL yarns in 9 different colors (grey, red, black, mustard, brown, blue, yellow, green, orange)
  • 02
    Cotton or acrylic yarn suitable for amigurumi work, sport weight recommended

β€” Tools Required

  • 01
    2.5 mm crochet hook
  • 02
    19 cm long 2.5 mm wire
  • 03
    Fiberfill stuffing
  • 04
    1 small button
  • 05
    Stitch markers
  • 06
    Scissors
  • 07
    Yarn needle
  • 08
    Wire cutters (for trimming wire to size)

Progress Tracker

0% Complete

β€” Grey Subfloors of Train :

Rnd 1 :

Make 20 ch, insert your hook to the 2nd ch from the hook and 18sc, 3-sc inc on the last chain, turn to the other side of the chain, 17sc, 1inc = 40sc

Rnd 2-36 :

40sc (35 rnds)

Rnd 37 :

Don't fill the subfloor with fiberfill. At the end of 37th round, combine two side by single crochet, cut and hide the yarn

β€” Subfloors of Logs :

Rnd 1 :

Make 20 ch, insert your hook to the 2nd ch from the hook and 18sc, 3-sc inc on the last chain, turn to the other side of the chain, 17sc, 1inc = 40sc

Rnd 2-29 :

40sc (28 rnds)

Rnd 30 :

Don't fill the subfloor with fiberfill. At the end of 27th round, combine two side by single crochet, cut and hide the yarn

β€” Wheels of Train (X8) :

Rnd 1 :

6sc in MR = 6sc

Rnd 2 :

6inc = 12sc

Rnd 3 :

Blo 12sc = 12sc

Rnd 4 :

12sc (1rnd)

Info :

Switch to black colored yarn

Rnd 5 :

Blo (1sc, 1inc)*6 = 18sc

Rnd 6 :

(2sc, 1inc)*6 = 24sc

Rnd 7 :

(3sc, 1inc)*6 = 30sc

Rnd 8 :

Blo 30sc = 30sc

Rnd 9-10 :

30sc (2 rnds)

Rnd 11 :

Blo (3sc, 1dec)*6 = 24sc

Rnd 12 :

(2sc, 1dec)*6 = 18sc

Rnd 13 :

(1sc, 1dec)*6 = 12sc

Rnd 14 :

6dec = 6sc, pick up the remaining 6 stitches with the yarn needle, cut the yarn long for sewing

β€” Axles Of Wheels (X4) :

Rnd 1 :

6sc in MR = 6sc

Rnd 2 :

6inc = 12sc

Rnd 3-20 :

12sc (18 rnds)

Rnd 21 :

6dec = 6x

Info :

Pick up the remaining 6 stitches with the yarn needle. Fix the yarn and hide. Sew both ends to the wheels as in the image

β€” Logs (X6) :

Rnd 1 :

6sc in MR = 6sc

Rnd 2 :

6inc = 12sc

Rnd 3 :

switch to brown colored yarn, Blo 12sc = 12sc

Rnd 4-27 :

12sc (24 rnds)

Rnd 28 :

switch to mustard colored yarn again, 12sc = 12sc

Rnd 29 :

Blo 6dec = 6sc, pick up the remaining 6 stitches with the yarn needle, finish the log cutting and hiding the yarn

β€” Chassis of Train :

Rnd 1 :

6sc in MR = 6sc

Rnd 2 :

6inc = 12sc

Rnd 3 :

(1sc, 1inc)*6 = 18sc

Rnd 4 :

(2sc, 1inc)*6 = 24sc

Rnd 5 :

(3sc, 1inc)*6 = 30sc

Rnd 6 :

(4sc, 1inc)*6 = 36sc

Rnd 7 :

Blo 36sc = 36sc

Rnd 8-17 :

36sc (10 rnds)

Rnd 18-22 :

Switch to the yellow colored yarn, 36sc (5 rnds)

Info :

Fasten up the yarn with 1 sl st and cut the yarn long for sewing

Assembly Instructions

  • Attach the square chassis to the cylindrical chassis by sewing the opening of the cylinder to the top of the square base
  • Sew the red roof piece to the top of the chassis, ensuring proper alignment with the square base
  • Insert the chimney through the designated opening in the roof and secure with stitching
  • Attach the yellow chimney top piece and wire-covered orange connector to the back of the train
  • Sew windows to both sides of the chassis and attach front lamps to the red front piece
  • Connect the wheel axles to the grey subfloors and attach the complete wheel assemblies to the train chassis
  • Assemble the log wagon by attaching wheels to the grey log subfloor and securing the orange rope system with button closure

Important Notes

  • πŸ’‘Use wire reinforcement in the connecting piece to ensure the train maintains structural integrity during play
  • πŸ’‘Stuff all components firmly but not overly tight to maintain proper shape and proportions
  • πŸ’‘Keep track of color changes with stitch markers to ensure clean transitions between sections
  • πŸ’‘Test the wheel alignment before final attachment to ensure the train sits level on surfaces
  • πŸ’‘The rope system should be secure but functional to allow loading and unloading of logs from the wagon

This delightful Train Loris pattern brings childhood imagination to life with its functional design and vibrant colors. The detachable log wagon and working rope system add interactive play value that goes beyond typical amigurumi projects. Every stitch builds toward creating a treasured toy that combines the joy of handmade craftsmanship with hours of creative play. πŸš‚ All aboard for your next crochet adventure! 🧢✨

You ask,

we answer.

FAQs

Can I use different colors than suggested in the pattern?

Absolutely! While the pattern suggests specific colors, you can customize your train with any color combination you prefer. Just ensure you maintain good contrast between sections for visual clarity.

Is the wire reinforcement necessary?

The wire adds important structural support, especially for the connecting piece between train and wagon. Without it, the connection may be too flexible for proper play functionality.

How do I attach the wheels securely?

The pattern includes detailed instructions for wheel attachment. Make sure to align all wheels properly before final stitching and test that the train sits level on a flat surface.

Can children safely play with this train?

Yes, when properly constructed with secure stitching. However, supervise young children due to small parts like the button closure on the wagon rope system.

What if my train doesn't sit straight?

Check wheel alignment and ensure all axles are the same length. Also verify that the chassis base is evenly stuffed and the wheels are attached at consistent positions.