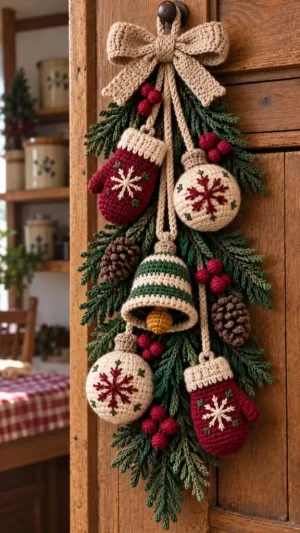
Bring a woodland Christmas look to your doorway with this crochet swag, combining a generous beige bow, evergreen sprigs, a striped bell, embroidered mittens, round baubles, pinecones, and berry clusters. You will crochet each piece separately, add the small embroidered details, and arrange everything around a simple yarn spine with individual hanging cords. I like how the separate components make this a practical project to divide into sessions and personalize for your own festive display.
Progress Tracker
0% Complete
— Before You Begin :
Construction :
Make one bow with two tails and one center band; one spine and hanging loop; ten evergreen sprigs; two mittens; two baubles with caps; one bell with a clapper; two pinecones; fifteen berries arranged in five clusters; and five ornament cords.
Working Method :
Use US crochet terminology. Work rounds in a continuous spiral unless a joining instruction is given. Place a marker in the first stitch of each round and move it upward as you work. Starting chains and joining slip stitches do not count as stitches unless explicitly stated.
Fabric :
No fixed gauge is required for this decoration. Choose a hook that makes dense single crochet without visible stuffing gaps. Keep the same yarn weight throughout so the components remain in proportion; finished dimensions depend on yarn, tension, and the final layout.
Color Changes :
When a new color is required, complete the final yarn-over of the preceding stitch with the new color. Cut colors that will not be used again nearby, leaving tails long enough to weave securely through several stitches.
Row Turning :
For the flat bow pieces, the turning ch 1 does not count as a stitch. Work the first sc into the first stitch of the preceding row.
— Bow Loop Panel :
Row 1 :
With warm beige, ch 61. Starting in the second chain from the hook, sc in each chain. (60)
Row 2 :
Ch 1, turn, sc in each stitch. (60)
Row 3 :
Ch 1, turn, sc in each stitch. (60)
Row 4 :
Ch 1, turn, sc in each stitch. (60)
Row 5 :
Ch 1, turn, sc in each stitch. (60)
Row 6 :
Ch 1, turn, sc in each stitch. (60)
Row 7 :
Ch 1, turn, sc in each stitch. (60)
Row 8 :
Ch 1, turn, sc in each stitch. (60)
Row 9 :
Ch 1, turn, sc in each stitch. (60)
Row 10 :
Ch 1, turn, sc in each stitch. (60)
Row 11 :
Ch 1, turn, sc in each stitch. (60)
Row 12 :
Ch 1, turn, sc in each stitch. (60)
Finish Panel :
Fasten off, leaving a sewing tail.
Join Panel :
Bring the two short edges together without twisting the panel. Sew their 12 corresponding row ends together to form a ring.
Shape Bow :
Flatten the ring with its seam at the center back. Pinch the middle into shallow accordion folds and secure the folds with several beige stitches. Leave the two loop ends rounded.
— Bow Tails :
Info :
Make two tails in warm beige.
Row 1 :
Ch 23. Starting in the second chain from the hook, sc in each chain. (22)
Row 2 :
Ch 1, turn, sc in each stitch. (22)
Row 3 :
Ch 1, turn, sc in each stitch. (22)
Row 4 :
Ch 1, turn, sc in each stitch. (22)
Row 5 :
Ch 1, turn, sc in each stitch. (22)
Finish Tails :
Fasten off each tail, leaving a sewing tail.
Attach Left Tail :
Sew one short edge of the first tail behind the pinched bow center, angling the free end down and left.
Attach Right Tail :
Sew one short edge of the second tail behind the pinched bow center, angling the free end down and right.
— Bow Center Band :
Row 1 :
With warm beige, ch 7. Starting in the second chain from the hook, sc in each chain. (6)
Row 2 :
Ch 1, turn, sc in each stitch. (6)
Row 3 :
Ch 1, turn, sc in each stitch. (6)
Row 4 :
Ch 1, turn, sc in each stitch. (6)
Row 5 :
Ch 1, turn, sc in each stitch. (6)
Row 6 :
Ch 1, turn, sc in each stitch. (6)
Row 7 :
Ch 1, turn, sc in each stitch. (6)
Row 8 :
Ch 1, turn, sc in each stitch. (6)
Row 9 :
Ch 1, turn, sc in each stitch. (6)
Row 10 :
Ch 1, turn, sc in each stitch. (6)
Finish Band :
Fasten off, leaving a sewing tail.
Fit Band :
Wrap the band around the pinched bow center and the attached tail ends. If it cannot meet comfortably, add individual rows of 6 sc before fastening off again.
Close Band :
Sew the two short band edges together at the back of the bow.
— Spine and Hanging Loop :
Spine :
With warm beige, ch 101. Starting in the second chain from the hook, sl st in each chain. (100 sl sts)
Finish Spine :
Fasten off, leaving a long tail at each end. Set the spine vertically on a flat surface to establish the center line of the decoration.
Hanging Loop :
With warm beige, ch 25. Starting in the second chain from the hook, sl st in each chain. (24 sl sts)
Finish Hanging Loop :
Fasten off, leaving a sewing tail at each end. The two ends will be joined to the top of the spine during assembly.
— Evergreen Sprigs :
Quantities :
Make four long sprigs, four medium sprigs, and two short sprigs. Use dark green for three long, three medium, and one short sprig. Use olive for the remaining long, medium, and short sprigs.
Needle Method :
A needle is a new chain worked outward from the current stem point and then slip stitched back toward that point. Its stitches do not count as stem stitches. After returning along a needle, continue with the next instruction without adding a slip stitch into the stem attachment point.
Long Sprig Foundation :
Ch 37. The 36 chains after the first chain from the hook form the stem return path.
Long Sprig Return Row :
Repeat the following sequence 11 times: sl st in the next 3 foundation chains; ch 9 and, starting in the second chain from the hook, sl st in the next 8 needle chains; ch 9 again and sl st back along its 8 chains in the same way. After all 11 repeats, sl st in the final 3 foundation chains. The stem has 36 sl sts and 22 needles.
Finish Long Sprig :
Fasten off, leaving a long sewing tail at the base. Arrange each pair of needles to fan toward opposite sides of the stem.
Medium Sprig Foundation :
Ch 31. The 30 chains after the first chain from the hook form the stem return path.
Medium Sprig Return Row :
Repeat the following sequence 9 times: sl st in the next 3 foundation chains; ch 8 and, starting in the second chain from the hook, sl st in the next 7 needle chains; ch 8 again and sl st back along its 7 chains in the same way. After all 9 repeats, sl st in the final 3 foundation chains. The stem has 30 sl sts and 18 needles.
Finish Medium Sprig :
Fasten off, leaving a long sewing tail at the base. Arrange each pair of needles to fan toward opposite sides of the stem.
Short Sprig Foundation :
Ch 25. The 24 chains after the first chain from the hook form the stem return path.
Short Sprig Return Row :
Repeat the following sequence 7 times: sl st in the next 3 foundation chains; ch 7 and, starting in the second chain from the hook, sl st in the next 6 needle chains; ch 7 again and sl st back along its 6 chains in the same way. After all 7 repeats, sl st in the final 3 foundation chains. The stem has 24 sl sts and 14 needles.
Finish Short Sprig :
Fasten off, leaving a long sewing tail at the base. Arrange each pair of needles to fan toward opposite sides of the stem.
— Mittens :
Info :
Make two mittens. Begin at the closed fingertip in burgundy and work toward the open cuff. The thumb is added afterward.
Round 1 :
Work 6 sc in a MR. (6)
Round 2 :
Inc in each stitch. (12)
Round 3 :
(1 sc, inc) 6 times. (18)
Round 4 :
(2 sc, inc) 6 times. (24)
Round 5 :
(3 sc, inc) 6 times. (30)
Round 6 :
Sc in each stitch. (30)
Round 7 :
Sc in each stitch. (30)
Round 8 :
Sc in each stitch. (30)
Round 9 :
Sc in each stitch. (30)
Round 10 :
Sc in each stitch. (30)
Round 11 :
Sc in each stitch. (30)
Round 12 :
Sc in each stitch. (30)
Round 13 :
Ch 5, skip the next 5 stitches, sc in the remaining 25 stitches. The chain bridge forms the thumb opening. (30, counting the 5 chains)
Round 14 :
Sc in each of the 5 chain stitches, then sc in each of the remaining 25 stitches. Do not work into the skipped stitches below the bridge. (30)
Round 15 :
Sc in each stitch. (30)
Round 16 :
Sc in each stitch, changing to cream on the final yarn-over of the last stitch. (30)
Round 17 :
With cream, sc in BLO of each stitch. (30)
Round 18 :
Sc through both loops of each stitch. (30)
Round 19 :
Sc in each stitch. (30)
Round 20 :
Sc in each stitch. (30)
Finish Cuff :
Sl st in the next stitch and fasten off, leaving a long tail for closing the cuff later. Leave the cuff open while adding the thumb and embroidery.
— Mitten Thumbs :
Info :
Work one thumb on each mitten. Join burgundy at one corner of the thumb opening.
Round 1 :
Sc in each of the 5 skipped hand stitches, then sc in the unused underside of each of the 5 bridge chains. Do not add corner stitches. (10)
Round 2 :
Sc in each stitch. (10)
Round 3 :
Sc in each stitch. (10)
Stuff Thumb :
Add a very small tuft of fiberfill to support the thumb without stretching it.
Round 4 :
Dec 5 times. (5)
Close Thumb :
Fasten off. Thread the tail through the front loops of the remaining 5 stitches, draw closed, and secure inside the thumb.
Close Corner Gaps :
Use the starting tail to close any small holes at the thumb corners, then secure that tail inside the mitten.
— Mitten Embroidery and Closure :
Choose Fronts :
Flatten each mitten with its thumb at a side fold. Choose opposite faces for the embroidery so one finished mitten has its thumb on the left and the other has its thumb on the right.
Snowflake Rays :
With cream, mark a center between hand Rounds 8 and 9 at the middle of the chosen front. Embroider eight straight rays from this center: upward and downward for about 3 rounds, left and right for about 3 stitch widths, and four diagonals spanning about 2 rounds and 2 stitch widths each. Keep all stitches on the front layer.
Snowflake Branches :
Near the outer third of each ray, add two short diagonal stitches that meet the ray and open toward its tip, forming a small branching V. Keep the stitches relaxed so the mitten lies flat.
Green Accents :
With olive yarn, embroider three small V shapes in the empty spaces around each snowflake, keeping them away from the thumb and cuff.
Secure Embroidery :
Weave the embroidery tails through the inside of the front layer, keeping the back layer free.
Stuff Hand :
Place a thin layer of fiberfill inside the hand. Leave the cream cuff unstuffed and keep the mitten gently flattened.
Close Cuff :
Flatten the 30-stitch cuff opening into 15 matching stitch pairs. Using the cream tail, sew each pair together across the top. Leave the center of this seam available for the hanging cord.
— Bauble Discs :
Info :
Make four cream discs: two fronts and two backs. Each finished bauble uses one front and one back.
Round 1 :
Work 6 sc in a MR. (6)
Round 2 :
Inc in each stitch. (12)
Round 3 :
(1 sc, inc) 6 times. (18)
Round 4 :
(2 sc, inc) 6 times. (24)
Round 5 :
(3 sc, inc) 6 times. (30)
Round 6 :
(4 sc, inc) 6 times. (36)
Round 7 :
(5 sc, inc) 6 times. (42)
Finish Discs :
Sl st in the next stitch and fasten off each disc. Secure the center tails and weave the outer tails into the wrong side.
Embroider Bauble Rays :
On the right side of each front disc, use burgundy yarn to embroider eight evenly spaced straight rays from the MR center to the outer edge of Round 5.
Embroider Bauble Branches :
On each ray near Round 4, add two short diagonal stitches that meet the ray and open toward its tip. Each branch should span roughly one crochet stitch.
Embroider Bauble Accents :
With olive yarn, add eight small V shapes around Round 6, placing one between each adjacent pair of snowflake rays.
Secure Bauble Embroidery :
Weave all embroidery tails into the wrong side of each front disc.
Joining Round :
Place one front and one back together with wrong sides facing inward. Join cream through corresponding edge stitches of both discs. Ch 1, then sc through both layers for 32 stitch pairs. Pause and add a thin, even layer of fiberfill. Sc through the remaining 10 stitch pairs. (42 joining sc)
Finish Bauble Join :
Sl st to the first joining sc, fasten off, and weave in the tail. Repeat the joining round and finish for the second bauble.
— Bauble Caps :
Info :
Make two caps in warm beige. Leave them unstuffed.
Round 1 :
Work 6 sc in a MR. (6)
Round 2 :
Inc in each stitch. (12)
Round 3 :
Sc in each stitch. (12)
Round 4 :
Sc in each stitch. (12)
Finish Caps :
Sl st in the next stitch and fasten off each cap, leaving a sewing tail.
Attach Caps :
Flatten each cap opening into 6 stitch pairs. Sew these pairs over 6 joining stitches at the top of its bauble, with the MR crown pointing upward.
— Striped Bell :
Info :
Begin at the closed crown and work toward the open rim. Keep the bell hollow.
Round 1 :
With warm beige, work 6 sc in a MR. (6)
Round 2 :
Inc in each stitch. (12)
Round 3 :
Sc in each stitch, changing to cream on the final yarn-over. (12)
Round 4 :
With cream, (1 sc, inc) 6 times. (18)
Round 5 :
(2 sc, inc) 6 times, changing to dark green on the final yarn-over. (24)
Round 6 :
With dark green, sc in each stitch. (24)
Round 7 :
(3 sc, inc) 6 times. (30)
Round 8 :
Sc in each stitch, changing to cream on the final yarn-over. (30)
Round 9 :
With cream, (4 sc, inc) 6 times. (36)
Round 10 :
Sc in each stitch, changing to dark green on the final yarn-over. (36)
Round 11 :
With dark green, sc in each stitch. (36)
Round 12 :
(5 sc, inc) 6 times. (42)
Round 13 :
Sc in each stitch, changing to cream on the final yarn-over. (42)
Round 14 :
With cream, (6 sc, inc) 6 times. (48)
Round 15 :
Sc in each stitch. (48)
Finish Bell :
Sl st in the next stitch, fasten off, and weave the tail into the inside of the rim.
Shape Bell :
Open the hollow bell with your fingers and ease the final two rounds outward into a circular lip. Do not add stuffing.
— Bell Clapper :
Round 1 :
With mustard yellow, work 6 sc in a MR. (6)
Round 2 :
Inc in each stitch. (12)
Round 3 :
Sc in each stitch. (12)
Round 4 :
Sc in each stitch. (12)
Stuff Clapper :
Add a small tuft of fiberfill to form a rounded ball.
Round 5 :
Dec 6 times. (6)
Close Clapper :
Fasten off. Thread the tail through the front loops of the remaining 6 stitches and draw closed. Secure the tail inside.
Clapper Cord :
With warm beige, ch 12. Starting in the second chain from the hook, sl st in each chain. (11 sl sts)
Finish Clapper Cord :
Fasten off, leaving sewing tails at both ends.
Attach Clapper Ball :
Sew one cord end securely to the closed top of the mustard ball.
Attach Inside Bell :
Sew the other cord end to the inside of the bell crown. Position the ball so its lower edge shows just below the rim. If the cord hangs too low, fold its excess against the inside crown and secure that fold.
— Pinecones :
Info :
Make two pinecones in brown. The starting MR forms the lower tip. Push each bobble toward the outside before continuing.
Round 1 :
Work 6 sc in a MR. (6)
Round 2 :
Inc in each stitch. (12)
Round 3 :
(1 sc, inc) 6 times. (18)
Round 4 :
(1 sc, 1 bobble) 9 times. Each bobble counts as one stitch. (18)
Round 5 :
Sc in each stitch, including the top of every bobble. (18)
Round 6 :
(1 bobble, 1 sc) 9 times. (18)
Round 7 :
Sc in each stitch. (18)
Round 8 :
(1 sc, dec) 6 times. (12)
Round 9 :
(1 sc, 1 bobble) 6 times. (12)
Stuff Pinecone :
Add enough fiberfill to support an oval shape without flattening or stretching the bobbles.
Round 10 :
Dec 6 times. (6)
Close Pinecone :
Fasten off, leaving a long sewing tail. Thread it through the front loops of the remaining 6 stitches and draw closed. Keep the tail for attachment at this narrow upper end.
— Berries :
Info :
Make fifteen berries in burgundy, then arrange them into five clusters of three.
Round 1 :
Work 6 sc in a MR. (6)
Round 2 :
Inc in each stitch. (12)
Round 3 :
Sc in each stitch. (12)
Stuff Berry :
Add a tiny tuft of fiberfill, keeping the berry round and soft.
Round 4 :
Dec 6 times. (6)
Close Berry :
Fasten off, leaving a sewing tail. Thread it through the front loops of the remaining 6 stitches and draw closed.
Form Berry Clusters :
Group the berries into five triangles of three. Sew the neighboring sides together with small stitches, keeping one long tail per cluster for attachment to the greenery.
— Ornament Hanging Cords :
Length Check :
Use warm beige for all five cords. The counts below give graduated lengths, but their finished drop depends on tension. Before working the return slip stitches, hold each foundation chain between the top of the spine and its planned ornament position. Add or remove chains if needed; the return count will always be one less than the foundation chain count.
Upper Mitten Cord :
Ch 19. Starting in the second chain from the hook, sl st in each chain. (18 sl sts)
Upper Bauble Cord :
Ch 28. Starting in the second chain from the hook, sl st in each chain. (27 sl sts)
Bell Cord :
Ch 41. Starting in the second chain from the hook, sl st in each chain. (40 sl sts)
Lower Bauble Cord :
Ch 55. Starting in the second chain from the hook, sl st in each chain. (54 sl sts)
Lower Mitten Cord :
Ch 65. Starting in the second chain from the hook, sl st in each chain. (64 sl sts)
Finish Ornament Cords :
Fasten off each cord, leaving long sewing tails at both ends.
— Layout and Assembly :
Attach Hanging Loop :
Bring the hanging-loop ends together above the top of the spine. Sew both ends securely across the first 3 spine stitches with several passes, forming a loop above the attachment.
Position Long Sprigs :
Lay two long sprigs on each side of the spine. Place one pair of bases near the top and the other pair around the middle, with their needles pointing downward and outward. Pin in place.
Position Medium Sprigs :
Place two medium sprigs on each side, filling the spaces between the long sprigs and extending greenery toward the lower spine. Alternate the green shades where possible and pin in place.
Position Short Sprigs :
Place one short sprig on each side of the lower spine, angled downward to finish the tapered end of the arrangement. Pin in place.
Secure Foliage :
Sew each sprig base to the spine. Add a second attachment farther along each sprig stem where it crosses the spine or an already secured stem. Leave the individual needles free.
Pin Ornament Layout :
Arrange the upper mitten on the left, upper bauble on the right, bell in the center, lower bauble on the left, and lower mitten on the right. Keep each embroidered front visible and leave enough clearance around the bell for its open rim and clapper.
Attach Upper Mitten Cord :
Sew the shorter mitten cord to the center of the upper mitten's closed cuff seam, passing through several cuff stitches for support.
Attach Upper Bauble Cord :
Sew the shorter bauble cord through the upper bauble's cap crown and continue the sewing tail into its cap-to-bauble seam before securing.
Attach Bell Cord :
Sew the bell cord through several stitches of the beige outer crown, keeping the internal clapper cord free.
Attach Lower Bauble Cord :
Sew the longer bauble cord through the lower bauble's cap crown and continue the sewing tail into its cap-to-bauble seam before securing.
Attach Lower Mitten Cord :
Sew the longer mitten cord to the center of the lower mitten's closed cuff seam, passing through several cuff stitches for support.
Secure Cord Tops :
Bring the free upper ends of all five ornament cords to the top of the spine, below the hanging loop. Sew each end separately across several spine stitches, arranging the cords so they descend without twisting.
Stabilize Ornament Positions :
If an ornament turns sideways, add a small matching-yarn tack from its back to a nearby secured foliage stem. Keep the stitch loose enough that it does not pull the ornament out of shape.
Attach First Pinecone :
Sew the narrow upper end of one pinecone to the secured greenery on the left, between the upper mitten and the bell. Let its starting-ring tip point downward.
Attach Second Pinecone :
Sew the narrow upper end of the second pinecone to the secured greenery on the right, between the bell and the lower mitten. Let its starting-ring tip point downward.
Attach First Berry Cluster :
Sew one cluster to the upper-left greenery, just below the future bow position.
Attach Second Berry Cluster :
Sew one cluster to the right-side greenery beside the upper bauble.
Attach Third Berry Cluster :
Sew one cluster to the right-side greenery beside the bell.
Attach Fourth Berry Cluster :
Sew one cluster to the left-side greenery below the bell and above the lower bauble.
Attach Fifth Berry Cluster :
Sew the final cluster to the lower greenery between the two lowest ornaments. Keep the tapered green tips visible below it.
Attach Bow :
Place the bow over the top cord attachments, immediately below the hanging loop. Sew the back of its center band to several spine stitches and the secured sprig bases beneath it.
Check Hanging Balance :
Hang the swag from its loop and support it while checking the joins. Confirm that the spine hangs vertically, the ornaments face forward, and no attachment relies on a single loose stitch.
Weave Remaining Ends :
Weave every remaining tail back and forth through several stitches on the hidden side of its component before trimming.
Final Shaping :
Fan the evergreen needles with your fingers, open the bow loops, and smooth the embroidered faces. If individual flat pieces need blocking, follow the yarn label and let them dry completely before display.
Your woodland Christmas swag comes together most convincingly when the greenery supports the ornaments without hiding their details. Before making the final joins, hang the pinned arrangement briefly and check that the bell faces forward, the mittens sit on opposite sides, and the bow covers the cord attachments. Take time to secure every yarn end through several stitches. I would finish by gently shaping the evergreen needles with my fingers, then choosing an indoor spot where the embroidery can be enjoyed up close.